Good morning, Friends! I am pre-posting this as we will be up early this morning and driving back to Colorado! What a great visit we had!
Today's card was inspired by a card I saw in the recent PaperCrafts magazine. Mine doesn't look anything like the magazine one, but the card I saw inspired me to use some of my new products. I started with a card base of Whisper White. I cut down another piece of Whisper White and glued a piece of the Blushing Bride pleated satin ribbon to it. Then I stamped the greeting from Friendly Phrases in Island Indigo right above that. I popped this up on the card base. Then I stamped the flower from Mixed Bunch on a scrap piece of Whisper White in Island Indigo and punched it out with the Blossom punch. I colored in the flower with the Blushing Bride marker. I also punched a flower using the same punch from Island Indigo. I attached these two punched flowers together and popped them up on the card. Then I ran some linen thread through a Baja Breeze button (from the new Twitterpated designer buttons) and glued that to the center of the flowers. The last thing I did was to curl the edges of the flower petals to give it some more dimension. A super simple card! Thanks for stopping by and have a super day!
Card Recipe: Stamps- Mixed Bunch, Friendly Phrases; Paper- Whisper White, Island Indigo; Ink- Island Indigo, Blushing Bride; Accessories- Blushing Bride pleated ribbon, Blossom punch, Twitterpated designer buttons, linen thread, dimensionals
Good Friday morning everyone! Wow! The 2011 year is about to close out! I can hardly believe it! I hope you are having a wonderful holiday season! And I hope that you will find some time to play along with us at Sketch Frenzy Friday. This week's sketch was created by Sharon Wheet. Take a look!
And here is what I came up with!

Since I made most of these cards before I left for Christmas vacation, I needed to remind myself that I should make cards other than Christmas. It's hard for me to shift gears like that. So to make it easier for me, I turned to the Create a Cupcake set and coordinating cupcake builder punch. I can always count on these two things to help me create a quick, easy and cute card! I started with a card base of Blushing Bride. Then I adhered a piece of Poppy Parade that I had run through the Big Shot with the Perfect Polka Dots embossing folder. Then I took a piece of Early Espresso and adhered a piece of designer paper from the Just Add Cake pack. Around this I wrapped a piece of Poppy Parade poly twill ribbon. I added a tail that is tied with a piece of white baker's twine. This panel is popped up on the card. Then I punched a piece of Early Espresso with the 2 3/8" scallop circle punch. I adhered a piece of Whisper White card stock that was cut with the circles #2 die. This is popped up onto the card. Then I stamped the cupcake top in Blushing Bride and the cupcake bottom in Wild Wasabi onto Whisper White and punched them out with the cupcake builder punch. These were popped up on the circle. Then I punched out a heart from Poppy Parade and adhered it to the cupcake. I stamped the greeting in Early Espresso onto the card and added three little rhinestones.
Click 'here' to move on to Jennifer's blog to see how she used this week's sketch. Keep moving through the tour to get inspired and then create your own project. Be sure to upload it to the Sketch Frenzy Friday blog so that we can all take a look! We always love to see what you do! Thanks for stopping by and have a great day!
Card Recipe: Stamps- Create a Cupcake; Paper- Blushing Bride, Poppy Parade, Early Espresso, Whisper White, Just Add Cake designer paper; Ink- Early Espresso, Wild Wasabi, Blushing Bride; Accessories- Poppy Parade poly twill ribbon, white baker's twine, cupcake builder punch, 2 3/8" scallop circle, circles #2 die, heart punch, rhinestones, dimensionals
Good morning everyone! I hope you all had a wonderful Christmas! It's time for another great challenge at Create with Connie and Mary! This week is a sketch challenge. I hope you will be able to find some time to play along with us! Take a look at this fun sketch!
And here is what I decided to do!

I had to make another snowman card and I do like the way this one turned out! I started with a card base of Riding Hood Red. Then I started with the different blocks from the sketch. The scallop edge is Island Indigo punched with the dotted ribbon scallop punch. Over this is a strip of Island Indigo designer paper. The Whisper White card stock has the snowman stamped from Snow Much Fun in black StazOn. Then I colored him with Blushing Bride, Riding Hood Red, Basic Grey, and Pumpkin Pie markers. Then I stamped the snowball four more times on a scrap piece of Whisper White and cut them out. I popped these up to look like he was juggling them. These are attached with glue dots. Then I ran a piece of Basic Grey card stock and ran it through the Big Shot with the Snow Burst embossing folder. The flagged piece is Blushing Bride with the greeting stamped in black StazOn. This is popped up over the seam. The snowflake is cut with the Northern Flurry decorative strip die from the silver glimmer paper. I popped this up and added a Basic Grey button with some white baker's twine. A fun card for the upcoming winter months!
Please be sure to check out what the rest of the design team did with this sketch at Create with Connie and Mary. Then create your own project using the sketch and be sure to upload it to the site so that we can all take a look! Thanks for stopping by and have a super day!
Card Recipe: Stamps- Snow Much Fun; Paper- Riding Red Hood, Basic Grey, Island Indigo, Whisper White, Blushing Bride, silver glimmer, In Color designer paper; Ink- black StazOn, Pumpkin Pie, Basic Grey, Riding Hood Red, Blushing Bride; Accessories- Northern Flurry decorative strip die, neutrals buttons, white baker's twine, dotted scallop ribbon punch, dimensionals
Good morning everyone! I can't believe the weather we are having for December! It is supposed to get into the 50's!! That is kind of nice as we can kick the kiddos outside to play for a while. They tend to get cabin fever when they have to stay inside for too long - lol! We have just a few more days with my parents and then we will be heading home. Time just goes so fast!
Today's card was inspired by one of Karen Giron's sketches. It was a few weeks ago but it helped me use some of my new supplies! My card base is Crumb Cake with a layer of Very Vanilla and then another layer of Crumb Cake. On top of this layer I adhered three pieces of designer paper from the Everyday Enchantment pack. Then I cut a piece of Very Vanilla with the new Paper Doily sizzlet. Isn't it pretty? Then I cut a piece of Crumb Cake with the 3" circle die. On this I stamped the image from Fresh Vintage stamp set using Lucky Limeade, Poppy Parade, Daffodil Delight, Baja Breeze and Soft Suede markers. I sponged the edges of the circle with Crumb cake and popped it up on the doily. Then I took a strip of Baja Breeze and flagged one end and glued it to the circle. I carefully stamped the greeting from Teeny Tiny Wishes in Soft Suede on the circle. My final touch was to add a Very Vanilla button with some Lucky Limeade ribbon from the Everyday Enchantment ribbon and brad back. Thanks for stopping by and have a super day!
Card Recipe: Stamps- Fresh Vintage, Teeny Tiny Wishes; Paper- Crumb Cake, Very Vanilla, Baja Breeze, Everyday Enchantment designer paper; Ink- Lucky Limeade, Poppy Parade, Daffodil Delight, Baja Breeze, Soft Suede, Crumb Cake; Accessories- Everyday Enchantment ribbon and brad pack, paper doily sizzle, neutrals buttons, sponge, dimensionals
Good morning, Friends! I am sure you can tell that I am having a fantabulous time with my family! My posts are getting later and later in the day - lol! I love to sit around the table in the morning sipping my coffee and talking with everyone. This is something that I will miss when I have to go home.
Today's card uses some new products! I decided that I would start showing some new products from the upcoming Occasions and SAB catalogs. You are going to fall in love with these wonderful products!! While this card is not my favorite, I like the idea. I started with a card base of Very Vanilla. Then I cut down a piece of Very Vanilla and a piece of Calypso Coral and adhered them together. I wrapped a piece of Calypso Coral ribbon (from the new SAB catalog) around this three times and tied it. This piece is then popped up onto the card. Then I punched two flowers with the Blossom punch (from the new Occasions mini catalog) from new designer paper from the SAB catalog. Please forgive me for not knowing the names. I will look them up and put them in the recipe. The two flowers are glued together and then I curled up the ends and popped it up on the card. Then I stamped the flower center from the Mixed Bunch set onto Very Vanilla with Soft Suede and cut it out. Then I glued it to a 1" circle that was punched from Soft Suede. Then I used a new brad from the SAB catalog to put in the center. This is popped up on the card. Finally, I stamped the greeting from Teeny Tiny Wishes in Soft Suede onto the card (I actually recommend that you stamp this before popping up the panel). Simple and cute! Thanks for stopping by and have a super day!
Card Recipe: Stamps- Teeny Tiny Wishes, Mixed Bunch; Paper- Very Vanilla, Calypso Coral, Soft Suede, Everyday Enchantment designer paper; Ink- Soft Suede; Accessories- Everyday Enchantment ribbon and brad pack, Blossom punch, 1" circle punch, dimensionals
Good morning, Friends! I hope you all had a most wonderful Christmas! I know I sure did! And, of course, I ate way too much! Yum!! I think my brother leaves today so that will be sad. I am not sure what our plans are for the day. I am thinking that I will need to do some laundry.
Today's card is one that I did with my stamp club this month. This is a super easy card. I wanted to keep it really simple so that the beautiful Morning Mocha paper would take center stage! I started with a card base of Soft Suede card stock. Then I added a piece of Very Vanilla card stock. Then I took a piece of Crumb Cake and scalloped one end of it, added a piece of Soft Suede and then a piece of the Morning Mocha designer paper. Then I tied a piece of the Soft Suede taffeta ribbon around this and popped it up on the card. Then I took a piece of Very Vanilla card stock and ran it through the Big Shot using the Designer Frames embossing folder. I cut around the oval and lightly sponged the edges with Crumb Cake ink. I stamped the greeting from Sincere Salutations in Soft Suede onto a scrap piece of Crumb Cake and punched it out with the extra large oval punch. I lightly sponged the edges with Crumb Cake in and glued it inside the oval. The oval is popped up onto the card. The final touch was to add five small pearls. There you have it! Thanks for stopping by and have a super day!
Card Recipe: Stamps- Sincere Salutations; Paper- Soft Suede, Crumb Cake, Very Vanilla, Morning Mocha designer paper; Ink- Soft Suede, Crumb Cake; Accessories- Soft Suede taffeta ribbon, Designer Frames embossing folder, extra large oval punch, scallop edge border punch, pearls, sponge, dimensionals
Good morning everyone! And Merry Christmas to you all! I didn't get Christmas cards sent out this year so this is my card to everyone. Maybe next year - lol! I pray that you all find peace this coming year. And God bless you all! Thank you so much for visiting and reading my blog and leaving comments. They have all meant so much to me! Have a wonderful day!
For my card, I started with a card base of Concord Crush (haven't used this color in quite a while). Then I adhered a piece of Very Vanilla. Then I cut another piece of Concord Crush and stamped the Medallion stamp on it with VersaMark. I put clear embossing powder on it and embossed it. Then I cut a piece of Very Vanilla card stock and cut a circle using the circles #2 die and stamped the word 'peace' from Four the Holidays stamp set in Concord Crush. Then I used the Movers and Shapers/Holiday Windows die to cut the dove from the beautiful silver glimmer paper. I popped this up onto the card and added a few random rhinestones. I thought this would be perfect for my final Christmas card of the season! Thank you so much for stopping by and have a wonderful Christmas!!!
Card Recipe: Stamps- Four the Holidays, Medallion; Paper- Concord Crush, Very Vanilla, silver glimmer; Ink- VersaMark, Concord Crush; Accessories- circles #2 die, movers and shapers/holiday windows die, clear emboss powder, dimensionals
Good morning everyone! Happy Christmas Eve! I am thoroughly enjoying my stay at my mom's!! Already I am eating too much! So this morning I decided that I was going to do a little workout on the treadmill. Now I can eat some more - lol!! Anyway, we are here and the weather is looking great (a little chilly, though)! Not sure what the plan is for today but that is o.k.! I am pretty sure we will be watching some football!
Today's card is one that I did for my stamp club this month. I used an older sketch from Karen Giron. I love the way this one turned out! These snowmen are just so stinkin' cute! And you don't have to use them for just Christmas. This card could be used any time of the year! I started with a card base of Cherry Cobbler. Then I cut down another piece of Cherry Cobbler and adhered a piece of Frostwood Lodge designer paper. Then I took a piece of Marina Mist and ran it through the Big Shot using the Snow Burst embossing folder and glued onto the designer paper. Then I tied a piece of the beautiful Cherry Cobbler quilted satin ribbon around this and attached this panel to the card base. I took a piece of Whisper White card stock and stamped the snowman in black StazOn. I also stamped him again on another piece of Whisper White, colored him and cut him out. He got popped up onto the "flat" snowman and then the panel was glued to a piece of Cherry Cobbler. I popped this panel up over the ribbon. Then I stamped the greeting in black StazOn and flagged one end. This was glued to the snowman panel. Thanks for stopping by! have a fantastic day!!
Card Recipe: Stamps- Snow Much Fun; Paper- Cherry Cobbler, Marina Mist, Whisper White, Frostwood Lodge designer paper; Ink- black StazOn, Marina Mist, Cherry Cobbler, Pumpkin Pie, Basic Grey; Accessories- Cherry Cobbler quilted satin ribbon, Snow Burst embossing folder, dimensionals
Good morning, Friends! It's Friday! And Christmas is only two days away! We are with my family right now and it is SO nice! Time to relax and enjoy each other's company! But I do want to remind you that there is a new sketch challenge at Sketch Frenzy Friday! This week's sketch was created by Robbie Rubala. Take a look!
Cute!! And different! I wasn't sure what I was going to do with that curvy area. But after going through my stamps I got an idea! Take a look!

Now, my curve goes the other direction than the sketch, but it is still the same idea. And I do love the way this turned out! My card base is textured Basic Grey. I stamped the image from Come to Bethlehem in black StazOn onto Basic Grey (being careful to not ink up the star part of the image) and cut the curved area by hand. I attached this to a piece of the beautiful silver glimmer paper. Then I cut a piece of Basic Black and attached a piece of the beautiful flocked paper from the Mocha Morning designer paper to the bottom and my stamped image is glued to the Basic Black piece. The Basic Black taffeta ribbon is tied around all this to hide the seam between the silver glimmer and the flocked papers. Then I popped this panel up onto my card base. The last thing I did was to stamp the star part of the image onto the back side of the silver glimmer paper and cut it out. I then popped this up on the card.
Please click 'here' to go and see what Jennifer has created using this sketch. Continue your way through the tour and get inspired. I know this will be a busy week for all but I hope that there might be some time for you to join us for this week's challenge. We always love to see what you come up with! Be sure to upload your creation to the Sketch Frenzy Friday blog! Thanks for stopping by and have a super day!
Card Recipe: Stamps- Come to Bethlehem; Paper- Basic Grey, Basic Black, Silver glimmer paper, Mocha Morning designer paper; Ink- black StazOn; Accessories- Basic Black taffeta ribbon, dimensionals
Hello Friends! Are you ready for Christmas? It won't be long now!! We are on our way to Kansas to spend Christmas with my family. We will get there later tonight and then my sister and her family and my brother will be coming this weekend. I am looking forward to a really restful few days! Even though I am on the road for the next several hours, it is still Thursday and time for another great challenge at Create with Connie and Mary. This week they are challenging us with color. Take a look!
This isn't a lot of color but it is still fabulous and I found it quite challenging! The challenge colors are Whisper White and Silver Glimmer. I did make a few different cards but decided I liked this one best. Take a look!
I did decided that I needed to add black for the greeting. My card base is Whisper White. The next layer is also Whisper White that I ran through the Big Shot with the Northern Flurry embossing folder. Then I took a piece of Whisper White organza ribbon and taped one end behind this piece and glued the piece to the card base. I tacked the ribbon to the front of the card and flagged the bottom. I punched a piece of the silver glimmer paper with the scallop circle punch and popped it up over the ribbon. I stamped the greeting from Season of Joy onto Whisper White and punched it out with the 1 3/4" circle punch. I popped this up onto the silver scallop piece. And that's allI did! Very simple but elegant!
While this is a busy time of year, I do hope you can squeeze some time in to play along with the challenge! Need more inspiration? Head on over to the Create with Connie and Mary site to see all the great samples and then upload your project so that we can all see! Thanks for stopping by and have a super day!
Card Recipe: Stamps- Season of Joy; Paper- Whisper White, Silver Glimmer; Ink- black StazOn; Accessories- Whisper White organza ribbon, Norther Flurry embossing folder, scallop circle punch, 1 3/4" circle punch, dimensionals
Good morning, Friends! I can't believe there are only a few more days until Christmas! Here we celebrate Christmas a little unconventional like - lol! We travel to Kansas to see my family at Christmas so we have to make Christmas at different times. Sunday, we celebrated with my husband's family that live around here. His parents are traveling to Kansas as I type! And since we will be traveling tomorrow, we celebrated last night and this morning. Yesterday was Nick's last day for the quarter and now we are on vacation! Today I will get my haircut, do mounds of laundry and get packed!
Today's card is one that I did with my stamp club this month. I wanted to stay away from Christmas cards so I did a birthday card. I am sure you know how much I love this cupcake set and coordinating punch! It makes super easy and cute cards! I started with a card base of Whisper White. Then I took another piece of Whisper White and ran it through the Big Shot with the Perfect Polka Dots embossing folder. To this I attached a piece of designer paper from the Just Add Cake pack. Then I tied a piece of Baja Breeze 1/8" taffeta ribbon around it before adhering it to the card. I punched a scallop circle from Peach Parfait. I used my circles #2 die to cut the circle from Whisper White. These two are glued together and then popped up on the card. Then I stamped the cupcake bottom in Early Espresso onto Whisper White and the cupcake top in Peach Parfait and punched them out with the Cupcake builder punch. These are popped up onto the circle. My final touch was to punch a little flower from Baja Breeze using the Itty Bitty Shapes Punch Pack. This is attached to the cupcake with a glue dot and a rhinestone is added for some bling! Cute! Thanks for stopping by and have a super day!
Card Recipe: Stamps- Create a Cupcake; Paper- Whisper White, Baja Breeze, Peach Parfait, Just Add Cake designer paper; Ink- Early Espresso, Peach Parfait; Accessories- Baja Breeze 1/8" taffeta ribbon, Perfect Polka Dots embossing folder, Itty Bitty Shapes Punch Pack, scallop circle punch, circles #2 die, Cupcake builder punch, dimensionals
Hello everyone! And welcome to another Freaky blog tour!! Maybe you just came from the wonderfully talented Barb Mullikin! Or maybe you visit me on a regular basis. However you got here I hope you enjoy your visit and then decide to make the rounds for this fantastic blog tour! This month the Freaks are going to be showing off some of the most fantastic products from the upcoming Occasions mini catalog! You are going to LOVE them all!!! Please note that if you are visiting before the 20th, some of the links may not be working. Be sure to come back on the 20th to go through the entire tour without any hiccups!
So for my first project I used a new product that I am SO super excited about and a new stamp set. Take a look!

The new stamp set that I used for this card is called Apothecary Art. It is such a beautiful and elegant set! I am so excited to really sit down and play with it! If you look at the card, you will notice that the stamp has a fun shape to it. Well, the new product that Stampin' Up! created to go with this set is the new Framelits dies!!! Yippppeeee!!!! And they are so super easy to use. I started with a card base of Soft Suede and then added a piece of So Saffron that was run through the Big Shot with the Vintage Wallpaper embossing folder. I cut a smaller piece of Soft Suede and used my ticket corner punch on the four corners. I ran this piece through the Big Shot with the Vintage Wallpaper embossing folder and then attached a piece of Pear Pizzazz to the back of this and then popped it up on the card. I stamped the image from Apothecary Art onto Very Vanilla with Soft Suede ink and then colored the image with So Saffron and Pear Pizzazz markers. Then I used the new Labels Framelits dies (I picked the appropriate size) and ran it through the Big Shot to cut the frame! It is really so easy! I stamped the greeting (also from the same set) on a scrap of Very Vanilla and then attached it to the frame. I popped up the frame onto the card and added several pearls of various sizes to the centers of the flowers!
For my second project, I decided to try something that I had seen on Pinterest. I had several little mason jars sitting around just waiting for me to do something with them! So I decided to make a votive holder using some fabulous new fabric that will be in the new Occasions mini catalog. I love this fabric! Such fun prints and colors!! So this is what the front looks like.
And then I tried to give you a little peek as to what the inside might look like, too. Please note that I do not have a burning candle in there!! It is just a battery operated candle. I am a little too scared to try a burning candle!!
So what I did for this was to cut strips of this fabulous new fabric called Twitterpated - cute name, right! I love this fabric (did I say this already?)! Anyway, I used Mod Podge and applied it to the front of the fabric and glued it to the inside of the jar (so the printed side was facing out). I wasn't too worried about the strips overlapping or having a little gap here and there. How cute would it be to have several of these in the different prints around the house or lining the shelves? I was even thinking of finding a way to hang them. Lots of possibilities!
I hope that you will click the button below to move through the tour to Dawn's blog. What wonderful projects await you there! Thanks for stopping by and have a super day!
Good morning, Friends! I had every intention of posting yesterday but ran out of time. We had to get Nick to the gym early yesterday for his basketball tournament. The team played three games yesterday. They won one and lost two. They didn't play terrible for a team that has been together for only a few short weeks! Then we came home for just a few moments and bundled up for a baseball fundraiser at our local parade of lights. The boys sold hot chocolate and cookies. Didn't make a ton of money but didn't do too bad either! Today we will be at the gym early again for two more games and then we go up to the 'ranch' where Pat's family is and have an early Christmas. Since we are all heading out of town later this week, we are getting together for a little Christmas! Very exciting! Anyway, it has been a busy weekend!!
Today's card is one that I made a while ago. Not a favorite but there are things that I like about it. As I look at it, I do wish that I had paid better attention and made the stripes match. But I love these colors!! And I love the Mocha Morning designer paper!! My card base is Early Espresso with a layer of Crumb Cake that was run through the Big Shot with the Tulip Frame embossing folder. Then I cut a piece of Early Espresso and scalloped one end and tied a piece of Very Vanilla seam binding ribbon around it. I cut four squares of Mocha Morning designer paper, rounded the corners and glued them onto the Early Espresso piece. This panel is popped up on the card. Then I cut a square of Crumb Cake and stamped the tree from Thoughts and Prayers in Crumb Cake and the greeting in Early Espresso. I also sponged the edges in Crumb Cake. This square is also popped up. Thanks for stopping by and have a super day!
Card Recipe: Stamps- Thoughts & Prayers; Paper- Early Espresso, Crumb Cake, Mocha Morning designer paper; Ink- Early Espresso, Crumb Cake; Accessories- Very Vanilla seam binding ribbon, Tulip Frame embossing folder, corner rounder, sponge, dimensionals
Good Friday morning everyone! I hope you are ready for another sketch challenge from Sketch Frenzy Friday! This week's sketch is from Patrice Herrera. Take a look!
And here is how it inspired me.
My card base is Cherry Cobbler with a piece of Crumb Cake layered on top. Then I took a piece of Marina mist and ran it through the Big Shot a couple of times - first with the scallop circles #2 die and then with the Snow Burst embossing folder. I popped this up on the card. Then I punched a stocking with the stocking builder punch from the Frostwood Lodge designer paper. I punched another stocking from Whisper White card stock. I took the Whisper White pieces and layered them on the designer stocking and then popped it up on the scallop circle. Then I used some Cherry Cobbler baker's twine and tied two mini jingle bells together and glued them to the stocking. The last thing I did was to stamp the greeting in Early Espresso at the bottom. Pretty easy!!
Please click 'here' to see what Jennifer did with this sketch. And keep clicking your way through the tour to get inspired! I do hope you will play along with us this week and upload your creation to the Sketch Frenzy Friday blog so that we can all take a look! We love to see what you do! Thanks for stopping by and have a super day!
Card Recipe: Stamps- Four the Holidays; Paper- Cherry Cobbler, Crumb Cake, Whisper White, Marina Mist, Frostwood Lodge designer paper; Ink- Early Espresso; Accessories- Snow Burst embossing folder, stocking builder punch, scallop circles #2 die, Cherry Cobbler baker's twine, mini jingle bells, dimensionals
Good morning, Friends! I hope you are ready for another fabulous and fun Thursday challenge at Create with Connie and Mary! This week the challenge is a sketch. Take a look!
And here is what I created!
The sketch is a square card but I made mine a regular card size. That's why I like sketch challenges so much! I started with a card base of Marina Mist and then added a strip of Frostwood Lodge designer paper. On top of this is a piece of Cherry Cobbler that was run through the Big Shot using the Snow Burst embossing folder. Then I stamped the snowman from Snow Much Fun in black StazOn onto a piece of Whisper White that was cut with the 3" circle die. I colored the snowman with Marina Mist, Cherry Cobbler, Pumpkin Pie, and Basic Grey markers. This circle is glued to a piece of Marina Mist that was cut with the scallop circles #2 die and then popped up on the card. Then I stamped the greeting in black StazOn on a strip of Whisper White and flagged one end and tucked it under the circles. The last thing I did was to tie two mini jingle bells together with the Cherry Cobbler baker's twine and glue them to the circle. Cute, huh!!
Please visit the Create with Connie and Mary site to see what all the other designers did with this fun sketch. Then create your own beautiful project and upload it so that we can all see what you come up with! Thanks for stopping by and have a super day!
Card Recipe: Stamps- Snow Much Fun; Paper- Marina Mist, Cherry Cobbler, Whisper White, Frostwood Lodge designer paper; Ink- black StazOn, Cherry Cobbler, Marina Mist, Pumpkin Pie, Basic Grey; Accessories- Cherry Cobbler baker's twine, mini jingle bells, scallop circles #2 die, 3" circle die, Snow Burst embossing folder, dimensionals
Good morning, Friends! I am finally back to posting again. We had some technical difficulties to deal with but I think that they are taken care of now. At least I hope so! I am truly done with my Christmas shopping - yea!! Now to wrap and enjoy the last few days remaining until Christmas! Nick has finished up his last quarter requirements and is waiting for break to start. I still can't believe how fast time has gone!!
Today's card was one that I did with my stamp club/mystery hostess workshop on Monday. I tried to stay away from Christmas cards at this workshop. I hadn't planned on going in a 'spring' direction either but I still liked how this one turned out! I took a piece of Confetti White card stock that was cut down and stamped the greeting from Just Believe in Wild Wasabi, then glued it to a piece of Wild Wasabi and the popped it up on a card base of Confetti White. Then I punched a circle from Confetti White with the 2 1/2" circle punch and stamps the leafy branch image from the same set in Wild Wasabi several times (and some without re-inking). I attached this to a piece of Wild Wasabi that I had cut with the Perfect Pennants die and then popped it up on the card. The final touch was to add a butterfly that I had die cut from Blushing Bride with the Beautiful Wings sizzlet. I put a mini brad in the middle and used a glue dot to attach it to the card. Very soft and simple! Thanks for stopping by and have a super day!
Card Recipe: Stamps- Just Believe; Paper- Confetti White, Wild Wasabi, Blushing Bride; Ink- Wild Wasabi; Accessories- Perfect Pennants die, Beautiful Wings sizzlet, 2 1/2" circle punch, mini brad, dimensionals
Good morning, Friends! I was so glad to be able to sleep in a little this morning! It felt soooo good to keep snuggling under the blankets with it being so cold outside! Now I am snuggling up to a hot cup of coffee. Yum!! Not much planned today. I'm just glad it's the weekend! We are going over to a friend's house tonight. I am making dinner and I am trying a new recipe. I am super excited! I'll let you know how it turns out.
Today's card was inspired by an older sketch of Karen Giron's. You can find it 'here'. This is a card that I did for a swap last month. Since I just got my cards back today, I thought it was more than safe to show you all. I really do like the way this one turned out! And it was really pretty easy!! I got my color inspiration from an older challenge at The Paper Players. It was to use Always Artichoke, River Rock and Riding Hood Red. I like how these colors make a more muted, aged Christmas card. My card base is River Rock and then I cut another piece of River Rock and a piece of Riding Hood Red that I ran through the Big Shot with the Snow Burst embossing folder. Then I wrapped some Always Artichoke seam binding ribbon around it and glued it to my card base Then I cut a piece of Always Artichoke with the scallop circles #2 die and a piece of River Rock with the 3" die. I sponged the edges of the River Rock piece with River Rock before adhering it to the scallop piece. This is popped up on the card and one end is cut off. I stamped the tree from Season of Joy in Always Artichoke and Early Espresso onto Very Vanilla and cut it out. This is popped up on the circle. Then I stamped the greeting, from the same set, in Always Artichoke onto Very Vanilla and flagged one end. The other end is glued onto the circle. The last thing I did was to color a rhinestone with a Sharpie marker and put it on my tree! And there you have it! Thanks for stopping by and enjoy your day!!
Card Recipe: Stamps- Season of Joy; Paper- River Rock, Riding Hood Red, Always Artichoke, Very Vanilla; Ink- Always Artichoke, Early Espresso, River Rock; Accessories- Always Artichoke seam binding ribbon, rhinestone, Snow Burst embossing folder, scallop circles #2 die, 3" circle die, sponge, dimensionals
Good morning everyone! Are you glad it's Friday? I am!! Today we have another fun sketch challenge for you all from Sketch Frenzy Friday! Take a look at this fantastic sketch from Maria Vanderform!
I thought this was a fantastic opportunity to use up some of those scraps that I always seem to have lying around. Take a look at what I finally came up with.
I knew that I wanted to use the Snow Much Fun set (got to make as many cards as I can since I borrowed this set - lol)! So I took some of my In Color designer paper scraps - Pool Party and Island Indigo, and cut them in strips. I also threw in a strip of the beautiful silver glimmer paper. I glued these to a piece of Whisper White card stock and then glued the whole panel to a Whisper White card base. Then I stamped the image on a piece of Whisper White in black StazOn and colored him in with markers. This panel is glued to a piece of Basic Grey and then popped up on the card. I stamped the greeting in black StazOn onto Whisper White and flagged one end and put a brad through the other then glued it to the card. And there you have it!
Time for you to click 'here' to see what Jennifer did with this sketch. Be sure to continue through the tour to get inspired. I do hope you will play along with us this week! Upload your creation to the Sketch Frenzy Friday blog so that we can all take a look! Thanks for stopping by and have a super day!
Card Recipe: Stamps- Snow Much Fun; Paper- Whisper White, Basic Grey, silver glimmer, In Color designer paper; Ink- black StazOn, Basic Grey, Pool Party, Island Indigo, Pumpkin Pie; Accessories- silver brad, dimensionals
Good morning everyone! It's time again for another fantastic challenge at Create with Connie and Mary! This week is a color challenge and just take a look at these very fun colors!!
The challenge colors are Poppy Parade, Lucky Limeade, and Basic Grey. The green and red spoke Christmas to me. And the grey fits right in with a silver look. Love it! So here is what I came up with.
I really do like the way this one turned out! Lucky Limeade and Poppy Parade are very bright so I used more of the Basic Grey to mute them a bit. This is one super simple card! My card base is Basic Grey. I stamped the Simple Snowflake stamp on it in Basic Grey and rounded the bottom corners. Then I took a strip of Whisper White and stamped the greeting from Word Play in black StazOn. I stamped it again on a scrap piece of Whisper White and colored the ornament with the Lucky Limeade and Poppy Parade markers and cut it out. This strip is layered onto a piece of Poppy Parade and then a piece of Lucky Limeade ruffled ribbon is tied around it and glued to the card. Then I took the cut out ornament and popped it up on the card (right over the original one). Easy!!
Please take some time to go see what the other designers have come up with! You will find their creations at Create with Connie and Mary! I do hope you will have some time to play along with us! We always love to see what you come up with! Thanks for stopping by and have a super day!
Card Recipe: Stamps- Simple Snowflake, Word Play; Paper- Basic Grey, Poppy Parade, Whisper White; Ink- Basic Grey, Lucky Limeade, Poppy Parade, black StazOn; Accessories- Lucky Limeade ruffled ribbon, corner rounder, dimensionals
Good morning everyone! I think morning came a little too early today - lol! Guess I am ready for the weekend. It will get here soon enough. Can't wish the days away as I have a lot to do between now and then! Thanks to my wonderful husband, I think we have our Christmas shopping done! Yea!! I need to take Nick and go out looking for the hubby but that will be it! Our tree looks happy now!
Today's card is one that I just came up with from my own head. My friend, Becky, let me borrow her Snow Much Fun stamp set. This is one that I didn't get but I really like it. So I thought I should make a few cards before I have to send it back. This one is super simple. I stamped the snowman onto Whisper White card stock with black StazOn ink and colored him in with markers. This panel was layered onto a piece of Wild Wasabi and then popped up onto a Whisper White card base. Then I stamped the greeting in black StazOn onto a scrap piece of Whisper White and flagged one end and glued it to the card. The final touch was to add some rhinestones for his buttons. Super simple! Thanks for stopping by and I wish you all a super day!
Card Recipe: Stamps- Snow Much Fun; Paper- Whisper White, Wild Wasabi; Ink- black StazOn, Wild Wasabi, Sahara Sand, Bashful Blue, Pumpkin Pie, Real Red; Accessories- rhinestones, dimensionals
Good morning, Friends! Brrrr!!!! Baby it's cold outside! And in the house!! I think the temperature got down close to zero last night. So the fire feels really good right now! Thankfully, I put the flannel sheets on yesterday, too, so I slept really good! But I wanted to stay under the blankets a lot longer than I could. I was able to get a lot of stamping done yesterday and I am hoping to do the same today. I do need to start thinking about getting some Christmas presents done, too. The time is just flying by!!
Today's card was inspired by an older sketch at Stamping 411. It kind of looks like another one that I did a while ago but I did use different colors on this one. I rather like the way it turned out, too! My card base is Crumb Cake. The squares start with Early Espresso and then a piece from the Frostwood Lodge designer paper that was cut with the Scallop Squares duo die and then a piece of Whisper White. On the Whisper White piece I stamped the greeting from Bells and Boughs in Early Espresso. Then I wrapped a piece of Cherry Cobbler baker's twine around the squares and tied on some mini jingle bells. I love those little jingle bells!! Then I popped them up on the card. On a scrap piece of Whisper White, I stamped the holly in black StazOn and colored it in with Garden Green and Cherry Cobbler markers. Then I cut it out and popped it up, too. And there you have it! Thanks for stopping by and have a super day!
Card Recipe: Stamps- Bells and Boughs; Paper- Crumb Cake, Early Espresso, Whisper White, Frostwood Lodge designer paper; Ink- black StazOn, Early Espresso, Cherry Cobbler, Garden Green; Accessories- Cherry Cobbler baker's twine, mini jingle bells, Scallop Squares duo die, dimensionals
Good morning everyone! Here we are at another week. I just can't believe how fast it is all going! I know my son can't wait for Christmas break to get here, though. Everything just seems to go at record speed this time of year. We need to finish up the shopping and don't even talk to me about Christmas cards! Maybe I will get some sent out.
Today's card was inspired by the sketch at Clean&Simple. When I first saw the sketch I didn't have any ideas. But after looking through a magazine, I saw ideas using two triangles for a Christmas tree. Well, I decided to give it a try and here is my result! I got my color cues from the Just Add Cake designer paper. And I think it turned out pretty cute! My card base is Poppy Parade and then I used the 3 1/2" circle die to die cut a circle from Blushing Bride card stock and that is glued to the card front. I stamped the words from Grateful for You in Early Espresso onto the circle. Then I cut the two smaller triangles from the Perfect Pennants die using designer paper from the Just Add Cake pack. I trimmed the ends of each triangle with the scallop edge border punch and curled them out a little. I cut a small piece of Early espresso for the trunk and a star using the stars die and So Saffron paper. The tree is popped up on the card and the final touch was some rhinestones. I hope you like it, too! Thanks for stopping by and have a super day!
Card Recipe: Stamps- Grateful for You; Paper- Poppy Parade, Blushing Bride, Early Espresso, So Saffron, Just Add Cake designer paper; Ink- Early Espresso; Accessories- rhinestones, 3 1/2" circle die, stars die, Perfect Pennants die, scallop edge border punch, dimensionals
Good morning, Friends! I hope you are all having a super weekend! No winter storm here. Although, today I can't see the mountains around us because of the heavy cloud cover. Looks like they are getting snow. And that's good! So it will be a lazy day around here watching football (go Teebow!!) and staying warm! I made some yummy chili last night for dinner and we have leftovers so that might be the choice of food for tonight as well. I don't mind!
Today's card was inspired from a sketch at My Favorite Things. I don't have any fancy shape die cuts (not yet, anyway), so I made the layer behind my greeting from the two ends of the Top Note die. The card base is Cherry Cobbler with layers of Garden Green and a piece of Frostwood Lodge designer paper. Then I stamped the greeting from the Christmas Lodge stamp set with Cherry Cobbler and Garden Green markers onto Whisper White card stock and the two ends of the Top Note die were glued behind it. I popped this up on the card and added a silver snowflake from the Northern Frost decorative strip die to the corner and a rhinestone that I colored with a red Sharpie marker. A very simple card! Thanks for stopping by and have a super day!
Card Recipe: Stamps- Christmas Lodge; Paper- Cherry Cobbler, Garden Green, Whisper White, Silver glimmer, Frostwood Lodge designer paper; Ink- Cherry Cobbler, Garden Green; Accessories- Top Note die, Northern Frost decorative strip die, dimensionals
Good morning, Friends! I hope you are having a fantastic start to your weekend! I hope to find some time this weekend to get myself caught up on stamping and card making so that I have something to post. I got a new computer last week and am still getting used to using it. I actually went from a PC to a Mac. I love my Mac so far but I am having to learn a few things as I go. Thankfully I learned how to resize pictures and add a watermark (of some sorts). I have been out of the stamping routine for a while now that I feel like I need something to "jump" start me. I couldn't even get my mojo going last night while stamping with Becky. She did let me borrow a stamp set so I will be trying to get something going with it today. We are currently under a Winter Storm Warning but so far nothing is happening. It is just really cloudy. We will see what happens later today.
Today's card was inspired from Mary Jo's Monday Lunchtime Sketch Challenge. My card base is Always Artichoke with a layer of Crumb Cake that I sent through the Big Shot using the Snow Burst embossing folder on the top part and then wrapped a piece of Always Artichoke seam binding ribbon around it. Then I stamped the Christmas greetings from Season of Joy in Crumb Cake ink on Crumb Cake card stock and layered it onto Early Espresso and popped it up on the card. Then I stamped the tree in Always Artichoke and Early Espresso on Very Vanilla and cut it out and popped it up over the panel with the words. I stamped the snowflake in Early Espresso on Very Vanilla and punched it out with the 1" circle punch and added a silver brad and glued it over the ribbon. Then I stamped the greeting in Early Espresso right under the knotted ribbon. Then I decided it needed a little pop of red so I colored a rhinestone with my red Sharpie pen and put it on the tree. Thanks for stopping by and have a super day!
Card Recipe: Stamps- Season of Joy; Paper- Always Artichoke, Crumb Cake, Very Vanilla, Early Espresso; Ink- Early Espresso, Always Artichoke, Crumb Cake; Accessories- Always Artichoke seam binding ribbon, silver brad, rhinestone, 1" circle punch, dimensionals
Good Friday morning everyone! Are you ready for a great weekend? I think we are!! No big plans, really. Just ready to rest and relax! It is time for the Sketch Frenzy Friday challenge and it looks like I was ready for the wrong week so I am posting the sketch and sending you on to Jennifer. So sorry! Now go and have some fun by clicking 'here' to see what Jennifer did with this sketch.
Good morning everyone! Here we are at the beginning of December! Yikes!! I am finding it so hard to believe that 2011 is coming to a close! Besides that, I really need to get going on my Christmas cards and Christmas shopping! But first, it is Thursday, and that means another great challenge from our friends at Create with Connie and Mary! This week we have a sketch to challenge us! Take a look!
And here is what I decided to do with it!

I guess it is no surprise that I have Christmas on the brain. We have finally put up our Christmas tree and decorations. I did alter the sketch just a bit but it is mostly still there. My card base is Crumb Cake. I layered a piece of Cherry Cobbler and a piece of designer paper from the Frostwood collection together. Then I flagged one end of a strip of Garden Green and glued that down as well. Before this was glued to the card I wrapped a piece of Cherry Cobbler quilted satin ribbon around it. I also put another piece of Garden Green just under the ribbon with the word 'merry' (from Pennant Parade stamp set) stamped in Early Espresso. I punched a piece of Cherry Cobbler with the 2 1/2" circle punch and popped it up on the card. I stamped the the tree from the same set in Garden Green on Whisper White three times and cut them out. I also punched out three scallop pennants from Garden Green card stock. I glued the trees to a scallop pennant and then scored them down the middle. One side of the pennant was glued to one side of another and then glued to another (I hope that all made sense - lol). The other two sides were glued to the circle. I added a rhinestone at the top of the tree to finish it off. A fun card!!
I do hope that you will go on over to the Create with Connie and Mary site to see what the other fantastic designers did with this sketch! I do hope you will play along with us this week and let us see what you designed using this sketch! I do love to see what you all come up with! Thanks for stopping by and have a super day!
Card Recipe: Stamps- Pennant Parade; Paper- Crumb Cake, Cherry Cobbler, Garden Green, Whisper White, Frostwood Lodge designer paper; Ink- Garden Green, Early Espresso; Accessories- Cherry Cobbler quilted satin ribbon, rhinestone, pennant builder punch, 2 1/2" circle punch, dimensionals
Hello everyone! I am here to remind you that it is time for a great new sketch from Sketch Frenzy Friday! I am so sorry that I didn't get mine done this week. Too much turkey and fun with family, I guess. I hope to get one up later this week but we will see. We will be on the road on our way home on Saturday. Then I will be stamping on a regular basis once again! I did bring a few supplies with me but just didn't find the time for this wonderful sketch. So I send you on to Jennifer's blog who is the creator of this super fun sketch! Click 'here' to see what she created! I do hope you will find time to join us this week! I will be looking for your fabulous creations! Thanks for stopping by and have a super weekend!
Good morning everyone! And HAPPY THANKSGIVING! I hope you enjoy your day with family and/or friends! We are enjoying the day with family in Kansas! Nick had the whole week off so we left last Saturday and will be going back home to Colorado on Saturday. But today is the Thursday Create with Connie and Mary challenge. I wasn't able to get my design team card done before I left so I threw a few stamp supplies (and I mean a FEW) together and figured I would make the card at my mom's. This week's challenge is a color challenge. Take a look!
The challenge colors are Night of Navy, Lucky Limeade and River Rock. Don't they look wonderful together?! Here is what I came up with (with my limited supplies):
I brought my Lean on Me stamp set because it makes very easy cards and the images are so cute! For this card I used a sketch from the Clean&Simple blog (the sketch used an circle and I made mine a square). My card base is Lucky Limeade with a piece of Lucky Limeade striped dsp on top. The focal point is the stamp stamped in black StazOn on Whisper White. I also stamped the boy image again on scrap paper and cut him out after coloring him with my aqua painter. Then I cut a strip of River Rock and flagged the ends. This was glued to the Whisper White piece and then glued to a Night of Navy piece and then I put two gold brads in. I popped up this panel onto the card and after cutting the little boy out, I popped him up right over the original boy image. Done!!
Please be sure to check out the rest of the design team and their wonderful creations at the Create with Connie and Mary site! I hope you will be able to find some time this next week to play along with us and show off your wonderful creations! I know we all love to see what you come up with! Thanks for stopping by and have a super day!
Card Recipe: Stamps- Lean on Me; Paper- Lucky Limeade, Night of Navy, River Rock, Whisper White, in color designer paper; Ink- black StazOn, Lucky Limeade, River Rock, Night of Navy, Blush Blossom; Accessories- gold brads, aqua painter, dimensionals
Good morning, Friends! I hope you are all having a super week! We are having our 'big' dinner this afternoon because my sister and her family have to leave tomorrow. So the house is starting to smell really yummy right now!! I can't wait!! Then I think that we may work off the meal by doing a little shopping, but we may have to see if we can stay awake - lol!
Today's card is one that I did a while back. I found a similar design in a magazine. I liked the way the bottom of the strip and the decorative label seem like one piece. When actually they are two separate pieces and the ribbon hides the seam. A super simple card! Thanks for stopping by and have a super day!
Card Recipe: Stamps- Season of Joy; Paper- Cherry Cobbler, Crumb Cake, Whisper White; Ink- Early Espresso, Garden Green; Accessories- Early Espresso quilted satin ribbon, decorative label punch, mini brad, dimensionals
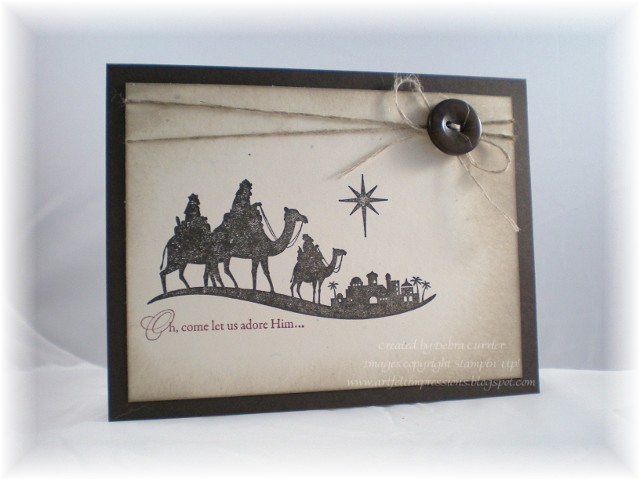
Good morning everyone! I know that I am a little late in posting but it is our vacation time - lol! I am at my parents' house for the week. I had the honor of meeting my mom's Stampin' Up! demonstrator, Eva and her husband (also a stamper)! They came over last night to bring my mom's order. Eva had some samples to show and they were gorgeous! I am anxious to try out a new technique they told me about! It's always so much fun to meet other demonstrators! My brother is here now and my sister and her family will be coming tonight. I just love this time of year when the whole family can be together!
Today's card is one that I did a while ago. I was looking through an older magazine and found a card with a CAS design. So, I decided to copy it using Stampin' Up! supplies. I added a little more to it but I think it turned out all right. Thanks for stopping by and have a super day!
Card Recipe: Stamps- Come to Bethlehem; Paper- Early Espresso, Very Vanilla; Ink- Early Espresso, Cherry Cobbler, Crumb Cake; Accessories- linen thread, Early Espresso button, sponge