Monday, August 31, 2015

Boo! From the Owl

Good morning, Friends! Boy it feels like it has been quite a while since I posted!! Yes, I do the regular Saturday posts but I haven't done anything else for quite some time. I have been stamping but it has been for some other projects that are coming up. And school has been kicking my butt!! Wow! I can't believe that this will be week number 5! And we haven't had any breaks yet. Thank goodness for Labor Day! And not to mention that we have been very busy with bike races and practices. I haven't been able to make a family meal since school started! We are all running in different directions! It's crazy! But Nick did great in his first high school race! He started out in 28th place and finished 10th out of 71 Sophomores! So proud! He sure is moving slow this morning!

Today's card was one that I did for a recent swap I was in. I just love this set and coordinating framelits! They make for a fun and easy card!

  • Card base is Very Vanilla
  • Adhere a piece of Happy Haunting designer paper to another piece of Very Vanilla card stock
  • Adhere a strip of Happy Haunting designer washi tape to the bottom of the panel
  • Adhere panel to card
  • Cut a circle from Crushed Curry card stock using the circles framelits and sponge the edges with Crushed Curry ink then adhere to card with dimensionals
  • Stamp the owl image from Howl-o-Ween Treat onto a piece of Very Vanilla using Basic Black archival ink and cut out using the Boo to You framelits then adhere him to the card with dimensionals
  • Cut the "boo!" from black glitter paper using the Boo to You framelits and adhere to card
  • Add three rhinestones
Thanks for stopping by and have a super day!

Card Recipe: Stamps- Howl-o-Ween Treat; Paper- Very Vanilla, Crushed Curry, Happy Haunting designer paper, black glitter paper; Ink- Crushed Curry, Basic Black archival ink; Accessories- Circles framelits, Boo to You framelits, Happy Haunting designer washi tape, sponge, rhinestones, dimensionals

Saturday, August 29, 2015

CCMC Saturday Blog Hop: Delightful Dijon


Hello everyone! It's time for another Saturday blog hop with the Create with Connie and Mary designers! This week we are featuring projects made using Delightful Dijon as the main color. I am your stop after the fabulous Debbie Henderson!

Delightful Dijon... This is a color I just haven't used much at all. I don't hate it but it hasn't been a color that I grab. So to make something that uses this color as the main focus was a little more difficult than I thought. I kept thinking of sunflowers (my favorite flower) and thought that this color would be perfect! So here's what I came up with!

  • Card base is Whisper White
  • Adhere a piece of Delightful Dijon Color Me Irresistible designer paper to the card base
  • Stamp the greeting from the Something to Say stamp set onto a panel of Whisper White using Delightful Dijon ink then adhere the panel to a piece of Soft Suede card stock
  • Tie a piece of Delightful Dijon dotted lace trim around the panel and adhere to card with dimenionals
  • On a piece of Whisper White, stamp the solid flower image from the Beautiful Bunch stamp set using Delightful Dijon and stamping off once before stamping onto the card stock
  • Use the Stamp-a-ma-jig to help align the outline flower image on top of the solid image and stamp using Delightful Dijon at full strength
  • Punch the flower out using the Fun Flower punch
  • Adhere flower to card with dimensionals
  • Add several Soft Suede candy dots to flower center
Pretty simple card! Time to send you on to see what the super creative Connie Babbert has created! Thanks for stopping by and have a super day!


Card Recipe: Stamps- Beautiful Bunch, Something to Say; Paper- Whisper White, Soft Suede, Color Me Irresistible designer paper; Ink- Delightful Dijon; Accessories- Delightful Dijon dotted lace trim, Neutrals candy dots, Fun Flower punch, stamp-a-ma-jig, dimensionals

Saturday, August 22, 2015

CCMC Saturday Blog Hop: Cucumber Crush


Hello everyone! It's time for another Saturday blog hop with the Create with Connie and Mary designers! This week we are featuring projects made with the Cucumber Crush color. I am your stop after the fabulous Debbie Henderson!

This new In Color can be a bit intimidating as it is pretty bright! So I used a bit of vellum and some white to help tone it down a bit. And I quite like how it turned out!

  • Card base is Whisper White
  • Adhere a piece of Cucumber Crush to a piece of Cherry on Top designer paper
  • Flag the bottom of a piece of vellum using the Triple Banner punch and adhere to panel by folding the top part of the banner to the back of the panel
  • Adhere panel to card base with dimensionals
  • Punch a flower from Whisper White card stock using the Fun Flower punch
  • Punch a circle from Cucumber Crush using the 1" circle punch and adhere to flower center
  • Stamp the greeting from Crazy About You stamp set onto a strip of Whisper White using Cucumber Crush ink and flag both ends then adhere to flower center with dimensionals
  • Stamp the leafy stem onto Whisper White using Cucumber Crush ink and cut out then adhere to back of flower and adhere flower to card with dimensionals
  • Add some white perfect accents to card

Have you seen the beautiful and fun projects on the Create with Connie and Mary mini edition? Lots of great ideas! But the only way to see these great projects is to be a subscriber! Find more information about signing up at the Create with Connie and Mary website!

Time to send you on to see what the fabulous Connie Babbert has created! Thanks for stopping by and have a super day!


Card Recipe: Stamps- Crazy About You; Paper- Whisper White, Cucumber Crush, Cherry on Top designer paper, vellum; Ink- Cucumber Crush; Accessories- Triple Banner punch, Fun Flower punch, White Perfect Accents; 1" circle punch, dimensionals


Thursday, August 20, 2015

Zig Zag Flower

Hello everyone! I hope you are having a great week! Friday can't get here soon enough! Nick has a bike race this weekend and I can't wait to get to some cooler weather! I have so much to do around here but I am looking forward to getting away. I can't believe that we have been in school for three weeks now! Wow! It's going fast but there are times when I feel like I have been there for months - lol! 

For today's card I challenged myself to use this set, Flower Patch. I have had it for a while but I think I have only used it once! So I created this simple card!

  • Card base is Whisper White
  • On another piece of Whisper White stamp the zig zag lines image from Stamp a Bag stamp set twice using Cucumber Crush ink
  • Stamp the greeting from Flower Patch onto the panel using Tuxedo black Momento ink then adhere panel to card base
  • On another piece of Whisper White stamp the flower from Flower Patch using Hello Honey ink and cut out using the coordinating Flower Fair framelits
  • Stamp the leafy stem image twice onto a piece of Cucumber Crush card stock using Cucumber Crush ink and cut out using the Flower Fair framelits
  • Adhere the leaves to the back of the flower and then adhere the flower to the card with dimensionals
  • Tie a piece of linen thread through a silver basic metal button and tie a bow then adhere to flower center
  • Add rhinestones

Don't forget to sign up for the Create with Connie and Mary mini edition! It started yesterday but it's not too late to sign up! You will only see these fabulous projects by being a subscriber! Check out the Create with Connie and Mary site for more details! Thanks for stopping by and have a fabulous day!

Card Recipe: Stamps- Flower Patch, Stamp a Bag; Paper- Whisper White, Cucumber Crush; Ink- Cucumber Crush, Hello Honey, Tuxedo Black Momento ink; Accessories- Flower Fair framelits, linen thread, silver basic metal button, rhinestones, dimensionals

Tuesday, August 18, 2015

SSSC 281

Good morning, Friends! I hope your week is off to a fabulous start! I wasn't quite ready to go back to work this week. But here we are! Nick's bike races will be starting up this weekend so I will be busy with that, too! Should be fun, though!

Today's card was inspired by last week's sketch from the Sweet Sunday Sketch challenge. I got some new goodies from the upcoming Holiday mini and tried them out. I love this set, Howl-o-Ween Treat with the coordinating framelits, Boo to You! I only got this one card done but I am hoping to find time (and energy) to make a few more!

  • Card base is Tangelo Twist
  • Run another piece of Tangelo Twist through the Big Shot using the Lucky Stars embossing folder then adhere to card base
  • Flag the end of a strip of Happy Haunting designer paper and adhere to card
  • Cut a square from Very Vanilla and adhere to card
  • Cut a circle from Very Vanilla and run through the Big Shot using the Lucky Stars embossing folder then adhere to card
  • Stamp the greeting from And Many More stamp set onto a strip of Basic Black using VersaMark ink and emboss with white emboss powder then adhere to card
  • Stamp the hat image from Howl-o-Ween Treat stamp set onto Very Vanilla using Blackberry Bliss ink and cut out (I cut this out by hand) then adhere to card with dimensionals
  • Add a few rhinestones to stars

Before I sign off I want to remind you all of the upcoming Create with Connie and Mary mini edition! It starts tomorrow! But the only way to see the fabulous projects is to be a subscriber! Find out more by visiting the Create with Connie and Mary site! Here is a little teaser!


Thanks for stopping by and have a fabulous day!

Card Recipe: Stamps- Howl-o-Ween Treat, And Many More; Paper- Very Vanilla, Tangelo Twist, Basic Black, Happy Haunting designer paper; Ink- VersaMark, Blackberry Bliss; Accessories- Lucky Stars embossing folder, white emboss powder, rhinestones, dimensionals

Sunday, August 16, 2015

The Stamp Review Crew: Awesomely Artistic


Hello everyone! Welcome to another blog hop with The Stamp Review Crew! This week we are featuring projects made using the Awesomely Artistic stamp set! I am your stop after the fabulous Shana Gaff!

I just love this stamp set! And I think the name of it fits perfectly! I used the sketch from Freshly Made to help me create this card. And as you can tell, I was in a neutral mood - lol!

  • Card base is Crumb Cake
  • Adhere a strip of Basic Black to the bottom of the card base
  • Cut another piece of Crumb Cake slightly smaller than the card base
  • Stamp the flower bunch image from Awesomely Artistic stamp set onto the panel using Tuxedo black Momento ink
  • Stamp the splotches image using Crumb Cake ink
  • Adhere panel to card with dimensionals
  • Stamp the dragonfly image onto Whisper White card stock using Crumb Cake ink and cut out
  • Adhere some silver metallic thread to the back of the dragonfly and then adhere to card with dimensionals
  • Stamp the sentiment onto a strip of Crumb Cake using Tuxedo black Momento ink and flag the end then adhere to card
  • Add several rhinestones to card

Now it's time to send you on to see what the fabulous Dawn Tidd has created! Thanks for stopping by and have a super day!


Card Recipe: Stamps- Awesomely Artistic; Paper- Crumb Cake, Basic Black, Whisper White; Ink- Tuxedo black Momento ink, Crumb Cake; Accessories- silver metallic thread, rhinestones, dimensionals

Saturday, August 15, 2015

CCMC Saturday Blog Hop: Tip Top Taupe


Hello everyone! It's time for another Saturday blog hop with the Create with Connie and Mary design team! This week we are showing projects that use the Tip Top Taupe in color! I am your stop after the fabulous Debbie Henderson

But first, I want to make sure you know about the upcoming Create with Connie and Mary mini edition. Here is some more information about that:


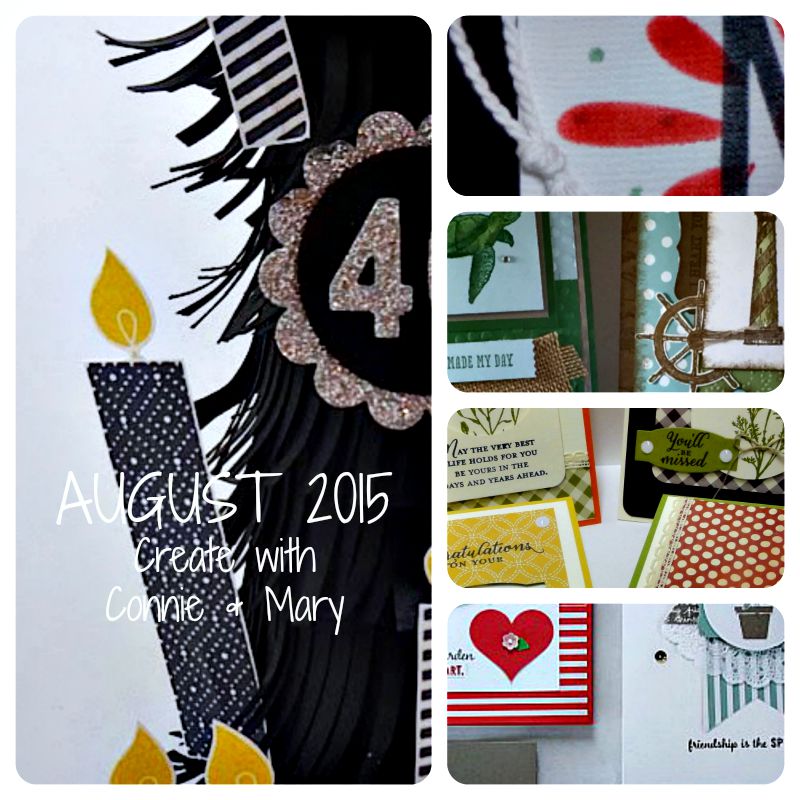
  • Our mini session includes the tutorials for FIVE projects with full step-by-step tutorials:
    • Each mini session includes THREE card sets, each with 4 cards, and
    • Each mini session includes TWO 3D items perfect for your club or stamp camp
  • All FIVE projects are available once the mini session opens so you immediately have all projects (and tutorials) right there at your fingertips
  • BONUS:  Every month in the weeks following the release, Connie and Mary will each do two additional cards to make an Bonus Card Set project for you!  Make sure you check back in with us!
Our FABULOUS design team members are joining us - Debbie Henderson, Nicole Tugrul, and Deb Currier!  They always have such GREAT ideas that are perfect and easy to recreate!
August Mini session is available on August 19th (and you'll have access for up to a year)

Cost is only $8.95 US
Sets used for this collection

    • Build a Birthday
    • From Land to Sea
    • Wild About Flowers
    • Gift from the Garden
    • Build a Banner (using it for other than banners!)
    • BONUS:  Howl-o-ween Treat
AND FINALLY...here's a little teaser for our August Collection...

I hope you will join us for this fun edition! The only way to see these awesome projects is to subscribe to this edition! I hope to see you all there!

And now for my project for the blog hop.

  • Card base is Tip Top Taupe
  • Run another piece of Tip Top Taupe through the Big Shot using the Woodland embossing folder (sneak peek of what's coming in the new Holiday mini!) and adhere to card base
  • Stamp the leaves from the Vintage Leaves stamp set onto Whisper White card stock using Tip Top Taupe ink and cut out using the coordinating Leaflets framelits
  • Adhere bigger leaf to card then adhere smaller one using dimensionals
  • Stamp the greeting from And Many More stamp set onto a piece of Whisper White using Tip Top Taupe ink
  • Punch the greeting out using the Washi Tape punch and adhere to card
  • Thread a piece of linen thread through a gold basic metal button and tie a bow then adhere to card

Now it's time to send you on to see what the fabulous Connie Babbert has created! Thanks for stopping by and have a super day!


Saturday, August 8, 2015

CCMC Saturday Blog Hop: Mint Macaron


Hello everyone! Welcome to another Saturday blog hop brought to you by the Create with Connie and Mary designers! We are excited to show you projects created using the color Mint Macaron! I am your stop right after the fabulous Debbie Henderson!

I LOVE this new In Color! It is just so pretty! I am always looking for new ways to use it! Here's how I used it for this week's hop:

  • Card base is Mint Macaron
  • Adhere a lace paper doily to the card base
  • Punch a scallop circle from Mint Macaron using the 2 3/8" scallop circle punch and adhere to center of doily
  • Punch a circle from Whisper White using the 2" circle punch
  • Stamp the honeycomb image from Butterfly Basics onto the circle using Mint Macaron ink (stamp off once) then sponge the edges using Mint Macaron ink and adhere to scallop circle
  • Stamp the butterfly image onto a piece of Whisper White using Mint Macaron ink and cut out using the Butterfly thinlits 
  • Sponge the edges of the butterfly using Mint Macaron ink and adhere to card with a dimensional
  • Thread a piece of linen thread through a silver basic metal button and tie a bow then adhere to butterfly
  • Stamp the greeting onto the card base using Momento ink
Now it's time to send you on to see what the fabulous Connie Babbert has created for you! Thanks for stopping by and have a fabulous day!


Card Recipe: Stamps- Butterfly Basics; Paper- Mint Macaron, Whisper White, lace doilies; Ink- Mint Macaron, Momento ink; Accessories- Butterfly thinlits, 2 3/8" scallop punch, 2" circle punch, linen thread, silver basic metal button, sponge, dimensionals

Sunday, August 2, 2015

The Stamp Review Crew: Crazy About You


Hello everyone! It's time for another fabulous blog hop from The Stamp Review Crew! This time we are featuring projects made using the Crazy About You stamp set! I am your stop after the fabulous Tanya Boser

I used the color challenge from Create with Connie and Mary and last week's sketch from Sweet Sunday Sketch Challenge

  • Card base is Sahara Sand
  • Cut a circle from a piece of Sahara Sand using the Circles framelits
  • On another piece of Sahara Sand, stamp the Hardwood background stamp using Sahara Sand ink
  • Adhere the stamped panel to the back of the cut out circle using dimensionals then adhere to card base
  • Stamp the greeting from Crazy About You stamp set onto a strip of Very Vanilla using Perfect Plum ink and flag both ends then adhere to card
  • Stamp the flower image onto Very Vanilla using Perfect Plum two times then punch each one out using the Flower Medallion punch
  • Adhere both flowers together with a dimensional
  • Stamp the leaf image two times onto Very Vanilla using Mint Macaron ink and cut each out by hand
  • Adhere leafy stems to the back of the flower
  • Adhere flower to card using dimensionals
  • Thread some gold metallic thread through a Very Vintage designer button (I used three strands) and tie a bow then adhere button to flower center
Now it's time to send you on to see what the wonderful Heidi Baks has created! Thanks for stopping by and have a super day!


Card Recipe: Stamps- Crazy About You, Hardwood; Paper- Sahara Sand, Very Vanilla; Ink- Sahara Sand, Perfect Plum, Mint Macaron; Accessories- Circles framelits, Flower Medallion punch, Very Vintage designer button, gold metallic thread, dimensionals

Saturday, August 1, 2015

CCMC Saturday Blog Hop: Watermelon Wonder


Hello everyone! Welcome to another Saturday blog hop! Today, the Create with Connie and Mary designers are featuring projects using Watermelon Wonder as the primary focus! I am your stop after the fabulous Debbie Henderson!

This week I made a treat bag using the Mini Treat Bag thinlits! And as you can see, my main color for this is Watermelon Wonder! This is very simple but so fun and bright and happy! The greeting is from the Cottage Greetings stamp set. I also used this stamp set to make a set of four cards for the Create with Connie and Mary mini edition! Did you see them?

  • The bag is made from two sheets of the Cherry on Top designer paper and the Mini Treat Bag thinlits
  • Score and adhere the two pieces together
  • Tie a piece of Watermelon Wonder dotted lace trim around the bag
  • Stamp the greeting from the Cottage Greetings stamp set using Momento ink
  • Punch a flower from Crushed Curry using the itty bitty accents punch pack and adhere to bag
  • Add a rhinestone to flower center
A very simple bag! Now I send you on to see what the awesome Connie Babbert has created for you! Don't forget to visit the Create with Connie and Mary site to find out how you can subscribe to the mini edition! Thanks for stopping by and have a super day!


Recipe: Stamps- Cottage Greetings; Paper- Crushed Curry, Cherry on Top designer paper; Ink- Momento ink; Accessories- Watermelon Wonder dotted lace trim, itty bitty accents punch pack, rhinestone, Mini Treat Bag thinlits