
Friday, November 25, 2011
SFF 112511
Thursday, November 24, 2011
CCMC 177
Good morning everyone! And HAPPY THANKSGIVING! I hope you enjoy your day with family and/or friends! We are enjoying the day with family in Kansas! Nick had the whole week off so we left last Saturday and will be going back home to Colorado on Saturday. But today is the Thursday Create with Connie and Mary challenge. I wasn't able to get my design team card done before I left so I threw a few stamp supplies (and I mean a FEW) together and figured I would make the card at my mom's. This week's challenge is a color challenge. Take a look!

The challenge colors are Night of Navy, Lucky Limeade and River Rock. Don't they look wonderful together?! Here is what I came up with (with my limited supplies):

I brought my Lean on Me stamp set because it makes very easy cards and the images are so cute! For this card I used a sketch from the Clean&Simple blog (the sketch used an circle and I made mine a square). My card base is Lucky Limeade with a piece of Lucky Limeade striped dsp on top. The focal point is the stamp stamped in black StazOn on Whisper White. I also stamped the boy image again on scrap paper and cut him out after coloring him with my aqua painter. Then I cut a strip of River Rock and flagged the ends. This was glued to the Whisper White piece and then glued to a Night of Navy piece and then I put two gold brads in. I popped up this panel onto the card and after cutting the little boy out, I popped him up right over the original boy image. Done!!
Please be sure to check out the rest of the design team and their wonderful creations at the Create with Connie and Mary site! I hope you will be able to find some time this next week to play along with us and show off your wonderful creations! I know we all love to see what you come up with! Thanks for stopping by and have a super day!
Card Recipe: Stamps- Lean on Me; Paper- Lucky Limeade, Night of Navy, River Rock, Whisper White, in color designer paper; Ink- black StazOn, Lucky Limeade, River Rock, Night of Navy, Blush Blossom; Accessories- gold brads, aqua painter, dimensionals
Wednesday, November 23, 2011
Simple Season

Today's card is one that I did a while back. I found a similar design in a magazine. I liked the way the bottom of the strip and the decorative label seem like one piece. When actually they are two separate pieces and the ribbon hides the seam. A super simple card! Thanks for stopping by and have a super day!
Card Recipe: Stamps- Season of Joy; Paper- Cherry Cobbler, Crumb Cake, Whisper White; Ink- Early Espresso, Garden Green; Accessories- Early Espresso quilted satin ribbon, decorative label punch, mini brad, dimensionals
Tuesday, November 22, 2011
Bethlehem Button
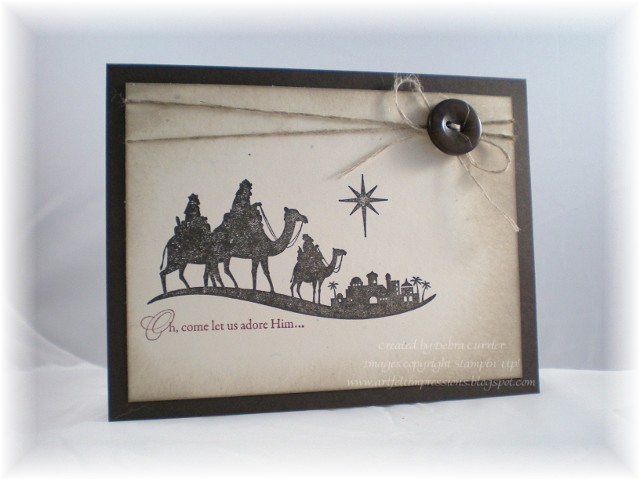
Today's card is one that I did a while ago. I was looking through an older magazine and found a card with a CAS design. So, I decided to copy it using Stampin' Up! supplies. I added a little more to it but I think it turned out all right. Thanks for stopping by and have a super day!
Card Recipe: Stamps- Come to Bethlehem; Paper- Early Espresso, Very Vanilla; Ink- Early Espresso, Cherry Cobbler, Crumb Cake; Accessories- linen thread, Early Espresso button, sponge
Monday, November 21, 2011
Serene Pool Party

Today's card was inspired by a magazine that I had bought a while back. It had three snowflakes down the side. Anyway, it is very simple! I did cut the center of the snowflake out and popped it up on the center snowflake with a brad. Love the little "extras" in the Confetti White card stock! Thanks for stopping by and have a super day!
Card Recipe: Stamps- Serene Snowflakes, Grateful Greetings; Paper- Confetti White; Ink- Pool Party, Crumb Cake; Accessories- Pool Party ruffled ribbon, silver brad, corner rounder, sponge, dimensionals
Saturday, November 19, 2011
Control Freaks Blog Tour - KISS

Hello everyone! It's that time of the month when the Freaks come out to provide you all with a great blog tour! This month the Freaks are focusing on the 'KISS' method - Keep It Simple Stamper! All of our projects have minimal layers and are easily duplicated. So you probably arrived here from Mary Brown's blog. Isn't she talented? I always love to see what she comes up with! If you just landed here be sure to click on the button at the end of this post to continue through the tour. (please note that if you are visiting before the 20th, all the links may not be working so be sure to come back on the 20th for a smooth tour)

I used the Christmas Lodge set. I stamped the tree onto a Garden Green textured card base with Garden Green ink. Then I took a strip of Whisper White card stock and rounded the corners on one end. I stamped the greeting using Garden Green and Cherry Cobbler markers. On the other end is a strip of Cherry Cobbler that I punched with the dotted ribbon scallop punch. The strip is then popped up on the card base and I added a Cherry Cobbler button with Cherry Cobbler baker's twine.

For this card I used the same stamp set, Christmas Lodge, along with Teeny Tiny Wishes. My card base is Confetti White card stock with the bottom corners rounded. I made a tag from Confetti White card stock as well. On the tag I stamped the image with Garden Green and Early Espresso markers. The greeting is stamped with Early Espresso. I took a strip of Cherry Cobbler card stock and punched it with the scallop edge border punch and glued it behind the tag. I tied a piece of Cherry Cobbler baker's twine at the top and popped the tag up on the card.
There you have it! I hope you got some inspiration for some clean and simple cards! I am the last stop on the tour but if you haven't been all the way through (there are 13 stops total), then be sure to click the button below to start at the beginning with Cindy Major. Thanks for stopping by!

Card Recipe: Stamps- Christmas Lodge, Teeny Tiny Wishes; Paper- Whisper White, Confetti White, Cherry Cobbler, Garden Green; Ink- Cherry Cobbler, Garden Green, Early Espresso; Accessories- Cherry Cobbler baker's twine, corner rounder, dotted scallop ribbon punch, scallop edge border punch, Cherry Cobbler button, dimensionals
Friday, November 18, 2011
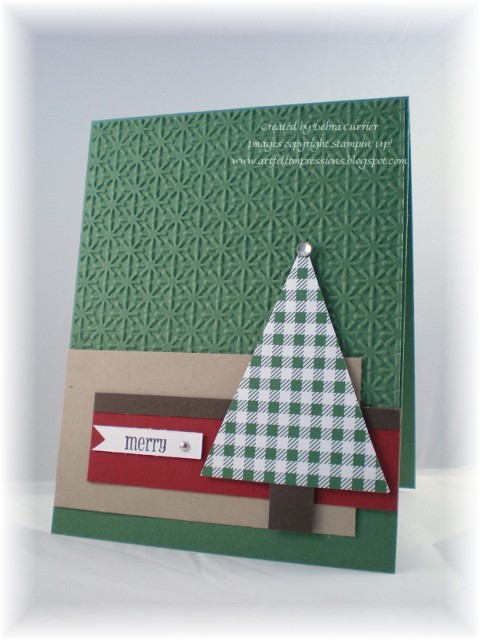
SFF 111811
Good morning everyone! Yea!! It's Friday!! Time for some fun with a sketch challenge from Sketch Frenzy Friday! This week's sketch was made by me! Take a look!

And here is what I finally came up with!

I don't know what it is but I have a much easier time with other people's sketches. When I have to come up with a card for my own sketch I get stumped. What is up with that? I wanted to do a card associated with Thanksgiving but I just couldn't get anything to work. So I went to Christmas. I love the look of the triangle shaped Christmas tree. I started with a card base of Garden Green and took a smaller piece of Garden Green and ran it through the Big Shot with the Snow Burst embossing folder. Then I used pieces of Crumb Cake, Cherry Cobbler and Early Espresso to finish the sketch off. The tree part is made from a piece of Frostwood Lodge designer paper that was cut with the Perfect Pennants die. Then I cut a square of Early Espresso for the trunk. The tree is popped up on the card and then I added a 'star' with a rhinestone. Not much room for a greeting so I used 'merry' from the Pennant Parade set and stamped it in Early Espresso on Whisper White and flagged one end and put a silver mini brad in the other.
Please click 'here' to see what Jennifer did with this sketch. I hope you will continue through the tour to see all the great designs and to get inspired. Then be sure to make your own creation and upload it to the Sketch Frenzy Friday blog so that we can all take a look! I can't wait to see what you do! Thanks for stopping by and have a super day!
Card Recipe: Stamps- Pennant Parade; Paper- Garden Green, Cherry Cobbler, Crumb Cake, Whisper White, Early Espresso, Frostwood Lodge designer paper; Ink- Early Espresso; Accessories- Snow Burst embossing folder, Perfect Pennants die, mini brad, rhinestone, dimensionals

And here is what I finally came up with!
I don't know what it is but I have a much easier time with other people's sketches. When I have to come up with a card for my own sketch I get stumped. What is up with that? I wanted to do a card associated with Thanksgiving but I just couldn't get anything to work. So I went to Christmas. I love the look of the triangle shaped Christmas tree. I started with a card base of Garden Green and took a smaller piece of Garden Green and ran it through the Big Shot with the Snow Burst embossing folder. Then I used pieces of Crumb Cake, Cherry Cobbler and Early Espresso to finish the sketch off. The tree part is made from a piece of Frostwood Lodge designer paper that was cut with the Perfect Pennants die. Then I cut a square of Early Espresso for the trunk. The tree is popped up on the card and then I added a 'star' with a rhinestone. Not much room for a greeting so I used 'merry' from the Pennant Parade set and stamped it in Early Espresso on Whisper White and flagged one end and put a silver mini brad in the other.
Please click 'here' to see what Jennifer did with this sketch. I hope you will continue through the tour to see all the great designs and to get inspired. Then be sure to make your own creation and upload it to the Sketch Frenzy Friday blog so that we can all take a look! I can't wait to see what you do! Thanks for stopping by and have a super day!
Card Recipe: Stamps- Pennant Parade; Paper- Garden Green, Cherry Cobbler, Crumb Cake, Whisper White, Early Espresso, Frostwood Lodge designer paper; Ink- Early Espresso; Accessories- Snow Burst embossing folder, Perfect Pennants die, mini brad, rhinestone, dimensionals
Thursday, November 17, 2011
CCMC 176
Good morning everyone! It's time for another fun challenge at Create with Connie and Mary! This week we are being challenged with a sketch. Take a look!

I knew that I wanted to do a Thanksgiving card so here is what I came up with:

I did a search to see if I could find a tutorial for making a turkey from punches. I found one from Angie Kennedy Juda who said she got it from one of our Stampin' Success magazines (it was from a while ago). So I followed her instructions and this is what evolved! Isn't he the cutest? I was really happy with how he turned out. I did add the little "wobble" but it looks more like a mustache. I won't go into details about how I made the turkey but you can do a search and find the video (and many others) on how to make him. I took pieces of More Mustard, Cajun Craze, and Old Olive and sponged them then mounted them to a piece of Early Espresso and ran it through the Big Shot using the Square Lattice embossing folder. This is mounted onto a card base of Confetti Cream. The turkey is mounted a 3" circle of River Rock that was sponged then glued to the card. I added a strip of Confetti Cream with "Happy Thanksgiving" stamped in Early Espresso and a gold brad attached. This is glued onto the card. There you have it!
Be sure to visit the Create with Connie and Mary site to find even more inspiration from the rest of the team. Then create your own project using the sketch provided! Remember that we are Stampin' Up! only! I can't wait to see what you do! Thanks for stopping by and have a super day!
Card Recipe: Stamps- Teeny Tiny Wishes; Paper- Confetti Cream, More Mustard, Cajun Craze, Old Olive, Early Espresso, Basic Black, River Rock; Ink- Early Espresso, More Mustard, Cajun Craze, Old Olive, River Rock; Accessories- gold brad, Square Lattice embossing folder, scallop circle punch, 1 3/8" circle punch, 3/4" circle punch, 1/4" circle punch, Boho Blossoms punch, sponge
Wednesday, November 16, 2011
Simple Solstice

Today's card is one that I did quite a while ago. I wasn't sure how I felt about it. It's o.k. I like the clean and simple look of it. Thanks for stopping by and have a great day!
Card Recipe: Stamps- Summer Solstice; Paper- Confetti Cream; Ink- Island Indigo, More Mustard, Lucky Limeade; Accessories- Very Vanilla narrow taffeta ribbon, mini brad, 1 3/8" circle punch, color spritzer, dimensionals
Tuesday, November 15, 2011
Monochromatic Christmas

Today's card was one that I made thinking I might do it for the workshop I had last week. It's not my favorite but I do like the simple monochromatic look. Thanks for stopping by and have a super day!
Card Recipe: Stamps- Delightful Decorations, Grateful Greetings; Paper- Crumb Cake, Always Artichoke; Ink- Always Artichoke; Accessories- linen thread, pearl, ornament punch, corner rounder, piercer, dimensionals
Monday, November 14, 2011
Pretty Boughs

Today's card was inspired by a few I found while blurfing. I was glad to use this stamp from Bells & Boughs. This particular stamp doesn't get much use so I wanted to see what I could do with it. I rather like the way it turned out! I used my blender pen and stamp pads. Pretty simple but can take a little time with the coloring. And I love the pop of color with the Cherry Cobbler seam binding ribbon. Thanks for stopping by and have a super day!
Card Recipe: Stamps- Bells & Boughs; Paper- Crumb Cake; Ink- black StazOn, Always Artichoke, Cherry Cobbler, Crumb Cake; Accessories- Cherry Cobbler seam binding ribbon, pearls, corner rounder, blender pen, sponge, dimensionals
Sunday, November 13, 2011
Mocha Morning Bethlehem

Today's card is one that I did in my workshop last week. I love this stamp set and it always makes very simple, yet elegant cards. I used some of the flocked Mocha Morning designer paper and the Tulip embossing folder. And then added a little ribbon and a rhinestone. Pretty simple! Thanks for stopping by and have a super day!
Card Recipe: Stamps- Come to Bethlehem; Paper- Crumb Cake, Basic Black, Mocha Morning designer paper; Ink- black StazOn; Accessories- Basic Black taffeta ribbon, tulip embossing folder, scallop edge border punch, rhinestone, dimensionals
Saturday, November 12, 2011
Ornamental Greetings

I had a workshop this past week and we made this card. It is a SUPER simple card but I think it packs a nice punch. I love the monochromatic with a pop of color with the ribbon. Of course I had to add a little rhinestone for some bling! Thanks for stopping by and have a super day!
Card Recipe: Stamps- Delightful Decorations, Grateful Greetings; Paper- Whisper White, Garden Green; Accessories- Cherry Cobbler seam binding ribbon, rhinestones, ornament punch, dimensionals
Friday, November 11, 2011
SFF 111111
Good Friday morning everyone! Time for another wonderful sketch challenge at Sketch Frenzy Friday! This week's sketch is brought to us by Angela Walters. Take a look!

A sketch with so many possibilities! But this is what I came up with!

I am quite pleased with this one! I did end up flipping the sketch to make it more balanced. For this card I started with a card base of Whisper White. Then I took another piece of Whisper White and ran it through the Big Shot with the Snow Burst embossing folder and glued it to a piece of Cherry Cobbler. To this panel I added a strip of Cherry Cobbler that I punched with the scallop edge border punch and wrapped a piece of Cherry Cobbler quilted satin ribbon around it. Then I popped up this panel onto the card base. My focal point is a piece of Garden Green card stock that was cut with the scallop squares duo die. I stamped the image from Bells & Boughs onto a scrap piece with black StazOn and colored it with Garden Green and Cherry Cobbler markers and then cut it out. It is popped up onto a piece of Whisper White with the greeting (from the same set) stamped in Cherry Cobbler. This is glued to the Garden Green scallop square that is popped up onto the card.
Please click 'here' to go to Jennifer's blog and see what she did with this sketch! Continue to click through the tour to get more inspiration and then I hope you will find some time to play along with us this week! Make your creation using this sketch and upload it to the Sketch Frenzy Friday blog. We always love to see what you come up with! Thanks for stopping by and have a super day!
Card Recipe: Stamps- Bells & Boughs; Paper- Whisper White, Cherry Cobbler, Garden Green; Ink- Garden Green, Cherry Cobbler; Accessories- Cherry Cobbler seam binding ribbon, scallop edge border punch, snow burst embossing folder, scallop squares duo die, dimensionals
Thursday, November 10, 2011
CCMC 175
Good morning, Friends! It's time for another great challenge from the Create with Connie and Mary team! This week we are being challenged with color. Take a look at these colors!

Our challenge colors are Cherry Cobbler, More Mustard, and Basic Black. I do like the swatches of color together. But what to do with them? Well, I have been cranking out the Christmas cards lately so that's what I went with. Check it out!

This is a very simple card. I love this stamp set and how easy it is to use! This set would definitely be a great one to use to mass produce those Christmas cards! I started with a card base of textured Cherry Cobbler card stock. Then I took a piece of More Mustard and scalloped the bottom of it and wrapped a piece of Basic Black narrow taffeta ribbon around the bottom. This is glued flat to the card front. Then I took a piece of Cherry Cobbler and stamped the image and greeting from Come to Bethlehem set in black StazOn. Then I sponged the edges with Cherry Cobbler and glued it to a piece of Basic Black card stock. This panel is popped up on the More Mustard. The final touch was to add a rhinestone to the star. Super easy!
Please be sure to check out the rest of the design team at Create with Connie and Mary to get more inspiration using these colors! I do hope that you will play along with us this week and post your card to the site so that we can all see what fabulous things you do with these colors! Thanks for stopping by and have a super day!
Card Recipe: Stamps- Come to Bethlehem; Paper- Cherry Cobbler, More Mustard, Basic Black; Ink- black StazOn; Accessories- Basic Black narrow taffeta, scallop edge border punch, rhinestone, sponge, dimensionals
Wednesday, November 9, 2011
Pennant Swap Card

Today's card is one that I did for a recent swap that I participated in. I really liked the way this one turned out! The card base is Cherry Cobbler with a piece of Garden Green that was run through the Big Shot using the Snow Burst embossing folder and then a piece of Frostwood Lodge designer paper that has the corners rounded and then a strip of Crumb Cake that was flagged at the bottom - all of these are glued flat. Then I took a piece of Cherry Cobbler and used my Perfect Pennants die to create the scallop circle. The Crumb Cake circle was punched with my 2 1/2" circle punch and sponged the edges with Crumb Cake and glued it to the scallop circle and then popped it up on the card. I used the stamp set Pennant Parade and stamped the tree in Garden Green on a scrap of Whisper White and cut it out and glued it to a piece of Garden Green that had been punched with the Pennant builder punch. I also stamped the little pot and cut it out to glue behind my tree. The tree is popped up on the circle and has a rhinestone added at the top! The greeting, also from the same set, is stamped in Early Espresso on the Crumb Cake strip. A fun and festive card!! Thanks for stopping by and have a super day!
Card Recipe: Stamps- Pennant Parade; Paper- Cherry Cobbler, Garden Green, Whisper White, Crumb Cake, Frostwood Lodge designer paper; Ink- Garden Green, Crumb Cake, Early Espresso; Accessories- Snow Burst embossing folder, Perfect Pennants die, 2 1/2" circle punch, corner rounder, pennant builder punch, rhinestone, sponge, dimensionals
Tuesday, November 8, 2011
Snowman Shaker

Today's card is another shaker card. When you get the sheet of shaker frames, there are many different sizes and I was trying to think of some different ways to use them. This card uses the second largest shaker frame. And it works perfectly for the snowman image from the Tags til Christmas set. It was a little harder to make the circle frame because we don't have a punch that size. So I improvised a little but I do like the end result! I made it pretty much the same way I did this one. Gotta love those little jingle bells! Thanks for stopping by and have a super day!
Card Recipe: Stamps- Tags til Christmas, Grateful Greetings; Paper- Whisper White; Ink- Island Indigo; Accessories- white baker's twine, mini jingle bells, window sheets, mica flakes, shaker frames, dimensionals
Monday, November 7, 2011
Comfort and Joy Sparkle

Today's card was inspired by one I saw on the Hero Arts blog. I love this glimmer paper! It is so bright and sparkly! This is a super simple card but I really like the sparkle and shine to it! Thanks for stopping by and have a super day!
Card Recipe: Stamps- Word Play; Paper- Cherry Cobbler, Whisper White, silver glimmer paper; Ink- black StazOn, Cherry Cobbler; Accessories- designer oval frames embossing folder, Northern Frost decorative strip, extra large oval punch, circle fire rhinestone brads, dimensionals
Sunday, November 6, 2011
Charlie Brown Christmas Tree

Today's card is so simple that I almost feel guilty. I just love the Charlie Brown Christmas tree look. This tree doesn't exactly look like it but it has that feeling of being a little 'thin'. So I call this card my Charlie Brown Christmas tree card. Lol! I used a set that I haven't used in quite some time, Loads of Love. Not a lot to it, but I really like it! Thanks for stopping by and have a super day!
Card Recipe: Stamps- Loads of Love; Paper- Confetti White, Cherry Cobbler; Ink- Always Artichoke, Accessories- Cherry Cobbler baker's twine, mini jingle bells, dimensionals
Saturday, November 5, 2011
Christmas Doily Wreath

Lately I have been inspired by cards and projects I see on the Hero Arts blog. And I decided to make a few of them using Stampin' Up! products. So they had a card that used a doily stamp for a wreath. I thought, how clever! So I pulled out my doily stamps and made a wreath, too! I stamped the doily stamp (from Delicate Doilies) onto Crumb Cake with Always Artichoke ink. Then I punced out the center with the 1 1/4" circle punch and then cut around it. Then I sponged some Always Artichoke ink around the edges to make it a little more green (I also sponged some ink on the inside of the wreath). Then I tied a bow with Cherry Cobbler seam binding ribbon and adhered it to the top of the wreath. The wreath is popped up onto a square of Crumb Cake which is adhered to a square of Cherry Cobbler which is then popped up onto a card base of Crumb Cake. I stamped the greeting in Crumb Cake and rounded the bottom corners of my card base. The final thing I did was to add the "berries" to the wreath. I used by sharpie pen and colored a few rhinestones before adhering them to the wreath. All in all a pretty simple card! Thanks for stopping by and have a most wonderful day!
Card Recipe: Stamps- Four the Holidays, Delicate Doilies; Paper- Crumb Cake, Cherry Cobbler; Ink- Always Artichoke, Crumb Cake; Accessories- Cherry Cobbler seam binding ribbon, rhinestones, 1 1/4" circle punch, sponge, dimensionals
Friday, November 4, 2011
SFF 110411
Good Friday morning! Time for another super fun sketch challenge at Sketch Frenzy Friday! This week's sketch is brought to us by Tina Taves. Take a look!

Clean and simple! Love it! I wasn't exactly sure which direction to go (too many possibilities). But here is what I came!

I kept my card very simple - just like the sketch. I started with a card base of Confetti Cream. The strip is a piece of Soft Suede with a piece of designer paper from the Spice Cake pack. I took a piece of Confetti Cream and used my Soft Suede, Pear Pizzazz and River Rock markers and colored onto the stamp from the Always Thankful stamp set. After stamping it, I used the 2 1/2" circle punch to punch it out. This is adhered to a piece of Soft Suede that was die cut using the Perfect Pennants die. Then I stamped the greeting from the same set in Soft Suede onto Confetti Cream and punched it out with the oval punch. I glued it to the circle and then popped both of them up onto the card. My final touch was to add a small flower that was punched from More Mustard using the itty bitty shapes punch pack. Then I added a pearl.
Be sure to click 'here' to see what Jennifer did with this sketch. Keep going through the tour to get inspired! Then I hope you will play along and make your own creation using this sketch. Be sure to upload it to the Sketch Frenzy Friday blog so that we can all take a look! Thanks for stopping by and have a super day!
Card Recipe: Stamps- Always Thankful; Paper- Confetti Cream, Soft Suede, More Mustard, Spice Cake designer paper; Ink- Soft Suede, Pear Pizzazz, River Rock; Accessories- Perfect Pennants die, itty bitty shapes punch pack, 2 1/2" circle punch, ovals punch, oval punch, dimensionals
Thursday, November 3, 2011
CCMC 174
Good morning everyone! It's Thursday and time for another super fun challenge at Create with Connie and Mary! This week they are challenging us with a great sketch. Check it out!

And here is what I came up with!

I went in a little different direction. I wanted to try to make a poinsettia. I have seen several different ways to make these and a lot of different inspiration using products from many different companies. So I combined several and came up with this! I used the blossom builder punch for mine and turned the petals so they were more pointy on the ends. First, my card base is Cherry Cobbler. The three strips are also Cherry Cobbler with strips of Basic Black that were punched with the dotted ribbon scallop punch peeking out. My flagged horizontal piece is Very Vanilla with the greeting from Teeny Tiny Wishes stamped in black StazOn. For the poinsettia I punched twelve of the longer petal from the Newsprint designer paper. I sponged those with Crumb Cake. I arranged six of them on a 1 1/4" circle using glue dots. Then I took the other six and staggered them over the first six using dimensionals. Then I punched eight of the smaller petals from the Newsprint designer paper and sponged them with Crumb Cake. I arranged four of them using glue dots and then staggered the remaining four with glue dots. Then I used the Boho Blossoms punch and punched the two smaller flowers from the Newsprint designer paper and sponged those with Crumb Cake. These are adhered to the middle of the poinsettia with glue dots. Then I took some Cherry Cobbler ink and lightly sponged it over the whole piece. I took three pieces of Always Artichoke seam binding ribbon and flagged one end. The other end is adhered with glue dots to the back of the poinsettia and the whole piece is adhered to the card. For the final touch, I add three pearl to the center of the poinsettia. I hope that I explained all of that so that it makes sense.
I now encourage you to visit the Create with Connie and Mary site to see what the other designers did with this sketch. I know you will be inspired by their work! Then make your own wonderful creation using the sketch and upload it to their site. I always love to see how you all interpret the sketch! Thanks for stopping by and have a super day!
Card Recipe: Stamps- Teeny Tiny Wishes; Paper- Cherry Cobbler, Basic Black, Very Vanilla, Newsprint designer paper; Ink- black StazOn, Crumb Cake, Cherry Cobbler; Accessories- Always Artichoke seam binding ribbon, blossom builder punch, boho blossoms punch, dotted ribbon scallop punch, pearls, sponge, dimensionals
Wednesday, November 2, 2011
LNS 145

Speaking of Thanksgiving, the LNS challenge this week was to make a project for the upcoming holiday. It seems like after Halloween we start thinking about Christmas but forget Thanksgiving in between. So I decided to pull out this stamp set that I had gotten, Always Thankful. I love the images in this set but hadn't used this one yet. So I cut a circle using my circle scissors (I am getting much better at using it) from Confetti White card stock and stamped the image in black StazOn. Then I water colored the image with various inks. The edges were sponged with River Rock and another circle was cut with the circle scissors out of Soft Suede. It is glued flat to a piece of Confetti white and the greeting (also from the same set) is stamped in Soft Suede. I wrapped a piece of Soft Suede taffeta ribbon around it and then popped up the panel onto a Confetti White card base. Pretty easy! Thanks for stopping and have a super day!
Card Recipe: Stamps- Always Thankful; Paper- Confetti White, Soft Suede; Ink- black StazOn, Soft Suede, Basic Gray, Pool Party, More Mustard, River Rock, Pear Pizzazz, Sahara Sand; Accessories- Soft Suede taffeta ribbon, circle scissors plus, aqua painter, sponge, dimensionals
Tuesday, November 1, 2011
CFC 26

Today's card was for the LNS challenge last week which was to create projects using leaves and/or trees. I wanted a different color combination so I looked at my Color Coach and this is what I found - Always Artichoke, Cajun Craze and Perfect Plum. Perfect Plum, really? But then I remembered a tree that we had at our last house. It was a Purple Autumn Ash. I loved that tree! The leaves turned the deepest purple in the fall. It was beautiful! So here it is on my card! I like the way it all came together! I also used the sketch at CAS-ual Fridays to get me going. Thanks for stopping by and have a super day!
Card Recipe: Stamps- Autumn Splendor, Grateful Greetings; Paper- Confetti Cream, Always Artichoke; Ink- Always Artichoke, Cajun Craze, Perfect Plum; Accessories- neutrals buttons, linen thread, piercer, dimensionals
Subscribe to:
Posts (Atom)