Monday, February 28, 2011

February Upscale


Good Monday morning, everyone! Can you believe that it is the last day of February? It's a great day for my son as he gets his braces off today! He is so excited!! But now I get to worry even more! He will have a retainer!!! AAAACCCK! I am so worried that he will lose it. And these things aren't cheap! I have threatened his life if he loses it! He is 11 after all. And if you could see his room, you would be as worried - lol! So I will be praying everyday that he will be responsible with his retainer. I am going to ask the orthodontist if there might be a way to cement it in. Yeah, I really don't think there is, either. Anyway, it will be a great day!

Today's card is one that I did a while ago. It was for a recent swap I was in and the swaps have been mailed back out to us so I thought it might be safe to show. I really like the way this one turned out. Again, it is my "safe" colors - Crumb Cake, Basic Black and Very Vanilla! This is actually a pretty simple card. Thanks for stopping by and enjoy the last day of February!

Card Recipe: Stamps- Bliss; Paper- Crumb Cake, Very Vanilla, Basic Black; Ink- Basic Black, Crumb Cake, Very Vanilla craft; Accessories- Very Vanilla seam binding ribbon, Tulip Frame embossing folder, Lots of Tags sizzlets, scallop edge border punch, basic rhinestones, sponges, dimensionals

Sunday, February 27, 2011

SASC 80


Good Sunday morning! Are you having a great weekend? We are! Nick and some other boys from the soccer team are helping the coach out today so I will take him to that and then hopefully spend some with my friend, Becky, and do some serious stamping! That should be fun!

Today's card was inspired by Stampin' Addicts sketch challenge. This is an older sketch but I liked it. I also wanted to use my new set, Clearly For You. I haven't used it much and decided that I was going to use it somehow. Be sure to check back later in the week for more ideas! I also decided I wanted to use some different colors! I think it turned out rather nice! Everything is sponged in Crumb Cake. But the colors I used were Very Vanilla, Cherry Cobbler, Old Olive, and the butterfly is stamped in Daffodil Delight. Thanks for stopping by and have a super day!

Card Recipe: Stamps- Clearly for You; Paper- Very Vanilla, Cherry Cobbler, Old Olive; Ink- Cherry Cobbler, Old Olive, Daffodil Delight, Basic Black, Crumb Cake; Accessories- Very Vanilla taffeta ribbon, Framed Tulip embossing folder, basic rhinestones, large wide oval punch, sponge, dimensionals

Saturday, February 26, 2011

SC 321


Good morning, Friends! I hope that you are all enjoying your weekend! It looks like we will have a fairly quiet one around here but that's o.k. with me! It is so dreary outside! And the wind is blowing! Yuck! It is supposed to continue through tomorrow and then next week looks pretty sweet!! Nick has a basketball game this afternoon and was supposed to have baseball practice but I think that will probably get cancelled as it is raining.

Well, a few days ago I told you that I was on a Crumb Cake, Very Vanilla and Basic Black mode. And here is another card! I love how it turned out and these colors are some of my favorites. And I love the designer paper which has all those colors in it. I am addicted!! The First Edition designer paper has like four sheets of each design. Well, I wouldn't really call it a design as it is just dictionary/encyclopedia type paper. But four sheets of each!! I won't run out of this for a while!! Lol! I am trying to find other colors to use for cards but it is hard! Anyway, the sketch at Splitcoast stampers looked like a super fun one, so I tried it out. I was going to use the Bliss set from Sale-a-bration but the butterfly was just a little too small for me. So, I dug out the Great Friend set. I haven't used this one in a while and I think it is perfect for this card! Anyway, if you have any questions please e-mail me. I would be happy to answer them! Thanks for stopping by and have a super day!

Card Recipe: Stamps- Great Friend; Paper- Crumb Cake, Basic Black, Very Vanilla, First Edition designer paper; Ink- Basic Black Crumb Cake, Very Vanilla craft ink; Accessories- Basic Black satin ribbon, linen thread, basic pearls, corner rounder, Framed Tulip embossing folder, sponges, dimensionals

Friday, February 25, 2011

SFF 022511

Good morning everyone and TGIF!! I know I am glad it is Friday! And the last Friday of February to boot! WOW! This month really went by quickly!! Just means spring is close behind and I can't wait!!

Sketch Frenzy Friday has another wonderful sketch challenge for us! Today's sketch is brought to us by Tammy Fite. Isn't it great?! Lots of possibilities!

I wanted to use my Sew Suite stamp set. It's new to me and I want to get the most out of it! Besides, it is such a fun set! So I started with a card base of Tangerine Tango and then used another piece of Tangerine Tango that was cut down just a bit to mount all of the other pieces onto. I used the Sweet Stitches designer paper and those pieces were mounted to a piece of Chocolate Chip. I wrapped a piece of Very Vanilla seam binding ribbon around this. Then I stamped the greeting from A Word for You on Very Vanilla with Chocolate Chip and punched it out with the extra large oval punch (the bottom of the oval is chopped off so when it was tucked behind the ribbon it wouldn't show). Then I stamped the pin cushion and the spool on Very Vanilla with Chocolate Chip ink and gave them some color with a blender pen. These were popped up onto the card. Then I added a Chocolate Chip button from the big designer buttons pack with some Very Vanilla seam binding ribbon. And that's it! I had a lot of fun making this card!

So now you are ready to go and see what Jennifer did with this fun sketch! Be sure to click your way through the tour to get inspired. And then make your project to upload to the Sketch Frenzy Friday blog so we can all see, too! I can't wait to see what you do with this sketch! Have a super day!

Card Recipe: Stamps- Sew Suite, A Word for You; Paper- Tangerine Tango, Very Vanilla, Chocolate Chip, Sweet Stitches designer paper; Ink- Chocolate Chip, Tangerine Tango; Accessories- Very Vanilla seam binding ribbon, Sweet Stitches big designer buttons, oval punch, dimensionals

Thursday, February 24, 2011

CCMC 139

Good morning, Friends! I can't believe that we are down to the last few days of February! This month has definitely flown by! Only two more weeks til Spring Break. But will spring actually come? I hope so! So today is another great Thursday challenge with the Create with Connie and Mary team! Are you ready?!


This week Connie and Mary found a fabulous cake to inspire us! Isn't it gorgeous?! I just love the bright colors! And they really pop off the white-ness of the cake! So that is what I went with for my card. I also liked the swirls on the cake (it might be hard to see them since they are white, too). So, for my card I started with a Whisper White card base and die cut another piece of Whisper White with the Lattice die and glued it to the card. Then I used my new Fun Flowers die (from the Occasions mini catalog) and die cut the flowers using Melon Mambo and Daffodil Delight. I actually cut more from other colors too, but decided to stick to just two colors. I sponged the edges of the flowers with their coordinating inks. Then I found a Whisper White button and threaded a skinny strip of Basic Black cardstock through the holes and carefully curled the ends. I had to do this part several times as I kept tearing the cardstock - lol! But I finally got it. This is popped up onto the card. Finally, I took a small strip of Whisper White cardstock and stamped the greeting from the level 3 hostess set, Occasional Quotes and glued it to the card.

Now it's your turn! Make sure to check out the rest of the design team at Create with Connie and Mary to see how they were inspired. Then go and make your project to share with us. I can't wait to see what you do with this cake inspiration challenge!

Card Recipe: Stamps- Occasional Quotes; Paper- Whisper White, Basic Black, Melon Mambo, Daffodil Delight; Ink- Basic Black, Melon Mambo, Daffodil Delight; Accessories- Neutrals buttons, lattice die, sponge, dimensionals

Wednesday, February 23, 2011

SSSC 105


Good morning, Friends! I can't believe we are mid-way through the week already! It is really going by fast and we will be into March by this time next week! I think spring may really come! They still predict snow but mainly for the mountains. That, I can handle. Our mountains need the snow. And we could use the rain down here. But I am ready for it to warm up a little. Looks like my little guy might be staying home from school today. He says he doesn't feel good. Hmmm.... And the update on the fugitive is that they still haven't found him. But they don't believe him to be in the area. I do hope that is true!

Today's card was inspired from a sketch I got from Karen Giron. I used to be very good about doing her sketches every week. And then I don't know what happened. But I looked her up again to see if I could come up with something and here it is! Be sure to check out her blog for the sketch. It is easy and fun! And I got to use my new stamp set and coordinating designer paper! Did you see the detail on the measuring tape? That way cool and clever idea came from Connie Babbert! Thanks for stopping by and have a super day!

Card Recipe: Stamps- Sew Suite, A Word for You; Paper- Wild Wasabi, Daffodil Delight, brushed silver, shimmery white, Sweet Stitches designer paper; Ink- Basic Black, Black StazOn, Chocolate Chip, Daffodil Delight; Accessories- Daffodil Delight narrow taffeta ribbon, Chocolate Chip big designer button, 3" circle die, aqua painter, dimensionals

Tuesday, February 22, 2011

TSSC 162


Good morning! It is early around here as I have to get Nick to the dentist before school starts. What was I thinking? Oh, yea. He won't have to miss school if we do it early. Well, maybe missing school wouldn't have been such a bad idea? LOL! And then last night we got two reverse 911 calls! So I got NO sleep! Apparently there was a car-jacking in our little town of Fruita and the thieves ended up out in the country just 8 miles from us. At this point one is still on the loose. Yikes! I hope they catch him real soon!!

Today's card is one I made yesterday. I used Mary Jo's lunchtime sketch. I haven't done a sketch of hers in a while and I wanted to participate. I also got this set just last week and was wanting to use it. It is really cute! And I think my card turned out nice, too. Well, gotta go! Thanks for stopping by!!

Card Recipe: Stamps- Sew Suite, A Word For You; Paper- Basic Black, Whisper White, Sweet Stitches designer paper; Ink- Basic Black, Daffodil Delight, Melon Mambo; Accessories- blender pen, scallop trim border punch, black brad, dimensionals

Saturday, February 19, 2011

Control Freak Birthday Tour

Note: If you are visiting before the 20th, some of the blogs may not be quite ready for you to visit. So be sure to check back!

Hello, Friends! It is the 20th of the month (already) and that means that the Control Freaks have a fabulous blog tour ready for you! I haven't participated in the last few and I really missed it. So I was ready to be in on it this month. This month's theme is everything birthday! If you are starting here, be sure to click all the way through the tour to get inspired! If you have come here from Jenn Smith's blog, then you are in the right place, too!

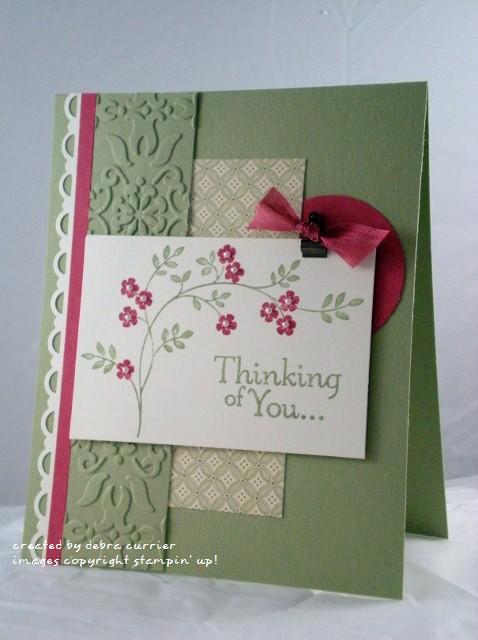
I wanted something bright and fun to do up my birthday projects with and the first thing that came to me was the Ice Cream Parlor designer paper and accents from the SAB catalog! It is full of wonderful bright colors and the best part is that the pack can be yours FREE! Be sure to ask your demonstrator how to get it! So this first picture is an overall look at my projects.


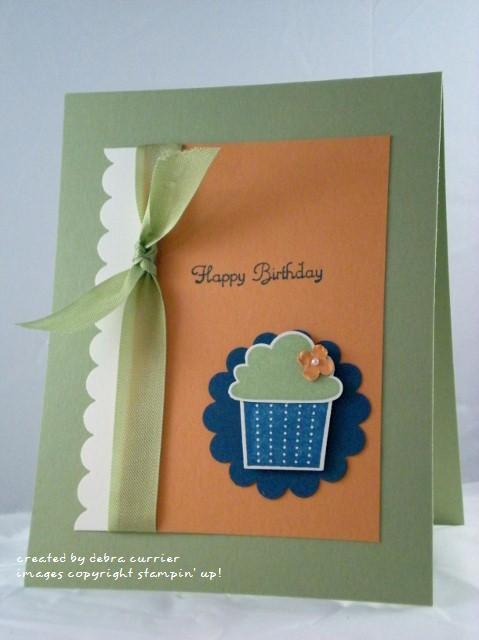
My first project is a card. No birthday is complete without a birthday card. I used a card base of Pacific Point, then a layer of Whisper White and strips of the Ice Cream Parlor designer paper. I also used the Create a Cupcake stamp set and the coordinating punch. Add a few punches and some Old Olive ribbon and there you have a fun, bright, cheery birthday card!


For my second project I made a gift card holder. If you are like me, you might find yourself needing a last minute gift and you don't have time to go shopping. So you go to your local movie theater and get a gift card! Everyone likes the movies, right? Anyway, gift cards are a great thing to give to the birthday person. There are many different types of gift card holders but this is what I came up with. Again, I used Pacific Point, Whisper White, Melon Mambo and the Ice Cream Parlor designer paper. I also finished it off with a strip of the new Melon Mambo pompom trim! Too fun!! The stamped image comes from the Bring on the Cake stamp set.


Here is an inside view of the gift card holder.


And last, but not least, here is a gift box that I made. Complete with a bow. I have had this pattern for a L O N G time!!! When I was looking for ideas I came across it and thought I might resurrect it. I think it turned out pretty cute! I made the box and lid from Pacific Point cardstock and the bow is made from two pieces of the Ice Cream Parlor designer paper. I also used some of the accent pieces to decorate the box. Then I stamped an image from the Bring on the Cake stamp set and tied it to the bow of the box.


We won't look inside because I had to glue the bow to the box. Plus there is nothing in there. But something really fun could fit inside! Great gifts come in small packages!! LOL!!

So that's it for me! I hope that you got some inspiration and are ready to party!! You will be visiting Melanie's blog next! Thanks for stopping by and have a super day!

Friday, February 18, 2011

SFF 021811


TGIF!! And welcome, Friends, to another Sketch Frenzy Friday challenge! Today's sketch is brought to us by Tammy Baldwin!

I decided to take the 'color block' approach to this sketch. That's the first thing that popped into my head when I saw this sketch. I love the look of color blocking. And it is so easy! I do hope you all will forgive me but I seem to be in a mode of Crumb Cake, Very Vanilla and Basic Black. I just love these colors together and you will probably see a lot more of it around here - lol! Hopefully I will venture out into some other colors, too. But Stampin' Up! makes it so easy for me with their designer papers! For my card I started with a card base of Crumb Cake. I did sponge the edges of the card with Crumb Cake. Then I took a piece of Basic Black and layered onto that another piece of Crumb Cake that had gone through the Big Shot with the Vintage Wallpaper embossing folder, a piece of Newsprint designer paper and a piece of Very Vanilla that has an image stamped in Crumb Cake and the greeting in Basic Black. I tied a piece of Basic Black narrow taffeta ribbon around the Crumb Cake piece and all were sponged with Crumb Cake before they were glued down. The tower was stamped in Basic Black on a scrap piece of Very Vanilla and cut out. This is popped up. I also added three black brads and the Basic Black panel is also popped up.

So there you have it! Time for me to send you on to Jennifer's blog to see how she used this week's sketch. Be sure to take the complete tour to get inspired and then make your project based on this sketch and upload it to the Sketch Frenzy Friday blog so we all can see and be inspired! I can't wait to see what you do! Thanks for stopping by and have a super day!

Card Recipe: Stamps- Artistic Etchings; Paper- Crumb Cake, Very Vanilla, Basic Black, Newsprint designer paper; Ink- Crumb Cake, Basic Black; Accessories- Basic Black narrow taffeta ribbon, black brads, Vintage Wallpaper embossing folder, sponge, dimensionals

Thursday, February 17, 2011

CCMC 138


Good morning, Friends! I hope that you are all ready to take on a fabulous sketch challenge! Today at Create with Connie and Mary, there is a fabulous sketch challenge going on! Don't you love it?

For my card I started with a card base of Pear Pizzazz. Then I added a layer of designer paper from the Springtime Vintage pack. Behind this is a 1 3/4" circle punched from Rose Red cardstock. For my strip down the left side I punched a piece of Very Vanilla with the scallop trim border punch. On top of that I added a piece of Pear Pizzazz that I ran through the Big Shot using the Vintage Wallpaper embossing folder. I also added a strip of Rose Red. For my focal point I stamped the vine and flowers stamp from Thoughts & Prayers in Pear Pizzazz and Rose Red markers and the greeting (from the same set) in Pear Pizzazz. I then decided to add a mini library clip with a piece of Rose Red seam binding ribbon tied around it. This is popped up. The last thing I did was to add a tiny pearl to each flower center. And there you have it! So is it spring yet???

Be sure to check out the Create with Connie and Mary site for more information on this challenge and to see what the rest of the design team came up with for this sketch. I do hope that you will find time to participate in this fun challenge! I can't wait to see what you come up with!

Card Recipe: Stamps- Thoughts & Prayers; Paper- Pear Pizzazz, Rose Red, Very Vanilla, Springtime Vintage designer paper; Ink- Pear Pizzazz, Rose Red; Accessories- Rose Red seam binding ribbon, mini library clips, scallop trim border punch, 1 3/4" circle punch, Vintage Wallpaper embossing folder, basic pearls, dimensionals

Wednesday, February 16, 2011

SAB - Bliss


Good morning, Friends! Wow! I can't believe that we are half way through the week already! My husband and I were just talking about our son's sports practices being outside starting in just a few weeks! Nick is so excited to be practicing outdoors again. He keeps telling us it's boring practicing indoors. Lol! The weather is warming up nicely and the sun is coming up a little earlier and staying up a little later! Ahhh! I think spring is coming!!!

Today's card is a 'tweak' from a swap card that I made. I will show you the actual swap card later this month, but I thought this one turned out quite nice, too. I made this as a made-n-take for a recent demonstrator meeting. I also did it in my stamp club this month. It has gotten a lot of mileage!! And it really is pretty simple! Thanks for stopping by and have a super day!

Card Recipe: Stamps- Bliss; Paper- Crumb Cake, Basic Black, Very Vanilla; Ink- Crumb Cake, Basic Black; Accessories- Crumb Cake seam binding ribbon, scallop edge punch, Lots of Tags sizzlets, basic rhinestones, sponge, dimensionals

Tuesday, February 15, 2011

Birthday Cupcake


Good morning everyone! I hope you all haven't given up on me. It seems it was my turn to get the flu bug. There are so many different strains of the flu. Mine didn't have the stomach flu, for which I am thankful! Mine seemed to settle right into my sinuses. I had a severe migraine behind my eyes for four days! My husband took me to the doctor and he gave me some antibiotics. It still took a while for them to work but progress is being made! I have been lots better for a few days but I sure do get tired easily! Now I just seem to have the nagging cough that lingers on forever. Ugh! Anyway, I am glad to be up and around. Now to get my house back in order (laundry, dishes). But I also hope to get back to stamping!

Today's card is one that I quickly came up with yesterday for my stamp club. I actually got the layout idea from my talented friend, Sherry! It is very simple and I love the colors! I wanted to showcase the cupcake stamp set and the coordinating punch. Too fun! I think the club ladies liked it, too. Thanks for stopping by and have a super day!

Card Recipe: Stamps- Create a Cupcake; Paper- Pear Pizzazz, Peach Parfait, Not Quite Navy, Very Vanilla; Ink- Not Quite Navy, Pear Pizzazz; Accessories- Pear Pizzazz seam binding ribbon, scallop circle punch, build a cupcake punch, scallop edge punch, itty bitty shapes punch pack, dimensionals

Thursday, February 10, 2011

CCMC 137


Good morning, Friends! We are coming close to ending another week! But I need to tell you about the challenge at Create with Connie and Mary!


This week they have a color challenge for us! Aren't these colors beautiful? And they remind me of spring but that I have to wait for - bummer. And just in case you can't read the color names, they are Rose Red, Pink Pirouette, Pear Pizzazz and Baja Breeze. These are some really great colors to put together!

So for my card I decided to use the Baja Breeze as my base card. I chose to use the textured cardstock. Then I took some textured Rose Red cardstock and made a tag by clipping the top corners and tying a piece of linen thread at the top. This is layered onto the card with dimensionals. Then I took the Build a Blossoms stamp set and stamped one of the images onto Whisper White cardstock and punched them out using the Blossom Petals punch. Then I took two other images from the same set and did the two-stamp thing to make the leaves. These I cut out as it was easier for me. I put the petals onto a 1/2" circle so they would stay together and then stamped yet another image from this set and punched it out with the 1/2" circle punch. To this I added an itty bitty button with some linen thread. The flower is attached to the tag with dimensionals. Then I used the dotted scallop ribbon border punch to punch a Pink Pirouette piece. To this I layered a sliver of a Pear Pizzazz piece. Then I went to my Teeny Tiny Wishes stamp set and found the 'Thank You' stamp and stamped in on a scrap of Whisper White. I punched it out with the 3/4" x 15/16" oval punch (which is a carry over item from the Holiday mini catalog). The oval is glued to the center of the tag.

So there it is! Time for you to check out the rest of the super talented design team to see what they did with these colors. You can find all their creations at Create with Connie and Mary. Then create your own project and upload it to their site. I can't wait to see what you do! Thanks for stopping by!

Card Recipe: Stamps- Build a Blossom, Teeny Tiny Wishes; Paper- Baja Breeze, Rose Red, Pink Pirouette, Pear Pizzazz, Whisper White; Ink- Pink Pirouette, Rose Red, Pear Pizzazz; Accessories- Blossom Petals punch, dotted scallop ribbon border punch, 1/2" circle punch, 3/4" x 15/16" oval punch, linen thread, itty bitty buttons, dimensionals

Friday, February 4, 2011

SFF 020411


Good morning, Friends! TGIF! Right? That's what my son was saying today as he didn't have school. And it was nice to be able to sleep in.


Well, Sketch Frenzy Friday has another wonderful sketch for us to try out! This is another one that is right up my alley! Clean and simple and easy! Love it! This week's sketch is brought to us by Ros Davidson.

First off, I decided to flip the sketch keeping the border at the bottom instead of the side. So I started off with a Whisper White card base. Then I took a slightly smaller piece of Melon Mambo and ran that through the Big Shot with the Perfect Polka Dots embossing folder and glued it to the front of the card. Then I took another smaller piece of Whisper White cardstock and scalloped the bottom with the scallop edge punch and rounded the corners at the top. I stamped the image from Love You Much in black StazOn. Then I used a blender pen with Melon Mambo and Old Olive ink to color it in. I tied a Pretty in Pink satin ribbon around it and attached it to the card with dimensionals. Then I punched a Melon Mambo and a Pretty in Pink flower with the itty bitty shapes punch pack. I scrunched up the Pretty in Pink one and attached them to the card and added a pearl. Done!

Time for you to go see what Jennifer did with this week's sketch! And after you have made the tour be sure to create your project using this sketch and upload it to the Sketch Frenzy Friday blog! I can't wait to see what you do! Thanks for stopping by!

Card Recipe: Stamps- Love You Much; Paper- Whisper White, Melon Mambo; Ink- Black StazOn, Melon Mambo, Old Olive; Accessories- Pretty in Pink satin ribbon, corner rounder, scallop edge punch, itty bitty shapes punch pack, blender pen, Perfect Polka Dots embossing folder, basic pearls, dimensionals

Thursday, February 3, 2011

CCMC 136


Good morning, Friends! WOW! Can you believe that we are already into February? It continues to amaze me how time flies by!


So, today is the Thursday challenge at Create with Connie and Mary. And I am so excited because it is a sketch challenge! Isn't it fabulous? I can really see so many possibilities with it! I have a workshop coming up and will have to use this sketch again.

So for my card I started with a Whisper White card base. The designer paper is from the Love Impressions pack and is glued to a piece of Basic Gray. This is then glued to another piece of Whisper White (which is slightly smaller than the card base). Then I wrapped a piece of Whisper White organza ribbon around that to mimic the three stripes on the sketch. I thought it worked perfectly!! Then for my focal point I punched a circle from Whisper White using my 2 1/2" circle punch. For the scallop border, I punched a bunch of 1/2" circles from Real Red cardstock and glued them to the back. This can be a little time consuming but I didn't have a scallop circle to fit behind the white circle. So I improvised! This is then popped up onto the card. Then I took a scrap of Real Red and Basic Gray and die cut the letters from the Simple Alphabet dies. These get popped up on the circle. To finish it off I stamped the greeting from Teeny Tiny Wishes in Real Red and added three little rhinestones. Done!

O.k. Now it is time for you to admire the work of the rest of the most talented design team! So, head on over to Create with Connie and Mary to see it all and then create your wonderful project to post so we can all see! Thanks for stopping by and have a super day!

Card Recipe: Stamps- Teeny Tiny Wishes; Paper- Whisper White, Real Red Red, Basic Gray, Love Impressions designer paper; Ink- Real Red; Accessories- Whisper White organza ribbon, 2 1/2" circle punch, 1/2" circle punch, Simple Letters dies, basic rhinestones, dimensionals

Tuesday, February 1, 2011

Simple Thank You


Good morning everyone! I hope that your first day of February was great! I know a lot of school districts around the country had the day off due to a lot of snow. We still have school because we do not have any snow. And that is o.k. with me. However, we are freezing around here! The temperature is in the teens and there is quite a wind blowing outside which makes it even colder! So it is nice to have a fire going on inside!! And in a little while, I get to have a massage! Ahhhh!! She always has the blankets so nice and warm!

Today's card was one that I started for a sketch challenge. But then, as I got going, it turned into something quite different and I never entered it into the challenge because it was so different than the original sketch - lol! But I really liked the way it turned out! And it is really easy! I got to use the new Tulip Frame embossing folder. And the way I found easiest to use is to emboss a piece of cardstock and then cut around it and glue it to your card. It was really hard for me to get it straight when I tried to emboss the entire card. You may get it straight but I sure couldn't. And when you look at my card you really can't tell that I did it that way. Cool! Thanks for stopping by and have a super day!

Card Recipe: Stamps- Just Believe; Paper- Always Artichoke, Very Vanilla, Vintage Springtime designer paper; Ink- Always Artichoke; Accessories- Always Artichoke seam binding ribbon, silver brads, Tulip Frame embossing folder, dimensionals