Showing posts with label Petite Pairs. Show all posts

Thursday, October 23, 2014

CCMC 326

Hello everyone! It's time for another fun challenge from the Create with Connie and Mary team! This week we are being challenged with color! Take a look at these fabulous colors!


 Mossy Meadow, Lost Lagoon and Silver! I was thinking that I could use them for a Christmas card but I wanted to use my Four Feathers set so this is what I came up with!


  • Card base is Whisper White
  • Adhere a strip of the All is Calm designer paper to the card base (this piece has silver foil dots on the paper which is hard to see from the photo)
  • Use the Project Life corner rounder to round the two right hand side corners of a piece of Lost Lagoon and then adhere to card
  • Run a piece of Whisper White card stock through the Big Shot using the Decorative Dots embossing folder and adhere to card with dimensionals
  • Stamp the feather images from Four Feathers onto Whisper White using Mossy Meadow and Lost Lagoon then cut out using the Feathers framelits dies and adhere to card with dimensionals
  • Stamp the greeting from Petite Pairs onto a piece of Whisper White using Lost Lagoon ink and punch out using the small oval punch then adhere to card with dimensionals
  • Tie a bow with a piece of silver baker's twine and adhere to card
Be sure to check out the wonderful creations from the other designers at the Create with Connie and Mary site! By the way, we are well into week 2 of the Holiday Edition!! Have you seen the fantastic projects that have been shared? Oh my!! It's not to late to sign up and see everything that has been shared! Don't miss out on all the fun! Thanks for stopping by and have a super day!


Card Recipe: Stamps- Four Feathers, Petite Pairs; Paper- Whisper White, Lost Lagoon, All is Calm designer paper; Ink- Mossy Meadow, Lost Lagoon; Accessories- Project Life corner rounder, Decorative Dots embossing folder, Feathers framelits, small oval punch, silver baker's twine, dimensionals


Sunday, August 31, 2014

The Stamp Review Crew: Mosaic Madness


Hello everyone! And welcome to another Stamp Review Crew blog hop! It's been quite a while since I have participated in one of these! This time around we are featuring the stamp set Mosaic Madness. You may have arrived from Shana's inspiring blog. However you got here you can take the entire tour by clicking the "next" button below to be taken to the next blog! By doing so you will make a full circle and will get to see everyone's wonderful creations using this set!

The goal of The Stamp Review Crew is to use sets that may otherwise get neglected with all the hype of the new products from mini catalogs that are being released. And I have to say that I really like that! I got this set and loved on it for a while and now it tends to get shoved to the back of the shelf in search of newer products. Pool Mosaic Madness - lol! So it was fun to pull it out and think of what I could do...


I decided to go a little glitzy! This is a very easy card with lots of gold details! I hope you are inspired! Here are the details:

  • Card base is Very Vanilla
  • Adhere a piece of Very Vanilla to a piece of gold foil paper
  • Adhere a piece of striped gold foil vellum to the panel and then adhere this to the to the card base with dimensionals
  • Punch a strip of gold foil paper with the scallop edge border punch then adhere to card
  • Stamp the two mosaic images from Mosaic Madness using gold Encore ink onto a piece of Very Vanilla and emboss with gold emboss powder
  • Stamp the sentiment from Petite Pairs onto the panel using Tuxedo Black Momento ink
  • Adhere panel to a piece of Basic Black card stock and then adhere to card with dimensionals
  • Thread some gold baker's twine through a gold basic metal button and tie a bow then adhere to card
Time to send you on to see what Mike Funke has created for you! Thanks for stopping by and have a super day!

Card Recipe: Stamps- Mosaic Madness, Petite Pairs; Paper- Very Vanilla, Basic Black, gold foil paper, gold foil designer vellum; Ink- gold Encore, Tuxedo Black Momento ink; Accessories- gold baker's twine, scallop edge border punch, gold basic metal button, dimensionals


Tuesday, July 22, 2014

CAS(E) This Sketch #85

Good morning, Friends! I hope your week is off to a great start! It's really hot around here so staying indoors makes great sense to me! Today should be a day of doing laundry. We'll see how much I get done - lol! And I need to stamp some more. Just can't seem to find my mojo on that. So I guess I will just keep working!

Today's card was inspired by the sketch at CAS(E) This Sketch. Very clean and simple! I used the colors from the Lullaby designer paper. 

  • Card base is Baked Brown Sugar
  • Stamp the line image from Mosaic Madness in Baked Brown Sugar onto the card base
  • Stamp the mosaic shape four times onto Coastal Cabana using Coastal Cabana ink and punch out using the mosaic punch
  • Adhere the four shapes onto the card using dimensionals
  • Stamp the little shape four times onto Whisper White using Hello Honey ink and cut out
  • Adhere these little shapes to the inside of the bigger shapes with glue dots
  • Add rhinestones to centers
  • Stamp the greeting from Petite Pairs onto the card base using Baked Brown Sugar
  • Add another rhinestone
Thanks for stopping by and have a super day!

Card Recipe: Stamps- Mosaic Madness, Petite Pairs; Paper- Baked Brown Sugar, Coastal Cabana, Whisper White; Ink- Baked Brown Sugar, Coastal Cabana, Hello Honey; Accessories- Mosaic punch, rhinestones, dimensionals

Monday, June 30, 2014

Simple Vase

Hello everyone! Here is a super simple card! But I do love it! Hope you do, too!!

  • Card base is Island Indigo
  • Scallop the top of a piece of Whisper White with the scallop edge border punch
  • Stamp the vase and stem image from the Pictogram Punches stamp set in Wild Wasabi onto the punched piece and stamp again onto another piece of Whisper White with Pool Party ink and cut the vase out
  • Adhere the Pool Party vase over the Wild Wasabi vase
  • Stamp the greeting from Petite Pairs onto the panel with Island Indigo ink
  • Tie a piece of Pool Party 1/4" cotton ribbon around panel and adhere to card with dimensionals
  • Punch three flowers from Crushed Curry ink with the itty bitty accents punch pack and adhere to card
  • Add rhinestones to flower centers
Thanks for stopping by and have a super day!


Card Recipe: Stamps- Pictogram Punches, Petite Pairs; Paper- Island Indigo, Crushed Curry, Whisper White; Ink- Pool party, Wild Wasabi, Island Indigo; Accessories- Pool Party 1/4" cotton ribbon, scallop edge border punch, itty bitty accents punch pack, rhinestones, dimensionals

Thursday, May 29, 2014

CCMC 305

Good morning, Friends! I am so sorry it's been a while since I have posted. I suddenly ran out of time for making cards before my parents got here. I actually have been making cards but they are for specific design editions. I will be back at it soon enough so hang in there - lol! Today is another challenge from the Create with Connie and Mary team! This week we have a sketch to play with. Take a look!


A super fun sketch and here's what I did!


I went a little regal with this! 

  • Card base is Very Vanilla
  • Round the corners of a piece of gold foil card stock and adhere to a piece of Very Vanilla
  • Adhere a piece of gold designer vellum then adhere panel to card base is dimensionals
  • Adhere a strip of gold sequins to card
  • Stamp the flower image from Flower Shop in black StazOn onto Rich Razzleberry and punch out with the pansy punch
  • Punch two stems from Old Olive card stock using the Bird builder punch and adhere branches to back of flower then adhere to card with dimensionals
  • Stamp greeting from Petite Pairs onto Very Vanilla using black StazOn ink and punch out with the oval punch and adhere to card
  • To make the pearls the gold color, I rubbed them in the gold Encore ink pad and then adhere them to the flower center
Be sure to visit Create with Connie and Mary to see what the rest of the fabulous designers did with this sketch! I hope you will join us this week and play along! We always are inspired by what you do! Thanks for stopping by and have a super day!

Card Recipe: Stamps- Flower Shop, Petite Pairs; Paper- Very Vanilla, Rich Razzleberry, Old Olive; gold foil card stock, gold designer vellum; Ink- black StazOn, gold Encore; Accessories- Bird builder punch, Pansy punch, pearls, corner rounder, gold sequin trim, oval punch, dimensionals

Wednesday, April 16, 2014

Vivid Smiles

Good morning, Friends! I'm up early and it looks like Nick will be going back to school today! Yeah!! Now to get him caught back up on all his missing work. Ugh! Not going to be easy for someone that does not enjoy school all that much anyway. A little at a time. And I need to get some work done today, too! So I am looking forward to a very productive day!

Today's card is one that I did with my stamp club this month. A fairly simple card!

  • Card base is Pool Party
  • Adhere a strip of Crisp Cantaloupe
  • Stamp the vases image from Vivid Vases single stamp (I stamped this image without the words) in black StazOn onto Whisper White
  • Cut out the image with the Banners framelits dies
  • Color image with a blender pen and Crisp Cantaloupe, Pool Party, Summer Starfruit, Pistachio Pudding and Sahara Sand markers
  • Adhere stamped image to card with dimensionals
  • Stamp greeting from Petite Pairs in black StazOn onto Whisper White and punch out with oval punch
  • Use the scallop oval punch to punch shape from Basic Black card stock and adhere to stamped greeting to this then adhere to card
  • Add rhinestone to flower center and two to card base
Thanks for stopping by and have a super day!

Card Recipe: Stamps- Vivid Vases, Petite Pairs; Paper- Pool Party, Crisp Cantaloupe, Basic Black, Whisper White; Ink- black StazOn, Crisp Cantaloupe, Summer Starfruit, Pool Party, Pistachio Pudding, Sahara Sand; Accessories- Banners framelits, scallop oval punch, oval punch, blender pen, rhinestones dimensionals

Tuesday, April 8, 2014

Flat and Fabulous

Good morning, Friends! I hope your week is off to a fabulous start! It's been hard having to get up early after having spring break! I do love having the routine and having the house back to myself again, though! Seems like I can get a lot more done! March Madness was a lot of fun this year! And last night's game was really exciting! I am looking forward to seeing the Women's final game, too! 

Today's card was one that I did for a swap I was in recently. It was the Control Freaks swap and the theme was Flat and Fabulous. Our hostess wanted cards that could be mailed without extra postage but still have the "wow" factor. And this is the card that I came up with!

  • Card base is Crisp Cantaloupe
  • Adhere a piece of Pool Party to card base
  • Adhere a piece of Basic Black to card
  • Stamp the Hardwood background stamp onto a piece of Sahara Sand using Sahara Sand ink and then adhere to card
  • Flag both ends of a strip of Basic Black and adhere to card
  • Flag one end of a small strip of Crisp Cantaloupe and adhere to card
  • Punch a circle from Whisper White using the 2 1/2" circle punch
  • Use the Essentials paper piercing pack to pierce just inside the circle
  • Stamp the greeting from Petite Pairs in black StazOn then adhere circle to card with dimensionals
  • Stamp the flower image from Flower Shop with Crisp Cantaloupe onto a piece of Crisp Cantaloupe and punch out with the Pansy punch
  • Cut a stem from Pistachio Pudding using the Little Leaves sizzlet and adhere to back of flower then adhere to card with dimensionals
  • Punch a small flower from Pool Party using the itty bitty shapes punch pack and adhere to flower center
  • Add a Basic Black candy dot to flower center
There you have it! Thanks for stopping by and have a fabulous day!

Card Recipe: Stamps- Petite Pairs, Flower Shop, Hardwood; Paper- Crisp Cantaloupe, Pool Party, Basic Black, Sahara Sand, Pistachio Pudding, Whisper White; Ink- black StazOn, Crisp Cantaloupe, Sahara Sand; Accessories- 2 1/2" circle punch, Essentials paper piercing pack, Pansy Punch Little Leaves sizzlet, itty bitty punch pack, Neutrals candy dots, dimensionals

Saturday, March 29, 2014

Gold Dot Birthday

Good morning, Friends! Are you all ready for a great weekend? Looks to be a beautiful day around here! I am so loving these warmer spring like days! Nick is loving his two weeks of spring break, too! He has one more week of it and I know that he will not waste one minute of it - lol! I think that more mountain biking is in order this weekend. My son is trying to get me to go, too, and I just may try it this weekend. We will see…

Today's card was inspired by last week's sketch at Freshly Made. It's not my favorite but I wanted to try out some of the new designer foil vellum. I know that I am late to the party on this but I just finally "had" to have it! So I am enjoying using these products!! This was my first attempt at using the new vellum. 

  • Card base is Whisper White
  • Adhere a piece of the gold designer foil vellum to the top part of a piece of Whisper White (I put adhesive to the back of the vellum only where the gold dots are)
  • Punch a strip of Basic Black with the scallop edge border punch and adhere to panel
  • Stamp the greeting from Petite Pairs in black StazOn onto the panel
  • Tie a piece of the gold twine around the panel and adhere to a piece of Basic Black
  • Adhere panel to card base with dimensionals
That's all there is to it! Did you get a chance to take the Create with Connie and Mary Card "Create"tions Design Team blog hop yesterday? This special edition starts tomorrow! I hope to see you there! Thanks for stopping by and have a super day!


  • 3 weeks of FABULOUS card ideas - 18 different sets (not including our two Preview sets). 
  • Each SET is presented with 4 cards...for a total of 72 EXCLUSIVE card ideas NOT SEEN ANYWHERE ELSE!
  • Each Saturday we will each do a small favor as a bonus item using the same set we use during the week.   These WILL be displayed publicly but only subscribers will see the cards!
  • Featuring designers:  Melissa Davies, Debbie Henderson, Deb Currier, Nicole Tugrul, Connie Babbert, and Mary Brown
The Create with Connie and Mary Card Create-tions session starts TOMORROW and runs from March 30 thru April 19! Sign up today for only $19.95!!
Card Recipe: Stamps- Petite Pairs; Paper- Whisper White, Basic Black, gold designer foil vellum; Ink- black StazOn; Accessories- gold twine, scallop edge border punch, dimensionals

Sunday, March 9, 2014

Purple Pierced Sympathy

Hello everyone! Did you all get your clocks forwarded an hour? I am so happy that we left for Denver yesterday so that we could sleep in and not worry about getting up early to drive over the mountains. I feel pretty rested but it does seem strange to lose that hour. It will be nice to have more daylight, though! 

Today's card was created several weeks ago. Let's see if I remember how I did it - lol!

  • Card base is Whisper White
  • On a layer of Whisper White use the Occasions paper piercing pack to pierce and oval (might be kind of hard to see in the photo)
  • Stamp the greeting from Petite Pairs in Elegant Eggplant
  • Adhere layer to card with dimensionals
  • Cut two stems from Always Artichoke with the Little Leaves sizzlet and adhere them to the card
  • Punch three flowers from Wisteria Wonder using the Petite Petals punch
  • Punch three flowers from Elegant Eggplant using the itty bitty shapes punch pack and adhere these to the Wisteria Wonder flowers
  • Adhere layered flowers to card
  • Punch a butterfly from So Saffron using the Bitty Butterfly punch and adhere to card
  • Add pearls to flower centers and to butterfly
Thanks for stopping by and have a super day!

Card Recipe: Stamps- Petite Pairs; Paper- Whisper White, Always Artichoke, So Saffron, Wisteria Wonder, Elegant Eggplant; Ink- Elegant Eggplant; Accessories- Occasions paper piercing pack, Little Leaves sizzlet, Petite Petals punch, itty bitty shapes punch pack, Bitty Butterfly punch, pearls dimensionals

Saturday, February 15, 2014

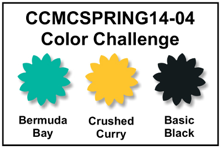
CCMC Spring 14-04

Good morning, Friends! I hope your weekend is off to a fabulous start! We are in Las Vegas this weekend for a soccer tournament! Today signals the last day of the Create with Connie and Mary Spring Collection. At the end of each week during the collection Connie and Mary provided a challenge for the public to play along with. Since this is the last day and the last challenge, this one is just for the designers to "show off" - lol! So we will show you all one last project using the fabulous products from the Celebrate the Everyday mini catalog and the SAB brochure. For this last challenge we have a color challenge. Take a look!


Bermuda Bay, Crushed Curry and Basic Black. Aren't these bold and fabulous!!! Love them!! Here's how I used them...


Card details:

  • Card base is Whisper White
  • Adhere a strip of Crushed Curry to card base
  • Adhere a strip of Basic Black that is flagged on both ends
  • Run a piece of Bermuda Bay through the Big Shot using the Decorative Dots embossing folder
  • Round the top right hand corner with the 1" circle punch then adhere to card with dimensionals
  • Use the Deco Labels framelits to cut the shape from Whisper White
  • Use the Essentials paper piercing pack to pierce a circle into the Deco Label then stamp the greeting from Petite Pairs in black StazOn onto the shape
  • Punch a circle from Basic Black using the 2 1/2" circle punch and adhere to card then adhere the Whisper White shape over the circle with dimensionals
  • Stamp the flower image from Petite Petals in Crushed Curry onto Crushed Curry card stock three times and punch out using the Petite Petals punch
  • Adhere flowers to card - two flowers are adhered to the shape and the third is adhered with dimensionals
  • Add three Basic Black candy dots to the flower centers
Be sure to see the other beautiful creations from the rest of the design team at Create with Connie and Mary! Thank you so much for stopping by! Have a super day!

Card Recipe: Stamps- Petite Petals, Petite Pairs; Paper- Whisper White, Bermuda Bay, Crushed Curry, Basic Black; Ink- black StazOn, Crushed Curry; Accessories- Decorative Dots embossing folder, 1" circle punch, Petite Petals punch, Neutrals candy dots, Deco Labels framelits, 2 1/2" circle punch, Essentials paper piercing pack, dimensionals

Thursday, January 23, 2014

CCMC 287

Good morning, Friends! It's time for another challenge at Create with Connie and Mary! This week we have a sketch! Take a look!


And my card...


I used some Sale-A-Bration products to make my creation. Here are the details…

  • Card base is Whisper White
  • Layer of Crisp Cantaloupe that was run through the Big Shot with the Decorative Dots embossing folder then adhered to card base
  • Strip of Sweet Sorbet designer paper that was flagged on both ends and then adhered to card
  • Cut an oval from Pool Party card stock with the Ovals framelits dies
  • Use the Occasions paper piercing pack to pierce holes then stamp the greeting from Petite Pairs in black StazOn and adhere to card to card with dimensionals
  • Stamp flower from Petal Parade in Summer Starfruit onto Whisper White and cut out then adhere to card with dimensionals
  • Tie a bow with a piece of white baker's twine and adhere to flower center then adhere a black candy dot over the bow center
  • Add three rhinestones
Be sure to visit the Create with Connie and Mary site to see what the rest of the designers did with this sketch! And don't forget to sign up for the Spring Collection! Thanks for stopping by and have a super day!


Card Recipe: Stamps- Petal Parade, Petite Pairs; Paper- Whisper White, Crisp Cantaloupe, Pool Party, Sweet Sorbet designer paper; Ink- Summer Starfruit, black StazOn; Accessories- Ovals framelits, Decorative Dots embossing folder, white baker's twine, Neutrals candy dots, Occasions paper piercing pack, rhinestones, dimensionals

Wednesday, January 15, 2014

CCMC Preview Project and Blog Candy!


Good morning everyone! I am so excited to bring you my preview project for the Create with Connie and Mary Spring Collection! Before I get to my project I would like to remind you of what the Spring Collection is all about!

  • 4 FABULOUS weeks filled with wonderful ideas featuring the products from the Occasions Mini and Sale-a-bration brochure!
  • One of these weeks...Card "Create"tions...24 cards seen ONLY by our subscribers
  • One of these weeks...it's a SALE-A-BRATION - projects feature the items from the Sale-a-bration brochure.
As with ALL of our collections...
  • Our projects are ONLY available to our subscribers...we never show the collection projects online (ONLY the Preview Projects are shown)
  • EACH project has a full downloadable PICTURE tutorial that continues all the information you need to recreate the project!
  • Less than $1 per project!
Spring Collection runs January 19th through February 15th!
Create with Connie and Mary
Spring Collection 2014

Only $24.95 US
Now on to my project! I have created a card set using the Vivid Vases single stamp. I love this stamp! So many wonderful things to do with it and I tried to show you all a few of them! Here is a group photo of the card set.

To see each card individually and to get a complete list of supplies and measurements, visit the Create with Connie and Mary website to download the FREE tutorial! And while you are there why not sign up for the Spring Collection! You will not be disappointed!

Now for the fun part!! I have blog candy to give away!! Leave me a comment TODAY to be entered into the drawing for a FREE subscription to the Create with Connie and Mary Spring Collection! 

Thanks for stopping by and have a super day!


Saturday, October 19, 2013

Crisp Layered Flowers

Good morning, Friends! I hope your weekend is off to a great start! We are in the Denver area for the last two soccer games of the season! Thankfully the roads were great and the moon shone gorgeous last night as we drove over! It was so beautiful the way the moon reflected off the snow on the mountain tops! The scenery was just as beautiful as it is during the day! Loved it! So here we are and tomorrow we will drive home and begin the week all over again! :)

Today's card was one I did with my stamp club this month. I love these colors together! Here are the details:

  • Card base is Baked Brown Sugar
  • Layer of Baked Brown Sugar that is run through the Big Shot with the Pretty Print embossing folder and then adhered to a layer of Crisp Cantaloupe
  • Tie a piece of Very Vanilla seam binding ribbon around the panel and pop up onto card
  • Stamp the flower from Mixed Bunch in Crisp Cantaloupe onto Crisp Cantaloupe and punch out with the Blossom punch
  • Stamp flower from Flower Shop in Crisp Cantaloupe onto Crisp Cantaloupe and punch out with the Pansy punch and adhere to bigger flower with dimensionals
  • Use the Little Leaves sizzle to cut leaves from Pistachio Pudding and cut apart then adhere to back of flowers and pop up onto card
  • Punch a flower from Soft Suede using the Boho Blossoms punch and adhere to flower center and add a large rhinestone
  • Stamp greeting from Petite Pairs in Soft Suede
I hope that you have been visiting the Create with Connie and Mary site everyday to see all the FREE tutorials that have been offered! And each day someone has been offering blog candy! Here are the details of the Winter Collection subscription.

 Create with Connie and Mary Winter Collection 2013
Save $5 with our EARLY BIRD PRICE - Only $24.95 US 
Regular $29.95 US
4 weeks of daily Christmas and Winter project ideas for decorating or gift giving that can be completed in about 2 hours...
perfect for classes and stamp camps!
*        Includes our popular Card "Create"tions Week...designers will feature six Christmas or Winter stamp sets with four cards using that set, over 24 exclusive card ideas! 
*        Also including one week of Last Minute Gift Ideas
*        Winter Collection runs October 20 - November 16
*        Features 2013-14 Holiday & Catalog Products
*        18 EXCLUSIVE projects AND 24 card ideas
*        See what we are all about during our FREE Preview Week October 13-19
*        Projects include step-by-step downloadable PHOTO tutorials
*        Fabulous Design Team
*        Saturday Creative Challenges for everyone
*        Projects only available to subscribers
*        Demonstrators & Customers welcome
Card Recipe: Stamps- Mixed Bunch, Flower Shop, Petite Pairs; Paper- Baked Brown Sugar, Crisp Cantaloupe, Pistachio Pudding; Ink- Crisp Cantaloupe, Soft Suede; Accessories- Very Vanilla seam binding ribbon, Pretty Print embossing folder, Blossom punch, Pansy punch, Little Leaves sizzlet, Boho Blossoms punch, large rhinestone, dimensionals

Saturday, September 21, 2013

CCMCFALL 13-04

Good morning, Friends! I can't believe this is the last Saturday challenge for the Create with Connie and Mary Fall Edition! I hope that you didn't miss out on all the fun! And I really hope you didn't miss out on all the wonderful and beautiful ideas that were shared! For this last week of the special edition Connie and Mary have provided a sketch challenge for just the designers. So here is the sketch we were provided with:

And here's my card:


I kept it pretty simple and kept the fall theme. Here are the details:

  • Card base is Sahara Sand with bottom corners rounded with corner rounder
  • Layer of Soft Sky with bottom corners rounded with corner rounder
  • On a panel of Whisper White, layer two pieces of Sweater Weather designer paper and stamp greeting from Petite Pairs in Chocolate Chip
  • Adhere panel to Soft Sky piece and pop up onto card
  • Stamp leaves from Wonderfall onto Whisper White in Crushed Curry and Tangerine Tango, cut out and pop up onto card
  • Tie some linen thread through a Naturals button and adhere to card
I hope you all have enjoyed the Create with Connie and Mary Fall Collection! Stay tuned for the Holiday Collection! More fun and beautiful creations are in store for you! Thanks for stopping by and have a fabulous day!

Card Recipe: Stamps- Wonderfall, Petite Pairs; Paper- Sahara Sand, Soft Sky, Whisper White, Sweater Weather designer paper; Ink- Chocolate Chip, Tangerine Tango, Crushed Curry; Accessories- linen thread, Naturals designer button, corner rounder, dimensionals

Saturday, September 7, 2013

CCMCFALL 13-02

Good morning, Friends! The Create with Connie and Mary Fall Collection week 2 has come to an end. This past week featured card sets! I do hope that you are a subscriber so that you could see all the fabulous card ideas and download the tutorials! If you aren't a subscriber can still sign up and see all the fabulous creations that the designers have come up with! My card set was featured this past week and I do hope you got to see it! At the end of each week, Connie and Mary offer a special challenge and this week it's a sketch challenge! Take a look!


Lots of fun with this one! I used a fall theme and here's what I created!


A fairly easy card but if you don't like cutting things out then using the coordinating die can make it all a little easier. I have an easier time cutting the leaves out than getting my stamping just right - lol! Anyway, here are the details:

  • Card base is Sahara Sand
  • Layer of Chocolate Chip
  • A layer of Sweater Weather designer paper is adhere to the Chocolate Chip and the greeting from Petite Pairs is stamped in Chocolate Chip
  • On Whisper White stamp the leaves from Wonderfall in Tangerine Tango, Crushed Curry and Soft Sky and cut out
  • Arrange leaves onto card and adhere together then pop up onto card
  • Fold a piece of Crushed Curry chevron ribbon in half and tie some linen thread around that and through a Naturals designer button then adhere to card
That's all there is to it! Be sure to check out the other fabulous creations at Create with Connie and Mary! Thanks for stopping by and have a super day!

Card Recipe: Stamps- Wonderfall, Petite Pairs; Paper- Sahara Sand, Chocolate Chip, Whisper White, Sweater Weather designer paper; Ink- Tangerine Tango, Crushed Curry, Soft Sky, Chocolate Chip; Accessories- Crushed Curry chevron ribbon, Naturals designer buttons, linen thread, dimensionals

Tuesday, August 27, 2013

Crushed Curry Maple

Good morning, Friends! I hope your week got off to a great start! Nick didn't have soccer practice yesterday so that made the evening a little more relaxing. He was able to get his homework done and we were able to celebrate Pat's birthday with a nice dinner prepared by our wonderful friend, Becky!! Yum!! And we were even able to watch our Rockies win!! Woohoo! I get my hair cut today. I think that I lost my focus yesterday and forgot to do some things that I had wanted to be sure to get done. Ooops!! So I guess I had better get that done first today! 

Today's card is one that I had done for a swap this month. I should be getting those back soon. I love how the bright maple leaf pops off the card! Reminds me of how the leaves look around here in Colorado during the fall. Here are the details:

  • Card base is Sahara Sand
  • On a layer of Sahara Sand stamp the splotches using the images from Gorgeous Grunge and Sahara Sand ink and stamp the greeting from Petite Pairs in Chocolate Chip
  • On a piece of Sweater Weather designer paper, stamp the splotches using Sahara Sand ink, sponge edges and adhere to panel
  • Adhere the panel to the card base
  • Stamp leaf image from Wonderfall in Crushed Curry onto Whisper White, cut out and pop up onto card
  • Tie a piece of linen thread around a strip of 7/16" Natural Trim and adhere to leaf
That's it! Pretty simple! Thanks for stopping by and have a super day!!

Card Recipe: Stamps- Wonderfall, Gorgeous Grunge, Petite Pairs; Paper- Sahara Sand, Whisper White, Sweater Weather designer paper; Ink- Sahara sand, Crushed Curry, Chocolate Chip; Accessories- 7/16" Natural Trim, linen thread, sponge, dimensionals

Monday, August 26, 2013

Mosaic Label

Good morning, Friends! Well, we made it back from Denver and now it's right back to "up and at 'em"!! Nobody wanted to get up after that long drive yesterday. But the drive was made better by the WIN we had!! Woohoo!! The boys played awesome and held their ground and it finally resulted in a win! Funny how the weather was sunny and quite warm where we were but it was apparently raining most of the day here at home. Now it is sticky and cool. It's my husbands birthday today so we get to have the famous chicken and noodle birthday dinner! I'm so excited!! Thanks, Becky!!

Today's card was inspired by a card I had pinned quite a while ago. I love the simplicity of it! Here are the details:

  • Card base is Smoky Slate
  • Stamp the border image twice in Smoky Slate (I used a stamp-a-ma-jig to help me)
  • From Whisper White cut the label shape using the Apothecary Accents framelits
  • Stamp greeting from Petite Pairs in Smoky Slate onto label and pop up onto card
  • Stamp mosaic image from Mosaic madness in Coastal Cabana onto Coastal Cabana, punch out using the mosaic punch and pop up onto label
  • Punch flower shape from Crushed Curry using the itty bitty shapes punch pack and adhere to mosaic
  • Add a rhinestone to flower center and two to the label
Super simple! Create with Connie and Mary Fall Collection 2013 has started! You can subscribe at any time and still receive all the tutorials that are being offered during this edition! Did you see if you were a winner for a free subscription? I hope to see you over there!! Thanks for stopping by and have a super day!

Card Recipe: Stamps- Mosaic Madness, Petite Pairs; Paper- Smoky Slate, Coastal Cabana, Crushed Curry, Whisper White; Ink- Smoky Slate, Coastal Cabana; Accessories- Apothecary Accents framelits, mosaic punch, itty bitty shapes punch pack, stamp-a-ma-jig, rhinestones, dimensionals

Tuesday, August 20, 2013

Framed Fall Leaves

Good morning, Friends! I think I am ready for the weekend already - lol! Nick's school has their Open House/Back to School Night tonight. I am looking forward to putting a face to the teacher's name. Other than that, it looks like a day to try and get caught up on things. 

Today's card is the last of the cards for my stamp club this month. I really liked the way this one came out! And it's not that hard! The frame can be easily made if you have the magnetic platform for the framelits dies. I don't have one, yet, but it would definitely have been easier!! Here are the card details:

  • Card base is Crumb Cake
  • On a layer of Crumb Cake, stamp the oak leaf image from Wonderfall in Cajun Craze, the splotches from Gorgeous Grunge in Crumb Cake, and the greeting from Petite Pairs in Early Espresso then sponge panel with Crumb Cake
  • Adhere layer onto Cajun Craze and then pop up onto card
  • Cut a frame using two of the labels framelits dies from Crumb Cake card stock, sponge inside and outside edges with Crumb Cake ink then pop up onto card
  • Stamp small leaf image in Always Artichoke onto Crumb Cake, cut out and adhere to frame
  • Tie a bow with some linen thread and use a glue dot to adhere to leaf then add a candy dot to the bow
There you have it! Fall will be here before we know it! 

So have you signed up for the Create with Connie and Mary Fall Collection 2013 yet? Here's the information once again. I don't want you to miss out on the Early Bird pricing!


What is the Create with Connie and Mary Fall Collection?
  • NEW card sets and projects that can be completed in about two hours...perfect for classes and camps?
  • FREE Preview Projects August 19 - 24 (so you can see what we're all about)!
  • Fall Collection runs August 24 - September 21
  • Features Holiday AND 2013-2014 Catalog Products
  • 24 EXCLUSIVE projects and 24 EXCLUSIVE cards
  • Step-by-step DOWNLOADABLE PHOTO tutorials
  • Only available to subscribers
  • Demonstrators and Customers welcome!
Create with Connie and Mary
Fall Collection 2013
Regularly $24.95 US


EARLY BIRD PRICE only $19.95 US

Card Recipe: Stamps- Wonderfall, Gorgeous Grunge, Petite Pairs; Paper- Crumb Cake, Cajun Craze; Ink- Early Espresso, Crumb Cake, Always Artichoke, Cajun Craze; Accessories- Labels framelits dies, linen thread, candy dots, sponge, dimensionals

Thursday, August 15, 2013

CCMC 264

Good morning, Friends! It's that time again! Create with Connie and Mary have another fabulous challenge for you! Check it out!


It's a beautiful color challenge! Blushing Bride, Pistachio Pudding and Smoky Slate! Check out how my card came together!


Love these colors together! I wanted to do something other than flowers but I could get flowers out of my head when these are so perfect for flowers - lol! So I used a card from the catalog to help me put this together. Here are the details:

  • Card base is Smoky Slate
  • Layer of Smoky Slate that was run through the Big Shot using the Modern Mosaic TIEF
  • A circle was punched using the 2 1/2" circle punch and then the layer was sponged with Smoky Slate ink
  • Pop up panel onto card base
  • Stamp flower from Flower Shop with Blushing Bride ink onto Whisper White and punch out with Pansy punch
  • Punch a flower from Blushing Bride card stock with the Blossom punch and sponge edges with Blushing Bride ink
  • Adhere flowers together with a dimensional
  • Punch leaves from Pistachio Pudding using the large oval punch and adhere to back of flowers
  • Adhere flowers to card with dimensionals
  • Stamp greeting from Petite Pairs in Smoky Slate onto a strip of Whisper White and flag the end
  • Adhere to card by tucking end under flowers
  • Add large rhinestone to flower center
There you have it!! Be sure to check out what the other designers did by going to the Create with Connie and Mary website! I hope you will be inspired to play along with us this week! Thanks for stopping by and have a super day!

Card Recipe: Stamps- Flower Shop, Petite Pairs; Paper- Smoky Slate, Blushing Bride, Pistachio Pudding, Whisper White; Ink- Smoky Slate, Blushing Bride; Accessories- Modern Mosaic TIEF, 2 1/2" circle punch, Pansy punch, Blossom punch, large oval punch, rhinestone, sponge, dimensionals