Saturday, August 31, 2013

CCMCFALL 13-01

Good morning, Friends! Have you been checking out the fabulous projects that are part of the Create with Connie and Mary Fall Collection? Oh MY!! They are just fantastic! If you are not a part of the subscription you can still join!! It's never too late! You can join now and still see ALL of the projects that have been offered this past week! I hope you will join us! 

At the end of each week during the special edition, Connie and Mary offer a challenge. This week they have a great color challenge! 


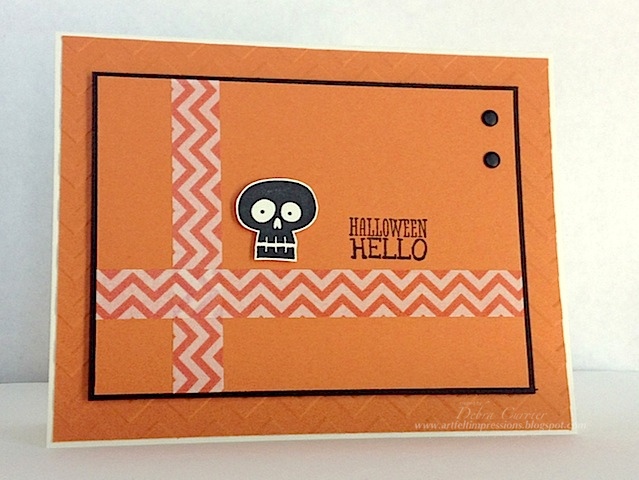
Pumpkin Pie, Summer Starfruit and Basic Black are colors that are found in the Witch's Brew designer paper. Week one of the Create with Connie and Mary Fall Collection is Halloween week. So I used the challenge colors along with the Witch's Brew designer paper to make a Halloween card!


A truly simple Halloween card that is easily mailable! Love this little bat from the Halloween Hello set!

  • Stamp bat image from Halloween Hello set onto a Pumpkin Pie card base three times
  • Punch a circle from Summer Starfruit and from a piece of the Witch's Brew designer paper using the 2 1/2" circle punch
  • Trim the designer paper down and adhere to the Summer Starfruit circle
  • Stamp greeting from Halloween Hello in black StazOn
  • Tie a piece of 1/8" Basic Black taffeta ribbon around the "seam" and pop up onto card
  • Stamp bat onto Very Vanilla card stock using black StazOn ink, cut out and pop up onto card
Check out the other creations from the fabulous designers at the Create with Connie and Mary website! And make sure to sign up for the Create with Connie and Mary Fall Collection! You won't be sorry!! Have a super day!

Card Recipe: Stamps- Halloween Hello; Paper- Pumpkin Pie, Summer Starfruit, Very Vanilla, Witch's Brew designer paper; Ink- black StazOn, Pumpkin Pie; Accessories- 1/8" Basic Black taffeta ribbon, 2 1/2" circle punch, dimensionals

Friday, August 30, 2013

SFF 083013

Good morning, Friends! Woohoo! It's Friday! And we don't have to travel for any games this weekend! In fact there are no games which means we get to have a super relaxing time at home!! And we have Monday off! I hope you all get to do something great this weekend! Today's Sketch Frenzy Friday sketch was created by ME!! 


I hope you like it as much as I do! Lots of possibilities with this one! I actually had a different idea in mind when I created the sketch but the washi tape was calling out to me and I thought it would work perfectly on this card. So here's what I came up with!


A super simple card! 

  • Card base is Very Vanilla
  • Adhere two strips of the Witch's Brew washi tape
  • Adhere a piece of the Witch's Brew designer paper to a piece of Basic Black card stock
  • Tie a piece of 1/8" Basic Black taffeta ribbon around this panel and pop up onto card
  • Stamp the candy image from Halloween Hello in black StazOn onto Pumpkin Pie card stock, cut out and pop up onto card
  • Ink the greeting using the Basic Black and Pumpkin Pie markers and stamp onto card
There you have it! Be sure to check out the other great creations at the Sketch Frenzy Friday blog! I hope you are inspired to play along with us this week! Have a super day!

Card Recipe: Stamps- Halloween Hello; Paper- Very Vanilla, Basic Black, Pumpkin Pie, Witch's Brew designer paper; Ink- black StazOn, Basic Black and Pumpkin Pie markers; Accessories- 1/8" Basic Black taffeta ribbon, Witch's Brew washi tape, dimensionals

Thursday, August 29, 2013

CCMC 266

Good morning, Stampers! Create with Connie and Mary have another super challenge for you all! This week we are being challenge with some beautiful colors! Take a look!


These colors just spoke "fall" to me! And the beautiful new Sweater Weather designer paper has these colors! Perfect! Here is what I came up with.


A pretty simple card! Here are the details:

  • Card base is Sahara Sand with the right hand corners rounded with the corner rounder
  • Stamp the splotches from Gorgeous Grunge in Tangerine Tango onto the card base
  • Adhere three strips of the Sweater Weather designer paper to the card base
  • Use the Oval framelits to cut two ovals from Sahara Sand
  • Use the Occasions paper piercing pack to pierce an oval on the larger one then sponge both ovals using Sahara Sand ink
  • Adhere the ovals together and pop up onto card
  • Stamp greeting from Teeny Tiny wishes in Chocolate Chip ink onto the card
  • Stamp the leaf from Wonderfall in Tangerine Tango onto Whisper White, cut out and pop up onto card
  • Tie a piece of linen thread around a piece of 7/16" Natural Trim and through a Naturals designer button then flag both ends of the trim
  • Adhere the element to the leaf
Be sure to visit the Create with Connie and Mary site to see what the other designers did with these colors! I hope you will be inspired to play along! Thanks for stopping by!

Card Recipe: Stamps- Teeny Tiny Wishes, Gorgeous Grunge, Wonderfall; Paper- Sahara Sand, Sweater Weather designer paper; Ink- Sahara Sand, Tangerine Tango, Chocolate Chip; Accessories- Ovals framelits, Naturals designer button, linen thread, 7/16" Natural trim, Occasions paper piercing pack, corner rounder, sponge, dimensionals


Wednesday, August 28, 2013

CAS(E) This Sketch 42

Good morning, Friends! Not much to report around here. Everything is status quo! Looks like a day to be creative! I hope your week is going great, too! Nick has soccer practice tonight but that's about it! We are looking forward to the long weekend!!

Today's card was inspired by the sketch at CAS(E) This Sketch. A fun and simple card! Here are the details:

  • Card base is Whisper White
  • On a layer of Whisper White I stamped the splotches from Gorgeous Grunge in Tangerine Tango, Bermuda Bay and Smoky Slate
  • After stamping I flagged the end of a piece of 3/4" Smoky Slate chevron ribbon and adhere it to the piece wrapping it around to the back
  • This panel is then popped up onto the card base
  • I stamped the chevron image from Oh, Hello in Smoky Slate (stamping off once) onto Whisper White and then the greeting in Bermuda Bay 
  • Punch out the greeting using the 1 3/4" circle punch
  • Adhere circle to a circle of Tangerine Tango that was cut using the Circles #2 die and then adhere to a scallop circle of Bermuda Bay that was punched with the 2 3/8" scallop circle punch
  • Pop up scallop circle onto card and add three rhinestones
Thanks for stopping by and have a super day!

Card Recipe: Stamps- Oh, Hello, Gorgeous Grunge; Paper- Whisper White, Bermuda Bay, Tangerine Tango; Ink- Smoky Slate, Tangerine Tango, Bermuda Bay; Accessories- 3/4" Smoky Slate chevron ribbon, 2 3/8" scallop circle punch, 1 3/4" circle punch, Circles #2 die, rhinestones, dimensionals

Tuesday, August 27, 2013

Crushed Curry Maple

Good morning, Friends! I hope your week got off to a great start! Nick didn't have soccer practice yesterday so that made the evening a little more relaxing. He was able to get his homework done and we were able to celebrate Pat's birthday with a nice dinner prepared by our wonderful friend, Becky!! Yum!! And we were even able to watch our Rockies win!! Woohoo! I get my hair cut today. I think that I lost my focus yesterday and forgot to do some things that I had wanted to be sure to get done. Ooops!! So I guess I had better get that done first today! 

Today's card is one that I had done for a swap this month. I should be getting those back soon. I love how the bright maple leaf pops off the card! Reminds me of how the leaves look around here in Colorado during the fall. Here are the details:

  • Card base is Sahara Sand
  • On a layer of Sahara Sand stamp the splotches using the images from Gorgeous Grunge and Sahara Sand ink and stamp the greeting from Petite Pairs in Chocolate Chip
  • On a piece of Sweater Weather designer paper, stamp the splotches using Sahara Sand ink, sponge edges and adhere to panel
  • Adhere the panel to the card base
  • Stamp leaf image from Wonderfall in Crushed Curry onto Whisper White, cut out and pop up onto card
  • Tie a piece of linen thread around a strip of 7/16" Natural Trim and adhere to leaf
That's it! Pretty simple! Thanks for stopping by and have a super day!!

Card Recipe: Stamps- Wonderfall, Gorgeous Grunge, Petite Pairs; Paper- Sahara Sand, Whisper White, Sweater Weather designer paper; Ink- Sahara sand, Crushed Curry, Chocolate Chip; Accessories- 7/16" Natural Trim, linen thread, sponge, dimensionals

Monday, August 26, 2013

Mosaic Label

Good morning, Friends! Well, we made it back from Denver and now it's right back to "up and at 'em"!! Nobody wanted to get up after that long drive yesterday. But the drive was made better by the WIN we had!! Woohoo!! The boys played awesome and held their ground and it finally resulted in a win! Funny how the weather was sunny and quite warm where we were but it was apparently raining most of the day here at home. Now it is sticky and cool. It's my husbands birthday today so we get to have the famous chicken and noodle birthday dinner! I'm so excited!! Thanks, Becky!!

Today's card was inspired by a card I had pinned quite a while ago. I love the simplicity of it! Here are the details:

  • Card base is Smoky Slate
  • Stamp the border image twice in Smoky Slate (I used a stamp-a-ma-jig to help me)
  • From Whisper White cut the label shape using the Apothecary Accents framelits
  • Stamp greeting from Petite Pairs in Smoky Slate onto label and pop up onto card
  • Stamp mosaic image from Mosaic madness in Coastal Cabana onto Coastal Cabana, punch out using the mosaic punch and pop up onto label
  • Punch flower shape from Crushed Curry using the itty bitty shapes punch pack and adhere to mosaic
  • Add a rhinestone to flower center and two to the label
Super simple! Create with Connie and Mary Fall Collection 2013 has started! You can subscribe at any time and still receive all the tutorials that are being offered during this edition! Did you see if you were a winner for a free subscription? I hope to see you over there!! Thanks for stopping by and have a super day!

Card Recipe: Stamps- Mosaic Madness, Petite Pairs; Paper- Smoky Slate, Coastal Cabana, Crushed Curry, Whisper White; Ink- Smoky Slate, Coastal Cabana; Accessories- Apothecary Accents framelits, mosaic punch, itty bitty shapes punch pack, stamp-a-ma-jig, rhinestones, dimensionals

Sunday, August 25, 2013

Grunge Hello

Good Sunday morning, Friends! I hope you are all having a fabulous weekend! We finally made it to Denver with no problems. We checked into our hotel and made our way to the field. When we got there it was lightning so we all had to wait about 45 minutes before we could even get out of our cars. But then the sky seemed to clear a bit and the game got underway. We played really, really good! But... the score didn't go our way - dang! And what was worse, the weather started getting bad about halftime. The lightning showed back up and then the rain started with about 5 minutes left. I ran back to the car and my husband and son followed after the rain. Boy were they soaked!!! So we have everything sitting out in the hotel room drying for today's game. Seems like it did dry out overnight - thank goodness! So we will see what today brings. Hopefully nice sunny weather and a WIN!!

Today's card was another experiment with the Gorgeous Grunge set. I love this one, too! I have been working so much with fall colors lately that I wanted something different so I came up with Crisp Cantaloupe, Strawberry Slush and Coastal Cabana! Here are the details:

  • Card base is Whisper White
  • Round the bottom corners with the 1" circle punch
  • Layer of Whisper White with bottom corners rounded with the 1" circle punch
  • On layer stamp the lines image from Gorgeous Grunge repeatedly using Strawberry Slush, Coastal Cabana, and Crisp Cantaloupe inks
  • Adhere stamped panel to card and add a strip of Coastal Cabana to hide the "seam"
  • Stamp greeting from Four You in Strawberry Slush
  • Punch a flower from Crisp Cantaloupe using the Blossom punch, sponge with Crisp Cantaloupe ink and pop up onto card
  • Stamp flower image from Flower Shop using Crisp Cantaloupe ink onto Whisper White, punch out with Pansy punch and pop up onto card
  • Punch flower center from Strawberry Slush using Boho Blossoms punch and adhere to flower center
  • Tie a bow with white baker's twine and adhere to flower center
  • Add large rhinestone to bow
Thanks for stopping by and have a great day! Keep checking the CCMC site to see if you're a winner!

Card Recipe: Stamps- Gorgeous Grunge, Four You Flower Shop; Paper- Whisper White, Crisp Cantaloupe, Strawberry Slush, Coastal Cabana; Ink- Strawberry Slush, Coastal Cabana, Crisp Cantaloupe; Accessories- Blossom punch, Pansy punch, Boho Blossoms punch, white baker's twine, large rhinestone, sponge, dimensionals

Saturday, August 24, 2013

A Grunge Meadow

Good morning, Stampers! First off I want to say a big THANK YOU to all of you who left very nice comments on my blog for Blog Candy on Wednesday! Thank you so much for enjoying the cards and downloading the FREE tutorial at Create with Connie and Mary! The winner will be announced tomorrow on their website so be sure to check there tomorrow to see if you are a winner of a free subscription! Good luck!! Also remember that Early Bird pricing ends today! Sign up now and save!

So we are supposed to be in Denver, watching our boys warm up for their game this morning but... A funny thing happened on the way to Denver... After school yesterday we packed up the car and went to gas up the car. As my husband was putting the gas in I was checking FaceBook to see the latest happenings. Well, I quickly found out that the Interstate was closed between here and Denver due to flooding. We had some very horrific rains (not at our house but in town) that had moved on and caused flooding in other areas! Anyway, some of our team got caught in the long line of cars that were trying to get turned around and some of us decided to wait it out at home (like us). While we waited the team manager and the coach were busy trying to get the game rescheduled because we had no way of knowing how long it would be before the Interstate opened. So now we are getting ready to leave, again, as the game has been rescheduled for tonight and then we have one tomorrow afternoon. So we'll try it again! What a start to the soccer season!! Lol!

Today's card was an experiment. It is pretty simple and I like the way it turned out! I am experimenting with the lines image from the Gorgeous Grunge set. You will see another one that I did later. Here are the details:

  • Card base is Whisper White
  • On a layer of Soft Sky, stamp the lines image from Gorgeous Grunge in Soft Sky
  • Over this, stamp the branch from Morning Meadow in Early Espresso
  • Sponge panel with Soft Sky ink and pop up onto card
  • Stamp bird image in Soft Sky onto Whisper White and cut out
  • Stamp greeting in Early Espresso onto strip of Whisper White and flag end
  • Adhere other end of strip to cut out bird and then pop up the element onto the card
  • Punch a flower from Blushing Bride using itty bitty shapes punch pack, adhere to bird and add a pearl
Thanks for stopping by and have a fabulous day!

Card Recipe: Stamps- Morning Meadow, Gorgeous Grunge; Paper- Whisper White, Blushing Bride, Soft Sky; Ink- Soft Sky, Early Espresso; Accessories- itty bitty shapes punch pack, pearl, sponge, dimensionals


What is the Create with Connie and Mary Fall Collection?
  • NEW card sets and projects that can be completed in about two hours...perfect for classes and camps?
  • FREE Preview Projects August 19 - 24 (so you can see what we're all about)!
  • Fall Collection runs August 24 - September 21
  • Features Holiday AND 2013-2014 Catalog Products
  • 24 EXCLUSIVE projects and 24 EXCLUSIVE cards
  • Step-by-step DOWNLOADABLE PHOTO tutorials
  • Only available to subscribers
  • Demonstrators and Customers welcome!
Create with Connie and Mary
Fall Collection 2013
Regularly $24.95 US


EARLY BIRD PRICE only $19.95 US

Friday, August 23, 2013

SFF 082313

Good morning, Friends! Woohoo! It's finally Friday! And the Sketch Frenzy Friday team has a fun sketch for us! Angela Walters is the creator for this week's sketch. Check it out!


Lots of possibilities with this one! The lines made me think washi tape! So here's what I came up with!


A very simple Halloween card that is very mailable! Here are the card details:

  • Card base is Very Vanilla
  • Layer of Pumpkin Pie that was run through the Big Shot using the Chevron embossing folder and then adhere to card base
  • On a layer of Pumpkin Pie adhere two strips of the Witch's Brew washi tape and stamp the greeting from Halloween Hello in black StazOn
  • Adhere this panel to a piece of Basic Black and pop up onto card
  • Stamp skull image in black StazOn onto Very Vanilla, cut out and pop up onto card
  • Add two Basic Black candy dots
Super simple! Be sure to visit the Sketch Frenzy Friday blog to see what the other fabulous designers came up with! I hope you will play along with us this week! We always love to see what you come up with! Thanks for stopping by and have a super day!

Card Recipe: Stamps- Halloween Hello; Paper- Very Vanilla, Pumpkin Pie, Basic Black; Ink- black StazOn; Accessories- Witch's Brew washi tape, Chevron embossing folder, Neutrals candy dots, dimensionals

Thursday, August 22, 2013

CCMC 265

Good morning, Friends! The Create with Connie and Mary team have a sketch challenge for us this week! Check it out!


What a fantastic sketch! Love that you can use scraps of designer paper for this! Here's what I came up with!


My card came together fairly quick as I had these two leaves stamped and cut out and just laying on my table waiting to be used! So that was my starting point! Here are the card details:

  • Card base is Sahara Sand
  • On a layer of Sahara Sand stamp the splotches from Gorgeous Grunge using Sahara Sand ink then run through the Big Shot using the Pretty Print embossing folder and adhere to card base
  • Cut three panels of Sweater Weather designer paper and pop up onto card
  • Stamp leaves from Wonderfall in Tangerine Tango and Crushed Curry onto Very Vanilla card stock, cut out and pop up onto card
  • Stamp greeting from Four You in Chocolate Chip onto a Very Vanilla strip, flag the end and adhere to card
  • Tie a bow on the back side of a Naturals button using linen thread and adhere to card
Pretty simple and a card that gets me thinking of fall! Be sure to see what the other wonderful designers did with this great sketch at the Create with Connie and Mary site! So much inspiration!!

Did you like my preview project for the Create with Connie and Mary Fall Collection 2013? I posted it yesterday! If you left a comment yesterday then be sure to check the Create with Connie and Mary site on Sunday to see if you won a FREE subscription! Remember that Early Bird pricing ends soon so don't delay! Check out what it's all about!


What is the Create with Connie and Mary Fall Collection?
  • NEW card sets and projects that can be completed in about two hours...perfect for classes and camps?
  • FREE Preview Projects August 19 - 24 (so you can see what we're all about)!
  • Fall Collection runs August 24 - September 21
  • Features Holiday AND 2013-2014 Catalog Products
  • 24 EXCLUSIVE projects and 24 EXCLUSIVE cards
  • Step-by-step DOWNLOADABLE PHOTO tutorials
  • Only available to subscribers
  • Demonstrators and Customers welcome!
Create with Connie and Mary
Fall Collection 2013
Regularly $24.95 US


EARLY BIRD PRICE only $19.95 US

Card Recipe: Stamps- Wonderfall, Four You, Gorgeous Grunge; Paper- Sahara Sand, Very Vanilla, Sweater Weather designer paper; Ink- Chocolate Chip, Sahara Sand, Tangerine Tango, Crushed Curry; Accessories- Pretty Print TIEF, Naturals buttons, linen thread, dimensionals

Wednesday, August 21, 2013

CCMC Fall Collection 2013 Preview Week and Blog Candy!


What is the Create with Connie and Mary Fall Collection?
  • NEW card sets and projects that can be completed in about two hours...perfect for classes and camps?
  • FREE Preview Projects August 19 - 24 (so you can see what we're all about)!
  • Fall Collection runs August 24 - September 21
  • Features Holiday AND 2013-2014 Catalog Products
  • 24 EXCLUSIVE projects and 24 EXCLUSIVE cards
  • Step-by-step DOWNLOADABLE PHOTO tutorials
  • Only available to subscribers
  • Demonstrators and Customers welcome!
Create with Connie and Mary
Fall Collection 2013
Regularly $24.95 US

EARLY BIRD PRICE only $19.95 US

Good morning, Friends! It's my day to show off a project for Preview Week of Create with Connie and Mary Fall Collection 2013! I have done a card set using the Halloween Hello. 


I am showing you the card set here. To see each individual card and to get the complete FREE step by step tutorial for each card, you will need to visit the Create with Connie and Mary site. 

I just love this Halloween set from the Holiday mini catalog! And all the coordinating products that go with this set are so much fun to use! I tried to use the Witch's Brew washi tape in unique ways. These cards are easily duplicated and great for mailing! 

Now are you ready for some blog candy? Yippee!! My blog candy is a FREE subscription to the Create with Connie and Mary Fall Collection 2013!! All you have to do to qualify is to leave me a comment. Easy, right? Just make sure to leave me a comment TODAY! I will be picking the winner from the comments that are left here today! The winner will be announced on the Create with Connie and Mary website on Sunday! Good luck everyone! Thanks for stopping by and have a super day!


Tuesday, August 20, 2013

Framed Fall Leaves

Good morning, Friends! I think I am ready for the weekend already - lol! Nick's school has their Open House/Back to School Night tonight. I am looking forward to putting a face to the teacher's name. Other than that, it looks like a day to try and get caught up on things. 

Today's card is the last of the cards for my stamp club this month. I really liked the way this one came out! And it's not that hard! The frame can be easily made if you have the magnetic platform for the framelits dies. I don't have one, yet, but it would definitely have been easier!! Here are the card details:

  • Card base is Crumb Cake
  • On a layer of Crumb Cake, stamp the oak leaf image from Wonderfall in Cajun Craze, the splotches from Gorgeous Grunge in Crumb Cake, and the greeting from Petite Pairs in Early Espresso then sponge panel with Crumb Cake
  • Adhere layer onto Cajun Craze and then pop up onto card
  • Cut a frame using two of the labels framelits dies from Crumb Cake card stock, sponge inside and outside edges with Crumb Cake ink then pop up onto card
  • Stamp small leaf image in Always Artichoke onto Crumb Cake, cut out and adhere to frame
  • Tie a bow with some linen thread and use a glue dot to adhere to leaf then add a candy dot to the bow
There you have it! Fall will be here before we know it! 

So have you signed up for the Create with Connie and Mary Fall Collection 2013 yet? Here's the information once again. I don't want you to miss out on the Early Bird pricing!


What is the Create with Connie and Mary Fall Collection?
  • NEW card sets and projects that can be completed in about two hours...perfect for classes and camps?
  • FREE Preview Projects August 19 - 24 (so you can see what we're all about)!
  • Fall Collection runs August 24 - September 21
  • Features Holiday AND 2013-2014 Catalog Products
  • 24 EXCLUSIVE projects and 24 EXCLUSIVE cards
  • Step-by-step DOWNLOADABLE PHOTO tutorials
  • Only available to subscribers
  • Demonstrators and Customers welcome!
Create with Connie and Mary
Fall Collection 2013
Regularly $24.95 US


EARLY BIRD PRICE only $19.95 US

Card Recipe: Stamps- Wonderfall, Gorgeous Grunge, Petite Pairs; Paper- Crumb Cake, Cajun Craze; Ink- Early Espresso, Crumb Cake, Always Artichoke, Cajun Craze; Accessories- Labels framelits dies, linen thread, candy dots, sponge, dimensionals

Monday, August 19, 2013

Skull Tag

Good morning, Friends! Here we are starting another week! The weather has warmed up again but I can still feel a little bit of fall in the air! My husband is really wanting fall to come early - lol! He works outdoors all summer long is currently really tired of the heat. But I think we got it pretty easy this year. Looks like I will have a day to finish up some stamping projects!

Today's card is one that I did with my stamp club last week. A pretty easy one that uses the washi tape a little differently. I was experimenting with it and kind of liked how it turned out! Here are the card details:

  • Card base is Very Vanilla
  • On a layer of Pumpkin Pie adhere a strip of the chevron Witch's Brew washi tape and then a strip of the script Witch's Brew washi tape right over the top and then adhere a piece of the Witch's Brew designer paper just above that
  • Adhere panel to a piece of Basic Black card stock and then pop up onto card
  • Make a tag from Very Vanilla card stock by using the 1 3/8" circle punch to round the top portion and flag the bottom
  • Stamp greeting from Halloween Hello in black StazOn and pop tag up onto card
  • Stamp skull image in black StazOn onto Very Vanilla, cut out and pop up onto tag
  • Use the circle punch from itty bitty shapes punch pack to punch a circle from Pumpkin Pie and adhere to tag
  • Add a Basic Black candy dot to punched circle
Very easy and very mailable! 

I hope you will join me for the Create with Connie and Mary Fall Collection 2013! Early Bird pricing ends this week! Don't delay! Mary has a super awesome project to share with you today during Preview Week! She is also offering blog candy!! Make sure to visit and see what it's all about!!


What is the Create with Connie and Mary Fall Collection?
  • NEW card sets and projects that can be completed in about two hours...perfect for classes and camps?
  • FREE Preview Projects August 19 - 24 (so you can see what we're all about)!
  • Fall Collection runs August 24 - September 21
  • Features Holiday AND 2013-2014 Catalog Products
  • 24 EXCLUSIVE projects and 24 EXCLUSIVE cards
  • Step-by-step DOWNLOADABLE PHOTO tutorials
  • Only available to subscribers
  • Demonstrators and Customers welcome!
Create with Connie and Mary
Fall Collection 2013
Regularly $24.95 US


EARLY BIRD PRICE only $19.95 US

Card Recipe: Stamps- Halloween Hello; Paper- Very Vanilla, Basic Black, Pumpkin Pie, Witch's Brew designer paper; Ink- black StazOn; Accessories- Witch's Brew washi tape, 1 3/8" circle punch, itty bitty shapes punch pack, candy dots, dimensionals 

Sunday, August 18, 2013

Hello, I'm a Guest Designer!!

Hello, everyone!! I am so excited to tell you that I am going to be a guest designer for the Create with Connie and Mary Fall Collection! I don't want to reveal anything about my project yet so you will have to come back here on Wednesday to get a hint of what my project will consist of. I will also have a fun surprise for you on that day!! I will have more information for you at the end of this post but if you just can't wait and want to sign up for early bird pricing then, by all means, click the link above and sign up!! You won't be sorry!!

Today's card is another one for my stamp club last week. I really liked the way this one turned out! I was going to put a small flower under the sentiment but then thought this could be a fun card for a guy! So I added two mini brads instead. Here are the details:

  • Card base is Very Vanilla
  • Layer of Etcetera designer paper that was sponged with Baked Brown Sugar and adhered to card base
  • Stamp oval chevron image from Oh, Hello set in Baked Brown Sugar onto Baked Brown Sugar and cut out using Ovals framelits
  • Use Essentials Paper Piercing pack and pierce around oval then sponge with Baked Brown Sugar and pop up onto card
  • Trim the ends of a strip of Night of Navy card stock at an angle and adhere to oval
  • Stamp greeting in Baked Brown Sugar onto Very Vanilla, punch out using 1 3/4" circle punch, sponge with Baked Brown Sugar, add two mini brads and adhere to oval
  • Punch the chevrons from Old Olive with the Chevron punch and adhere to strip
And there you have it!! Now for the details of the Create with Connie and Mary Fall Collection! Be sure to visit their site to see the reveal of the other guest designers! There will be surprises all week! So keep checking back! Oh, and don't forget to sign up during early bird pricing!!


What is the Create with Connie and Mary Fall Collection?
  • NEW card sets and projects that can be completed in about two hours...perfect for classes and camps?
  • FREE Preview Projects August 19 - 24 (so you can see what we're all about)!
  • Fall Collection runs August 24 - September 21
  • Features Holiday AND 2013-2014 Catalog Products
  • 24 EXCLUSIVE projects and 24 EXCLUSIVE cards
  • Step-by-step DOWNLOADABLE PHOTO tutorials
  • Only available to subscribers
  • Demonstrators and Customers welcome!
Create with Connie and Mary
Fall Collection 2013
Regularly $24.95 US

EARLY BIRD PRICE only $19.95 US

Card Recipe: Stamps- Oh, Hello; Paper- Very Vanilla, Night of Navy, Old Olive, Baked Brown Sugar, Etcetera designer paper; Ink- Baked Brown Sugar; Accessories- Ovals framelits, Chevron punch, Essentials paper piercing pack, mini brads, 1 3/4" circle punch, sponge, dimensionals

Saturday, August 17, 2013

Epic Butterfly

Good morning, Friends! Well, I guess it would be late morning! Ahhh!! It felt so good to sleep in this morning! It has been a long week! But I think that Nick has had a good first week of school and while school is not his thing, he is enjoying it and says he likes all of his teachers! And that's what I am very happy to hear!! Next weekend we will be in Denver for the start of the fall soccer season! Here we go! 

Today's card is one that I did with my stamp club last week. Here are the details:

  • Card base is Basic Grey
  • Layer of Calypso Coral with a layer of Epic Day designer paper adhered to the bottom portion
  • Add a strip of Epic Day washi tape to the top part of the designer paper then tie a piece of Basic Grey stitched grosgrain around the panel
  • Use a corner rounder to round the bottom corners
  • Stamp greeting from Sweet Essentials onto the Calypso Coral part in Basic Grey and pop panel up onto card
  • Cut shape from Basic Grey using the Apothecary Accents framelits and pop up onto card
  • Flag both ends of a strip of Gumball Green card stock and adhere to label
  • Punch a butterfly from Daffodil Delight using Elegant Butterfly punch and one from Pool Party using Bitty Butterfly punch
  • Adhere butterflies together and then to card
  • Add two rhinestones to butterfly body
Not a lot of stamping on this one! Thanks for stopping by and have a super day!

Card Recipe: Stamps- Sweet Essentials; Paper- Basic Grey, Calypso Coral, Gumball Green, Daffodil Delight, Pool Party, Epic Day designer paper; Ink- Basic Grey; Accessories- Basic Grey stitched grosgrain ribbon, Epic Day washi tape, corner rounder, Apothecary Accents framelits, Elegant Butterfly punch, Bitty Butterfly punch, rhinestones, dimensionals

Friday, August 16, 2013

SFF 081613

Good morning, Friends! School has been in session for a whole week now! Wow! It's good to be in a routine again! This week's Sketch Frenzy Friday sketch was created by Tammy Fite. Take a look!


I love this sketch but I kind of drew a blank when I went to do my card. So I will be trying this one again. Here's what I came up with.


Definitely a great sketch to use up some of those scraps of dsp!! I don't really have scraps of this dsp right now but I wanted to use some of the new products from the Holiday mini catalog. Here are the card details:

  • Card Base is Pumpkin Pie
  • On a layer of Very Vanilla, adhere pieces of designer paper from the Witch's Brew designer paper pack
  • Stamp greeting from Halloween Hello in black StazOn
  • Adhere panel to a piece of Basic Black and then pop up onto card
  • Add rhinestones
Super, super simple!! Be sure to check out the Sketch Frenzy Friday blog to see all the other creations! I would love to see what you do with this fun sketch! Thanks for stopping by and enjoy your day!

Card Recipe: Stamps- Halloween Hello; Paper- Pumpkin Pie, Basic Black, Very Vanilla, Witch's Brew designer paper; Ink- black StazOn; Accessories- rhinestones, dimensionals

Thursday, August 15, 2013

CCMC 264

Good morning, Friends! It's that time again! Create with Connie and Mary have another fabulous challenge for you! Check it out!


It's a beautiful color challenge! Blushing Bride, Pistachio Pudding and Smoky Slate! Check out how my card came together!


Love these colors together! I wanted to do something other than flowers but I could get flowers out of my head when these are so perfect for flowers - lol! So I used a card from the catalog to help me put this together. Here are the details:

  • Card base is Smoky Slate
  • Layer of Smoky Slate that was run through the Big Shot using the Modern Mosaic TIEF
  • A circle was punched using the 2 1/2" circle punch and then the layer was sponged with Smoky Slate ink
  • Pop up panel onto card base
  • Stamp flower from Flower Shop with Blushing Bride ink onto Whisper White and punch out with Pansy punch
  • Punch a flower from Blushing Bride card stock with the Blossom punch and sponge edges with Blushing Bride ink
  • Adhere flowers together with a dimensional
  • Punch leaves from Pistachio Pudding using the large oval punch and adhere to back of flowers
  • Adhere flowers to card with dimensionals
  • Stamp greeting from Petite Pairs in Smoky Slate onto a strip of Whisper White and flag the end
  • Adhere to card by tucking end under flowers
  • Add large rhinestone to flower center
There you have it!! Be sure to check out what the other designers did by going to the Create with Connie and Mary website! I hope you will be inspired to play along with us this week! Thanks for stopping by and have a super day!

Card Recipe: Stamps- Flower Shop, Petite Pairs; Paper- Smoky Slate, Blushing Bride, Pistachio Pudding, Whisper White; Ink- Smoky Slate, Blushing Bride; Accessories- Modern Mosaic TIEF, 2 1/2" circle punch, Pansy punch, Blossom punch, large oval punch, rhinestone, sponge, dimensionals

Wednesday, August 14, 2013

Framed Shop

Good morning, Friends! Man, it is getting so hard to get up this early in the mornings! I can't wait for the weekend when I will be able to sleep in a little! Nick has an orthodontist appointment and then soccer practice tonight. As for me, I need to finish up some design work for next week and then try to work ahead on some design work. I hope I can get a lot accomplished today! My legs are itching to get out for a run but I am still sore from the last one. I may have to postpone that for tomorrow. 

Today's card is another that was created for a display. I think that you can guess that my display was about the Notable Notions set and the Shop Around wheel. Love the vintage look of these images! I am not very good at vintage and so I was thankful for the challenge! I think this one was my favorite! Here are the card details:

  • Card base is Baked Brown Sugar
  • On card base, use Baked Brown Sugar marker and a ruler to draw a "frame"
  • Layer of Baked Brown Sugar that was sponged with Baked Brown Sugar ink then popped up onto card
  • A second layer of Baked Brown Sugar that was stamped with the Shop Around jumbo wheel in Baked Brown Sugar and then adhere to card
  • Stamp tag image onto Very Vanilla in Basic Grey, cut out and also cut out center part of tag
  • Use glue dots to adhere a folded piece of 7/16" Trim behind tag and then pop tag up onto card so that it frames one of the adds (I chose to frame the Queen ad)
  • Stamp sentiment from Bring on the Cake in Baked Brown Sugar onto a strip of Very Vanilla and flag one end
  • Tuck the other end of the sentiment behind the tag and adhere to card
  • The button was made with the Simply Pressed Clay and the Buttons and Blossoms mold then colored with a Calypso Coral marker
  • Tie a piece of linen thread through the button and adhere to card
  • Finish it off with a large pearl at the tag top
Thanks for stopping by and have a super day!

Card Recipe: Stamps- Notable Notions, Bring on the Cake, Shop Around jumbo wheel; Paper- Baked Brown Sugar, Very Vanilla; Ink- Baked Brown Sugar, Calypso Coral, Basic Grey; Accessories- 7/16" Trim, Simply Pressed Clay, Buttons and Blossoms mold, linen thread, large pearls, sponge, dimensionals

Tuesday, August 13, 2013

Thank You Tag

Good morning, Friends! Well the first day of school seemed to go great for Nick yesterday! But today he is really dragging his feet! I think he is wore out already - lol! After school yesterday we went to get his hair cut and then to find a guitar for his beginning guitar class. He put some of his own money toward one so he could get one that he likes. And I am glad it worked out that way! I am excited for him to learn how to play and he seems to be really excited about it, too! A sports guy that will have some musical ability, too! And then today after school we will need to get a few more school supplies for some of his classes. I think he is going to have a super year! I am still having a hard time getting used to this routine - lol!

Today's card was another one that I had made for a display. A very simple card!! I am pretty sure that I had used a sketch but now I can't remember which one it was. Here are the details:

  • Card base is Pool Party
  • Layer of Baked Brown Sugar and then a layer of Pool Party
  • On the layer of Pool Party the tag stamp from Notable Notions was stamped in Pool Party as well as the buttons (these were stamped off once) and then the layer was sponged with Pool Party ink
  • The two layers were adhered together and then I used a clip from the Hardware Clips Essentials
  • Pop up this panel onto card base
  • Stamp greeting from Morning Meadow in Baked Brown Sugar onto a strip of Very Vanilla and flag both ends
  • Strip is popped up onto card
  • Button is made from Simply Pressed Clay and the Buttons and Blossoms mold
  • I sponged the button with Baked Brown Sugar ink and tied some linen thread through it and adhered it to the card
  • I added a Very Vanilla candy dot to the stamped tag top
Thanks for stopping by and have a super day!

Card Recipe: Stamps- Notable Notions, Morning Meadow; Paper- Pool Party, Baked Brown Sugar, Very Vanilla; Ink- Pool Party, Baked Brown Sugar; Accessories- Hardware Clips Essentials, Neutrals candy dots, Simply Pressed Clay, Buttons and Blossoms molds, linen thread, sponge, dimensionals

Monday, August 12, 2013

Striped Notions

Good morning, Friends! Well, we have finally arrived at the first day of school! Woohoo! Well, Nick isn't really saying that but I think he is still excited nonetheless. It's a new school for him this year and that's what I think he is excited about. We did have a great time in Denver last week! He loved his camp and I found it quite nice to be able to come back to my room and have it tidied up for me! Lol!! The hotel we stayed at had a free hot breakfast every morning and then in the evening it offered a sort of dinner for its guests including complimentary cocktails!! So a few times we ate there! But now it's back to reality. I am getting my dryer fixed this morning so I can do the mound of laundry I have. I have stamp club tonight so I will be getting ready for that. And Nick has a haircut after school and then soccer practice! Lots to do!

Today's card was another that I had made for a display. A very simple card. I had fun using the Notable Notions stamp set! here are the details:

  • Card base is Very Vanilla
  • Use scallop edge border punch to punch the side of a piece of Old Olive, then sponge with Baked Brown Sugar ink
  • Stamp the script image from Notable Notions onto Etcetera designer paper using Baked Brown Sugar ink several times and then sponge dsp with Baked Brown Sugar before adhering to Old Olive panel
  • Pop up Old Olive panel onto card
  • Adhere a strip of Night of Navy card stock
  • Punch a scallop circle from Baked Brown Sugar and sponge edges using Baked Brown Sugar ink
  • Punch 1 3/8" circle from Night of Navy and adhere to scallop circle
  • Stamp focal image from Notable Notions in Old Olive onto Very Vanilla card stock and punch out using 1 1/4" circle punch then adhere this to Night of Navy circle
  • Adhere a piece of 7/16" Trim to the back of the scallop circle and then pop up onto card
  • Add a Night of Navy candy dot to the center of the focal image
Thanks for stopping by today! Have a fabulous day!!

Card Recipe: Stamps- Notable Notions; Paper- Very Vanilla, Night of Navy, Old Olive, Baked Brown Sugar, Etcetera designer paper; Ink- Baked Brown Sugar, Old Olive; Accessories- 7/16" Trim, 1 3/4" scallop punch, 1 3/8" circle punch, 1 1/4" circle punch, scallop edge border punch, Regals candy dots, sponge, dimensionals

Friday, August 9, 2013

SFF 080913

Good Friday morning, Friends! I am here with this week's sketch challenge from the Sketch Frenzy Friday team! This week's sketch was created by Sharon Wheet. Take a look!


And my card...


I just love grey and yellow together! Here are the card details:

  • Card base is Basic Grey
  • On a layer of Basic Grey, I stamped the oval chevron from the Oh, Hello stamp set in Basic Grey and then tied a piece of Daffodil Delight seam binding ribbon around it
  • Then I stamped the greeting from Petite Pairs in Basic Grey onto a strip of vellum
  • I flagged the bottom of the vellum piece and folded it over to the back to adhere it with some adhesive
  • I used a clip from the Hardware Clips Essentials and then adhered this panel to a piece of Daffodil Delight and then popped it up onto the card
  • I stamped the flower image using Daffodil Delight and Wild Wasabi markers onto Whisper White
  • This is cut out and popped up onto the card
  • I added some rhinestones in a random fashion
There you have it! Be sure to visit the Sketch Frenzy Friday blog to see what the other designers did with this sketch! I hope to see your creation linked up! Thanks for stopping by and enjoy your day!

Card Recipe: Stamps- Oh, Hello, Petite Pairs; Paper- Basic Grey, Daffodil Delight, Whisper White, vellum; Ink- Basic Grey, Daffodil Delight, Wild Wasabi; Accessories- Hardware Clips Essentials, Daffodil Delight seam binding ribbon, rhinestones, dimensionals