Thursday, October 31, 2013

CCMC 275

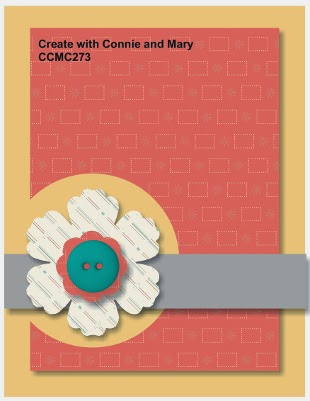
Good morning, Friends and HAPPY HALLOWEEN!! How fun that Halloween lands on Thursday! The same day as the Create with Connie and Mary weekly challenge! This week we have a sketch to play with! Take a look!


And my card...


I love the banners! It was a great way to use up some of those designer paper scraps that we all seem to have! Here are the details:

  • Card base is Very Vanilla cut at 4 1/4" x 11" and folded in half
  • Layer of Very Vanilla cut at 4" x 5 1/4"
  • Strips of designer paper were cut and flagged at the bottom and then adhered to Very Vanilla layer
  • Stamp greeting from Teeny Tiny Wishes in black StazOn and add two mini brads then adhere layer to card base using dimensionals
  • Adhere a strip of Basic Black card stock along the top of banners
  • Use the 1 3/8" circle punch to punch a circle from Summer Starfruit and sponge edges with Summer Starfruit ink then adhere to card with dimensionals
  • Stamp bat image from Halloween Hello using black StazOn ink onto Very Vanilla, cut out and adhere him to card with dimensionals
A pretty simple card! I hope your Halloween is safe and FUN! 

Be sure to check out the Create with Connie and Mary site for more wonderful inspiration using the sketch! And don't forget about Create with Connie and Mary's Winter Collection! Have you subscribed? Don't worry if you haven't! You still can and enjoy all the wonderful projects that have been shared so far! Week 2 is underway with awesome projects for the upcoming holidays! Thanks for stopping by and have a super day!


Card Recipe: Stamps- Halloween Hello, Teeny Tiny Wishes; Paper- Very Vanilla, Basic Black, Summer Starfruit, Witch's Brew designer paper; Ink- black StazOn, Summer Starfruit; Accessories- 1 3/8" circle punch, mini brads, sponge, dimensionals

Tuesday, October 29, 2013

Washi Bats

Good morning, Friends! I hope your week is off to a great start! I woke up this morning to hear the sound of rain! And the wind is blowing, too. So glad that I now have a garage! I won't have to walk outside in this to my car to take Nick to school! Would have been a great day to sleep in but no such luck this time. I do get my hair cut and colored today - yea!! And Nick has a basketball game this afternoon. Looking forward to that!

Today's card was inspired as I was surfing through Pinterest. I think the other card used stamps for the background but I thought that washi tape would be really cute! Here are the details:

  • Card base is Very Vanilla
  • Layer of Very Vanilla
  • Adhere three strips of Witch's Brew washi tape to Very Vanilla layer and then pop up onto card base
  • Layer of Basic Grey
  • Sponge layer with Basic Grey ink
  • Stamp greeting from Halloween Hello in black StazOn onto layer
  • Tie a piece of Basic Black 1/8" taffeta around layer and pop up onto card
  • Stamp bat image from Halloween Hello onto Very Vanilla in black StazOn, cut out and pop up onto card
Super simple! Thanks for stopping by and have a super day!

Card Recipe: Stamps- Halloween Hello; Paper- Very Vanilla, Basic Grey; Ink- black StazOn; Accessories- Basic Black 1/8" taffeta ribbon, Witch's Brew washi tape, sponge, dimensionals

Sunday, October 27, 2013

CCMC Winter Collection 2013

Week two begins today! It's not too late to sign up and enjoy ALL the projects that have been shown and will be showing! 


Create with Connie and Mary 
Winter Collection 2013

subscription has begun!

4 full weeks just for the Christmas/Winter HOLIDAYS beginning October 20!
• One week of Card "Create"tions with 24 unique card ideas!
• One week of last minute gift ideas!
• Less than $1 per project with 18 exclusive 3D projects and 24 card ideas 
• Features Christmas/Winter products in the Holiday and Main catalogs 
• Step-by-step DOWNLOADABLE PHOTO tutorials
• Exclusive to subscribers!
• Demos & Customers welcome!
Create with Connie and Mary
Winter Collection 2013

Only $29.95 US

Saturday, October 26, 2013

CCMCWINTER13-01

Good morning everyone! I hope your weekend is off to a great start! My son and I will be leaving later this morning for Denver. Nick has his third tryout for the state soccer team tomorrow so we are headed up today to do some shopping and hang out! 

Have you subscribed to the Create with Connie and Mary Winter Collection yet? They just finished up week 1 with fabulous ideas! At the end of each week Connie and Mary will provide a challenge and this week they have come up with a fabulous sketch challenge! Check it out!


And my card!


Card details:

  • Card base is Cherry Cobbler cut at 4 1/4" x 11" and folded in half
  • Layer of Cherry Cobbler cut at 4" x 5 1/4" and run through the Big Shot using the Stylish Stripes embossing folder
  • Layer of silver glimmer paper cut at 5" x 2" and flagged at the bottom then adhered to embossed layer
  • Layer of Season of Style designer paper cut at 2 1/4" x 4 1/4" and flagged at the bottom then adhered to layer
  • Tie a piece of Gumball Green stitched satin ribbon around layer and pop up onto card base
  • Stamp Santa image from Santa's List in Cherry Cobbler onto a piece of Whisper White cut at 3" x 2 3/4" then adhere to a piece of Gumball Green cut at 3 1/8" x 2 7/8"
  • Pop panel up onto card
Be sure to visit the Create with Connie and Mary website to see what the other designers did with this fun sketch! I hope you will all play along with us this week! Thanks for stopping by and have a super day!


Card Recipe: Stamps- Santa's List; Paper- Cherry Cobbler, Gumball Green, Whisper White, silver glimmer paper, Season of Style designer paper; Ink- Cherry Cobbler; Accessories- Gumball Green stitched satin ribbon, Stylish Stripes designer paper, dimensionals

Friday, October 25, 2013

SFF 102513

Good Friday morning! Woohoo! Another day off for the kiddos around here. So we all got to sleep in a little! It will also be a nice day to do some sewing and then I will finally be able to get together with Becky for some stitching! It's been way too long! Today's Sketch Frenzy Friday sketch was created by me!! Take a look!


And my card:


Halloween is right around the corner so I thought I would use up some of my Halloween supplies. Here are the details:

  • Card base is Basic Black
  • A piece of Witch's Brew designer paper
  • Two strips of Pumpkin Pie card stock that was cut with the Tasteful Trim die then adhere to the back of the designer paper and then adhere to the card
  • Punch a scallop circle from silver glimmer paper using the 1 3/4" scallop circle punch and pop up onto card
  • Stamp the bat image from Halloween Hello in black StazOn onto Very Vanilla and cut out then pop up onto scallop circle
  • Use the Modern Label punch to punch from Pumpkin Pie and adhere to card
  • Stamp greeting from Teeny Tiny wishes in black StazOn onto Summer Starfuit and punch out with the Word Window punch then pop up onto Pumpkin Pie piece
  • Add two rhinestones
I hope you enjoy my super fun Halloween card! Be sure to check out the other creations from the design team at the Sketch Frenzy Friday blog! I hope you will play along with us this week!

Card Recipe: Stamps- Halloween Hello, Teeny Tiny Wishes; Paper- Basic Black, Pumpkin Pie, Summer Starfruit, Very Vanilla, silver glimmer paper, Witch's Brew designer paper; Ink- black StazOn; Accessories- 1 3/4" scallop circle punch, Modern Label punch, Word Window punch, rhinestone, dimensionals

Thursday, October 24, 2013

CCMC 274

Good morning, Friends! It's Thursday and the kiddos are out of school today and tomorrow! Woohoo! It's also time for another challenge from the Create with Connie and Mary team! This week we are being challenged with some fabulous colors. Take a look!


Raspberry Ripple, Soft Sky and Very Vanilla. So soft and beautiful! Here's what I came up with!


I chose to make a Christmas card to go along with the Create with Connie and Mary Winter Collection that is going on right now! Have you subscribed? Here are my card details:

  • Card base is Very Vanilla
  • A strip of Raspberry Ripple was run through the Big Shot with the Stylish Stripes embossing folder then adhered to the card base on the left hand side
  • A panel of Soft Sky is cut and flagged at the bottom then adhered to a panel of Very Vanilla
  • Pop panel up onto card base
  • Stamp Santa from Santa's List in Raspberry Ripple onto a piece of Very Vanilla and pop up onto card
  • Stamp greeting from Teeny Tiny Wishes in Raspberry Ripple onto Soft Sky panel
  • Add several rhinestones
Super simple and another very mailable card! 

Here is some more information about the Create with Connie and Mary Winter Collection subscription. It's not too late to join! You will still get all the downloadable tutorials for all the projects that have been shown! I hope you will join us! My project was shown this week! But the only way you can see it is to be subscriber! 


 Create with Connie and Mary Winter Collection 2013
Save $5 with our EARLY BIRD PRICE - Only $24.95 US 
Regular $29.95 US
4 weeks of daily Christmas and Winter project ideas for decorating or gift giving that can be completed in about 2 hours...
perfect for classes and stamp camps!
*        Includes our popular Card "Create"tions Week...designers will feature six Christmas or Winter stamp sets with four cards using that set, over 24 exclusive card ideas! 
*        Also including one week of Last Minute Gift Ideas
*        Winter Collection runs October 20 - November 16
*        Features 2013-14 Holiday & Catalog Products
*        18 EXCLUSIVE projects AND 24 card ideas
*        See what we are all about during our FREE Preview Week October 13-19
*        Projects include step-by-step downloadable PHOTO tutorials
*        Fabulous Design Team
*        Saturday Creative Challenges for everyone
*        Projects only available to subscribers
*        Demonstrators & Customers welcome
Card Recipe: Stamps- Santa's List, Teeny Tiny Wishes; Paper- Very Vanilla, Raspberry Ripple, Soft Sky; Ink- Raspberry Ripple; Accessories- Stylish Stripes embossing folder, rhinestones, dimensionals

Wednesday, October 23, 2013

Wonderfall Pie

Good morning, Friends! I think morning came a little too early for me! I do wish I were still sleeping - lol! But there is lots to do today so I had better get busy! Nick's basketball team won their game last night and that makes them undefeated! I know there will be a team coming up next week that will be really tough! Soccer is over for now with just a few practices here and there to get ready for a tournament this winter. And I do know he wants to do indoor soccer. Still lots to keep him busy - lol!

I wanted to make a fall card for today's post. I am trying to get some made before it's really over. At the school where the game was played yesterday, they had a big tree with leaves that were red, yellow and green! It was so beautiful! While there were leaves still on the tree, there were quite a few on the ground, too! Now that's a true fall picture! Here are the details on the card:

  • Card base is Naturals white
  • Layer of Naturals white with a layer of Sweater Weather adhered to the bottom portion then all four corners of layer were rounded with the 3/4" circle punch
  • Stamp splatters and splotches from Gorgeous Grunge onto layer using Smoky Slate
  • Tie a piece of Smoky Slate 3/4" chevron ribbon around panel
  • Stamp greeting from Four You in Coastal Cabana then pop up onto card
  • Stamp leaf from Wonderfall in Pumpkin Pie onto Naturals white and cut out
  • Add some splatters from Gorgeous Grunge using Smoky Slate then adhere to card using dimensionals
I found these colors from the Color Coach and thought they sounded interesting. And they stamp a little differently using the Naturals white card stock. 

The Create with Connie and Mary Winter Collection is going on right now! My project was shown yesterday! But the only way to see it is to be a subscriber! It's not too late to sign up and join. You will still get to see ALL the projects shown so far and get the downloadable tutorials! You will get SO many great ideas and just in time for the holidays! Be sure to check it out! Thanks for stopping by and have a fabulous day!


Card Recipe: Stamps- Wonderfall, Four You, Gorgeous Grunge; Paper- Naturals white, Sweater Weather designer paper; Ink- Pumpkin Pie, Smoky Slate, Coastal Cabana; Accessories- Smoky Slate 3/4" chevron ribbon, 3/4" circle punch, dimensionals

Tuesday, October 22, 2013

CAS(E) This 50

Good morning, Friends! I really wanted to sleep a little longer - lol! Thankfully Nick is out of school Thursday and Friday so we can sleep in a little then! His team won their basketball game yesterday and they have one today! So far they are undefeated! I need to keep myself focused today and get some cards made. And I hope to get some sewing done as well. I'm working on a quilt for Nick and would like it to be done for Christmas. We will see about that...

Today's card was inspired by the sketch at CAS(E) This Sketch. Super simple and very clean. I wasn't sure about adding the ribbon but there was a spot on my card stock and I didn't want to start over so I added the ribbon to cover it up. I do think I like it! Here are the details:

  • Card base is Whisper White
  • Layer of Whisper White that as the top right hand corner rounded with the 3/4" circle punch
  • Stamp greeting from Four You in Smoky Slate
  • Use the Essentials paper piercing pack to pierce a series of circles in the background
  • Tie a piece of Smoky Slate 3/4" chevron ribbon around the panel and then pop up onto card
  • Punch a flower from Strawberry Slush with the itty bitty shapes punch pack and adhere to card
  • Add a rhinestone to flower center
There you have it! Have you subscribed to the Create with Connie and Mary Winter Collection? Today is day three and there are some wonderful projects already! My project will be shared this week as well! But the only way to see it is to be a subscriber! You will not be disappointed! 


Thanks for stopping by and have a fabulous day!

Card Recipe: Stamps- Four You; Paper- Whisper White, Strawberry Slush; Ink- Smoky Slate; Accessories- Smoky Slate 3/4" chevron ribbon, Essentials paper piercing pack, itty bitty shapes punch pack, rhinestone, dimensionals

Monday, October 21, 2013

Christmas Washi Tape

Good morning, Friends! Well, we made it home and in plenty of time to watch the football game. But I don't want to talk about that! Yuck! We did drive through snow on the way home! In fact, there were some people even skiing!! Now that our soccer season is over, it can snow all it wants on the passes! Actually, I had better not speak too soon as Nick still has his third tryout next weekend. And if he makes the state team, then we will be driving over every Sunday. Hmmm... He has a basketball game today. I'm looking forward to that!

Today's card was the last of the cards that we did for stamp club this month. This one is pretty easy! Here are the details:

  • Card base is Whisper White
  • On a layer of Whisper White adhere two strips of Season of Style washi tape on the left hand side, then stamp the greeting from Wishing You in Chocolate Chip
  • Adhere this panel to a layer of Cherry Cobbler and pop up onto card base
  • Stamp gifts image onto Whisper White using Baked Brown Sugar, Old Olive and Cherry Cobbler markers, cut out and pop up onto card
  • Add rhinestone to center package
Pretty simple! A great one for mass producing and mailing! 

Have you subscribed to the Create with Connie and Mary Winter Collection? It started today! And it's not too late to join! You can sign up anytime and get all the ideas along with the downloadable tutorials! And you will get fabulous ideas from the very talented design team! So what are you waiting for??


Card Recipe: Stamps- Wishing You; Paper- Whisper White, Cherry Cobbler; Ink- Chocolate Chip pad, Baked Brown Sugar, Old Olive, Cherry Cobbler markers; Accessories- Season of Style washi tape, rhinestone, dimensionals

Sunday, October 20, 2013

Gorgeous Grunge Leaf

Good Sunday morning, Friends! We are getting ready for our last soccer game of the season! The boys won yesterday so that was pretty exciting! They really have a great record this season! I am so proud of them!! We are hoping that we will be home in plenty of time to see the Bronco game this evening! 

Today's card was another one that we did at stamp club this month. I kind of liked how this one turned out! Here are the details:

  • Card base is Crumb Cake
  • Layer of Crumb Cake that was stamped with the images from the Gorgeous Grunge set in Tangerine Tango, Crushed Curry and Chocolate Chip then sponged with Crumb Cake
  • The greeting from Sweet Essentials was stamped in Chocolate Chip and then a piece of Crushed Curry 3/4" chevron ribbon was tied around it
  • The panel is popped up onto the card
  • The leaf was cut from the Sweater Weather designer paper using the Autumn Accents die and then sponged with Tangerine Tango ink and stamped with the splatter stamp from Gorgeous Grunge
  • Leaf is adhered to card with dimensionals
The Create with Connie and Mary Winter Collection starts today! They will be announcing the Blog Candy winners today so be sure to check their website throughout the day to see if  you are a winner! You can also sign up for this Winter Collection! I hope to see you there! Thanks for stopping by and have a super day!


Card Recipe: Stamps- Gorgeous Grunge, Sweet Essentials; Paper- Crumb Cake, Sweater Weather designer paper; Ink- Chocolate Chip, Tangerine Tango, Crushed Curry, Crumb Cake; Accessories- Crushed Curry 3/4" chevron ribbon, Autumn Accents die, sponge, dimensionals

Saturday, October 19, 2013

Crisp Layered Flowers

Good morning, Friends! I hope your weekend is off to a great start! We are in the Denver area for the last two soccer games of the season! Thankfully the roads were great and the moon shone gorgeous last night as we drove over! It was so beautiful the way the moon reflected off the snow on the mountain tops! The scenery was just as beautiful as it is during the day! Loved it! So here we are and tomorrow we will drive home and begin the week all over again! :)

Today's card was one I did with my stamp club this month. I love these colors together! Here are the details:

  • Card base is Baked Brown Sugar
  • Layer of Baked Brown Sugar that is run through the Big Shot with the Pretty Print embossing folder and then adhered to a layer of Crisp Cantaloupe
  • Tie a piece of Very Vanilla seam binding ribbon around the panel and pop up onto card
  • Stamp the flower from Mixed Bunch in Crisp Cantaloupe onto Crisp Cantaloupe and punch out with the Blossom punch
  • Stamp flower from Flower Shop in Crisp Cantaloupe onto Crisp Cantaloupe and punch out with the Pansy punch and adhere to bigger flower with dimensionals
  • Use the Little Leaves sizzle to cut leaves from Pistachio Pudding and cut apart then adhere to back of flowers and pop up onto card
  • Punch a flower from Soft Suede using the Boho Blossoms punch and adhere to flower center and add a large rhinestone
  • Stamp greeting from Petite Pairs in Soft Suede
I hope that you have been visiting the Create with Connie and Mary site everyday to see all the FREE tutorials that have been offered! And each day someone has been offering blog candy! Here are the details of the Winter Collection subscription.

 Create with Connie and Mary Winter Collection 2013
Save $5 with our EARLY BIRD PRICE - Only $24.95 US 
Regular $29.95 US
4 weeks of daily Christmas and Winter project ideas for decorating or gift giving that can be completed in about 2 hours...
perfect for classes and stamp camps!
*        Includes our popular Card "Create"tions Week...designers will feature six Christmas or Winter stamp sets with four cards using that set, over 24 exclusive card ideas! 
*        Also including one week of Last Minute Gift Ideas
*        Winter Collection runs October 20 - November 16
*        Features 2013-14 Holiday & Catalog Products
*        18 EXCLUSIVE projects AND 24 card ideas
*        See what we are all about during our FREE Preview Week October 13-19
*        Projects include step-by-step downloadable PHOTO tutorials
*        Fabulous Design Team
*        Saturday Creative Challenges for everyone
*        Projects only available to subscribers
*        Demonstrators & Customers welcome
Card Recipe: Stamps- Mixed Bunch, Flower Shop, Petite Pairs; Paper- Baked Brown Sugar, Crisp Cantaloupe, Pistachio Pudding; Ink- Crisp Cantaloupe, Soft Suede; Accessories- Very Vanilla seam binding ribbon, Pretty Print embossing folder, Blossom punch, Pansy punch, Little Leaves sizzlet, Boho Blossoms punch, large rhinestone, dimensionals

Friday, October 18, 2013

SFF 101813

Good morning, Friends! Yippee!! It's Friday! I can't believe that we have been in our new house for a whole week already! Wow! I even have my stamp/craft room somewhat unpacked and organized! Just a few more boxes and a little tweaking and I'll be good to go! We are off to Denver for the last two soccer games of the season! Basketball started this last week and Nick is playing great! He is just so fun to watch and he does love his basketball! 

Sketch Frenzy Friday has a new challenge for us this week! This week's sketch was created by Kim Innis. Take a look!


Such a fun sketch! Here is what I came up with...


I kept it pretty simple, just like the sketch. Card details:

  • Card base is Naturals White
  • Stamp the oak leaf from Wonderfall in Tangerine Tango onto the card 
  • Stamp splotches from Gorgeous Grunge in Sahara Sand
  • Stamp smaller leaf in Crushed Curry onto a scrap of Naturals White and cut out
  • Stamp the splotches again onto the smaller leaf
  • Adhere a strip of Sweater Weather designer paper with end flagged onto card
  • Adhere the cut out leaf with dimensionals
  • Stamp greeting from Sweet Essentials in Chocolate Chip onto card
  • Thread some linen thread through a Naturals designer button and adhere to leaf on card using glue dots
There you have it! Check out what the other designers did with this sketch at the Sketch Frenzy Friday blog! I hope you will be inspired to play along with us this week! We always love to see what you come up with! Thanks for stopping by and have a super day!

Card Recipe: Stamps- Wonderfall, Sweet Essentials, Gorgeous Grunge; Paper- Naturals white, Sweater Weather designer paper; Ink- Tangerine Tango, Crushed Curry, Sahara Sand, Chocolate Chip; Accessories- Naturals designer button, linen thread, dimensionals

Thursday, October 17, 2013

CCMC 273

Good morning, Friends! It's Thursday and time for another fun challenge from the Create with Connie and Mary team! This week we have a sketch challenge! Take a look!


And my card:


I had fun creating this one! Love the cut out circle! Here are the details:

  • Card base is Cherry Cobbler cut at 4 1/4" x 11" and folded in half
  • Layer of Old Olive cut at 4 1/2" x 3 1/4" and run through the Big Shot using the Styled Stripes embossing folder
  • Layer of Season of Style designer paper and punched with the 2 1/2" circle punch then adhered to Old Olive layer
  • Adhere panel to card base
  • Stamp greeting from Wishing You in Chocolate Chip onto a strip of Crumb Cake cut at 1 1/4" x 5 1/2" and adhere to card
  • Use the Circles #2 die to cut a 2" circle from silver glimmer paper then pop up onto card
  • Stamp gifts image from Wishing You onto Whisper White using Baked Brown Sugar, Cherry Cobbler, and Old Olive markers, cut out and pop up onto card
  • Add a rhinestone to the bow on the center gift
Be sure to visit the Create with Connie and Mary site to see what the other designers did with this fabulous sketch! I hope that you will be inspired to play along with us this week! 

Have you signed up for the Create with Connie and Mary Winter Collection 2013 yet? Check out the details! You are sure to love what you see from the fabulous designers!

 Create with Connie and Mary Winter Collection 2013
Save $5 with our EARLY BIRD PRICE - Only $24.95 US 
Regular $29.95 US
4 weeks of daily Christmas and Winter project ideas for decorating or gift giving that can be completed in about 2 hours...
perfect for classes and stamp camps!
*        Includes our popular Card "Create"tions Week...designers will feature six Christmas or Winter stamp sets with four cards using that set, over 24 exclusive card ideas! 
*        Also including one week of Last Minute Gift Ideas
*        Winter Collection runs October 20 - November 16
*        Features 2013-14 Holiday & Catalog Products
*        18 EXCLUSIVE projects AND 24 card ideas
*        See what we are all about during our FREE Preview Week October 13-19
*        Projects include step-by-step downloadable PHOTO tutorials
*        Fabulous Design Team
*        Saturday Creative Challenges for everyone
*        Projects only available to subscribers
*        Demonstrators & Customers welcome
Card Recipe: Stamps- Wishing You; Paper- Whisper White, Cherry Cobbler, Old Olive, Crumb Cake, Seasons of Style designer paper; Ink- Chocolate Chip, Baked Brown Sugar, Cherry Cobbler, Old Olive; Accessories- Styled Stripes embossing folder, 2 1/2" circle punch, Circles #2 die, rhinestone, dimensionals

Wednesday, October 16, 2013

CCMC Preview Week Winter Collection 2013 and Blog Candy!


 Create with Connie and Mary Winter Collection 2013
Save $5 with our EARLY BIRD PRICE - Only $24.95 US 
Regular $29.95 US
4 weeks of daily Christmas and Winter project ideas for decorating or gift giving that can be completed in about 2 hours...
perfect for classes and stamp camps!
*        Includes our popular Card "Create"tions Week...designers will feature six Christmas or Winter stamp sets with four cards using that set, over 24 exclusive card ideas! 
*        Also including one week of Last Minute Gift Ideas
*        Winter Collection runs October 20 - November 16
*        Features 2013-14 Holiday & Catalog Products
*        18 EXCLUSIVE projects AND 24 card ideas
*        See what we are all about during our FREE Preview Week October 13-19
*        Projects include step-by-step downloadable PHOTO tutorials
*        Fabulous Design Team
*        Saturday Creative Challenges for everyone
*        Projects only available to subscribers
*        Demonstrators & Customers welcome

Good morning, Friends! Are you enjoying Preview Week at Create with Connie and Mary? You are in for a real treat with all the talent that is lined up for this edition!! I am so excited to bring you my project for Preview Week! I have done a card set using the Santa's List stamp set!


I just love this Santa image! And yes, there is only one image in the whole set. But I hope that I have given you some different ideas of how you can use this set! I used the one greeting for most of the cards but the other greeting is perfect for the inside of the card! 

I am showing you the card set here. To see each individual card and get FREE step by step tutorial of each card, be sure to visit the Create with Connie and Mary site! You can download the tutorial and make your own!

Now are you ready for some blog candy? Yippee!! My blog candy is a FREE subscription to the Create with Connie and Mary Winter Collection 2013!! All you have to do to qualify is to leave me a comment. Easy, right? Just make sure to leave me a comment TODAY! I will be picking the winner from the comments that are left here today! The winner will be announced on the Create with Connie and Mary website on Sunday! Good luck everyone! Thanks for stopping by and have a super day!

Tuesday, October 15, 2013

Cherry Santa

Good morning, Friends! I hope your week is off to a great start! I was able to get a portion of my stamp/craft room unpacked so that I could get ready for my workshop last night. I even moved my file cabinet of card stock ALL BY MYSELF!! Woohoo!! It wasn't easy but very necessary and I was determined. Thank goodness that there are no stairs in our new home. So today I have to find a home for our cat. There are two prospects and I am just waiting to hear. Then I will take him to his new home. Then later this afternoon, Nick has his first basketball game! He is SO excited! So am I! I was hoping to get more of my craft room put together but we will see how much of that I can get done.

Today's card was one that I did at my stamp club last night. A super easy card! And very mailable! I just love the look of this Santa! 


Here are the details:

  • Card base is Old Olive cut at 8 1/2" x 5 1/2" and folded in half
  • Layer of Crumb Cake cut at 5 3/8" x 1 1/2" then run through the Big Shot using the Pretty Print embossing folder
  • Sponge edges of Crumb Cake piece with Crumb Cake ink and tie a piece of Crumb Cake taffeta ribbon around it then adhere to card
  • Layer of Cherry Cobbler cut at 3" square
  • Stamp Santa image from Santa's List in Cherry Cobbler and sponge edges with Cherry Cobbler
  • Adhere panel to card with dimensionals
Super simple! Have you signed up for the Create with Connie and Mary Winter Collection? I will have a special project to show those of you who subscribe! During Preview Week you can sign up with the Early Bird pricing and save $5!! Here are the details:


Create with Connie and Mary Winter Collection 2013
Save $5 with our EARLY BIRD PRICE - Only $24.95 US 
Regular $29.95 US
4 weeks of daily Christmas and Winter project ideas for decorating or gift giving that can be completed in about 2 hours...
perfect for classes and stamp camps!
*        Includes our popular Card "Create"tions Week...designers will feature six Christmas or Winter stamp sets with four cards using that set, over 24 exclusive card ideas! 
*        Also including one week of Last Minute Gift Ideas
*        Winter Collection runs October 20 - November 16
*        Features 2013-14 Holiday & Catalog Products
*        18 EXCLUSIVE projects AND 24 card ideas
*        See what we are all about during our FREE Preview Week October 13-19
*        Projects include step-by-step downloadable PHOTO tutorials
*        Fabulous Design Team
*        Saturday Creative Challenges for everyone
*        Projects only available to subscribers
*        Demonstrators & Customers welcome
Card Recipe: Stamps- Santa's List; Paper- Old Olive, Cherry Cobbler, Crumb Cake; Ink- Crumb Cake, Cherry Cobbler; Accessories- Crumb Cake taffeta ribbon, Pretty Print embossing folder, sponge, dimensionals