Tuesday, June 30, 2015

Birthday Blossom

Good morning, Friends! I feel like I am up way too early! I had so much fun at the baseball game last night! And the GJ Rockies won so that made it even more fun! Nick spent the night at a friend's house so I need to get him early because he is working with his dad today. Then I have a few errands and then I really need to think about tackling the laundry. Not only am I running out of clothes but we leave on Thursday!

Today's card uses some fun bright colors! 

  • Card base is Whisper White
  • Adhere a piece of Cherry on Top designer paper to card
  • Cut the scallop part off of a piece of Tip Top Taupe dotted lace trim and adhere to the back of a strip of Pool Party then trim the ends at an angle and adhere to card
  • Stamp the greeting from Birthday Blossoms onto the card using Tuxedo black Momento ink
  • Stamp the flower image using Tuxedo black Momento ink onto a piece of Watermelon Wonder and punch out using the Pansy punch
  • Stamp the leaves onto a piece of Cucumber Crush using Tuxedo black Momento ink and cut out then adhere to back of flower
  • Stamp the flower image again onto a piece of Crushed Curry using Tuxedo black Momento ink and cut the center of the flower out and adhere to punched flower
  • Adhere flower to card with dimensionals
  • Add rhinestones to card
Thanks for stopping by and have a fabulous day!

Card Recipe: Stamps- Birthday Blossoms; Paper- Whisper White, Watermelon Wonder, Cucumber Crush, Crushed Curry, Pool Party, Cherry on Top designer paper; Ink- Tuxedo black Momento ink; Accessories- Tip Top Taupe dotted lace trim, Pansy Punch, rhinestones, dimensionals

Monday, June 29, 2015

Bermuda Birthday

Good morning, Friends! I hope you all had a great weekend! I sure did!! My friend Sherry was in town and we had a great time celebrating birthdays and stitching and visiting and laughing! My guys were gone all weekend, too, as Nick had a bike race. They got back yesterday evening and it sounds like Nick had the best time! This is his first time doing these types of races and he finished 15th out of 33! Not too bad!! I got a good bit of stamping done yesterday with no one home. It's nice to have everyone home! And Thursday we will be leaving again for a few days. Summer is flying by!

Today's card is a super quick and easy one!

  • Card base is Whisper White
  • Adhere a strip of the Cherry on Top washi tape to a piece of Whisper White card stock
  • Adhere a piece of the Cherry on Top designer paper to the panel slightly overlapping the washi tape
  • Adhere panel to card base with dimensionals
  • Stamp the greeting from Age Awareness onto a piece of Whisper White using Bermuda Bay ink
  • Use the Project Life corner rounder to round the top right and bottom left corners then adhere to card with dimensionals
  • Add a few Bermuda Bay sequins to card
I haven't used this set in quite a while and thought it fit perfectly! Thanks for stopping by and have a super day!

Card Recipe: Stamps- Age Awareness; Paper- Whisper White, Cherry on Top designer paper; Ink- Bermuda Bay; Accessories- Cherry on Top washi tape, Project Life corner rounder, Bermuda Bay sequin trim, dimensionals

Saturday, June 27, 2015

CCMC Saturday Blog Hop: Shadow Box Card


Hello everyone! It's time for another Create with Connie and Mary Saturday blog hop! This week we are featuring Shadow Box cards! I am your stop after the super talented Debbie Henderson!

These shadow box cards are so easy and so much fun to make! And they will fold flat so you can mail them! These cards make it possible to create a lot of dimension! Here is what I did:


And here is a top view to show all the different layers and dimension:

  • Back panel is Basic Grey cut at 4 1/4" x 5 1/2" then scored on both short ends at 1/2" and 1"
  • Front panel is Smoky Slate cut and score at the same dimensions as the Basic Grey panel
  • Use the Circles framelits to cut a circle out of the Smoky Slate panel then run through the Big Shot using the Brick Wall embossing folder and sponge all edges with Smoky Slate ink
  • Cut a Whisper White panel that measures 4 1/8" x 3 3/8" 
  • Stamp the leaf image from Remarkable You stamp set onto the Whisper White panel using Basic Grey ink and color in using an aqua painter and Cucumber Crush ink
  • Stamp the speckles image from the Gorgeous Grunge set using Soft Sky ink then adhere panel to the Basic Grey panel
  • Stamp the leaf image two more time onto a piece of Whisper White using Basic Grey ink and color in with and aqua painter and Cucumber Crush ink then carefully cut out
  • Stamp the greeting from Tin of Cards onto a piece of Whisper White using Basic Grey ink and punch out using the 2" circle punch
  • Put two strips of the tear away tape onto the ends of the Basic Grey panel and expose the adhesive
  • Cut apart the two branches and adhere two of them to the exposed adhesive 
  • Add two more branches to the back panel with dimensionals and one to the front panel
  • Adhere the front panel to the back panel matching up the edges
  • Adhere the greeting to the front using a dimensional
  • Punch a flower from Real Red card stock using the itty bitty accents punch pack and adhere to circle then adhere a rhinestone to the flower center
Take the complete tour and be inspired! Time to send you on to see what the super talented Connie Babbert has created! Thanks for stopping by and have a super day!


Card Recipe: Stamps- Remarkable You, Gorgeous Grunge, Tin of Cards; Paper- Basic Grey, Smoky Slate, Real Red, Whisper White; Ink- Basic Grey, Soft Sky, Smoky Slate, Cucumber Crush; Accessories- Brick Wall embossing folder, Circles framelits, aqua painter, 2" circle punch, itty bitty accents punch pack, rhinestones, sponge, dimensionals


Friday, June 26, 2015

Birthday Flags

Good morning, Friends! I hope your week has been fabulous! During the school year I get so excited for the weekend but during the summer I like for the week to drag slowly - lol! But this weekend my friend from the eastern side of Colorado is coming for a visit and I am really looking forward to that! My son has his first bike race in Snowmass so he and my husband will be gone for the weekend. Nick is so excited! Go Nick!!

Today's card was made for a swap and then I decided to go a different direction. This one was fun and easy!

  • Card base is Tip Top Taupe
  • On a piece of Pool Party adhere a strip of Cherry on Top washi tape
  • Stamp two candles in the lower left hand side of the panel using VersaMark ink
  • Tie a piece of Bermuda Bay thick baker's twine around the panel and adhere to card base with dimensionals
  • Stamp the flags image from Build a Birthday stamp set using Tip Top Taupe, Bermuda Bay, Crushed Curry and Watermelon Wonder markers then punch out using the 2" circle punch
  • Adhere the stamped circle to a scallop circle that was punched from Bermuda Bay using the 2 3/8" scallop circle punch then adhere to card using dimensionals
  • Stamp the greeting onto a strip of Whisper White using Bermuda Bay ink and flag both ends then adhere to circle
And there you have it! Thanks for stopping by and have a super day!

Card Recipe: Stamps- Build a Birthday; Paper- Tip Top Taupe, Pool Party, Bermuda Bay, Whisper White; Ink- Bermuda Bay, VersaMark, Tip Top Taupe, Bermuda Bay, Watermelon Wonder, Crushed Curry markers; Accessories- Bermuda Bay thick baker's twine, Cherry on Top washi tape, 2 3/8" scallop circle punch, 2" circle punch, dimensionals

Thursday, June 25, 2015

Cottage Birthday

Hello everyone! I hope your week has been going fabulous! I have a lot that I want to get done today so I hope that I can organize my time accordingly! 

Today's card is a super quick and easy card!s

  • Card base is Whisper White
  • Adhere a piece of Cherry on Top designer paper to the card base
  • Cut the shape from Whisper White using Deco Labels framelits
  • Stamp the greeting from Cottage Greetings onto the shape using Tuxedo black Momento ink
  • Stamp the flower image using the same ink
  • Color in the flower using Watermelon Wonder, Crushed Curry and Cucumber Crush markers
  • Punch a circle from Watermelon Wonder using the 2 1/2" circle punch and cut in half then adhere each half to the back of the shape
  • Adhere the stamped shape to the card with dimensionals
  • Add a rhinestone to flower center
Super simple! Thanks for stopping by and have a super day!

Card Recipe: Stamps- Cottage Greetings; Paper- Whisper White, Watermelon Wonder, Cherry on Top designer paper; Ink- Tuxedo black Momento ink, Watermelon Wonder, Crushed Curry, Cucumber Crush markers; Accessories- Deco Labels framelits, 2 1/2" circle punch, rhinestones, dimensionals

Wednesday, June 24, 2015

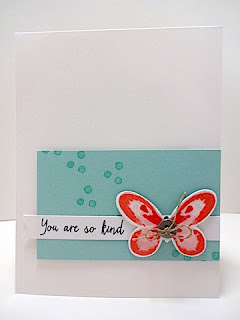
Watermelon Butterfly

Good morning, Friends! I hope you are all able to stay cool! I had a nice quiet day at home getting a lot of stuff done! I am loving my summer! Today I get a pedicure! I think I will stamp a few cards and then work on a small quilt project that I started last week. Here's hoping the summer slows down a bit - lol!

Today's card was inspired by a sketch I saw at Techno Stamper. I kept mine clean and very simple!

  • Card base is Whisper White
  • On a piece of Pool Party stamp the dots image from the Watercolor Wings stamp set several times using Pool Party ink and adhere to card base with dimensionals
  • On a strip of Whisper White stamp the greeting from Watercolor Wings using Tuxedo black Momento ink and flag the end then adhere to card
  • On a piece of Whisper White stamp the first layer of the butterfly using Blushing Bride ink, the second layer with Calypso Coral ink and the middle part or third layer with Watermelon Wonder (I did stamp the butterfly body using Tuxedo black Momento ink but you can't see it once you get the button on)
  • Cut the butterfly out using the Butterfly thinlits and adhere to card with dimensionals
  • Thread a piece of linen thread through a silver basic button and tie a bow then adhere to butterfly body
Thanks for stopping by and have a super day!

Card Recipe: Stamps- Watercolor Wings; Paper- Whisper White, Pool Party; Ink- Pool Party, Blushing Bride, Calypso Coral, Watermelon Wonder, Tuxedo black Momento ink; Accessories- Butterfly thinlits, silver basic button, linen thread, dimensionals

Tuesday, June 23, 2015

Cottage Elegance

Good morning, Friends! It has been crazy hot around here! We are breaking all kinds of records. So glad that I can stay inside and work on projects! I didn't get as much done yesterday as I would have liked. Nick wanted me to shuttle he and his friend around. Then when we got home it seemed like it continued. Finally he got to go riding with a group of friends and he ended up spending the night with them! So the house is quiet.

Today's card shows off the beautiful Timeless Elegance designer paper! I was inspired by a card from the Stampin' Up! demonstrator magazine.

  • Card is Sahara Sand
  • Adhere a piece of Timeless Elegance designer paper onto a piece of Sahara Sand
  • Tie a piece of Sahara Sand lace trim around the panel and adhere to card base with dimensionals
  • Stamp the greeting from Cottage Greetings onto the card base using Tuxedo black Momento ink
  • Stamp the flower image onto a piece of Very Vanilla using Tuxedo black Momento ink and color in with So Saffron, Pink Pirouette and Pear Pizzazz markers then cut out and adhere to card with dimensionals
  • Add pearls to card
So super easy when the designer paper does all the work! Thanks for stopping by and have a fabulous day!

Card Recipe: Stamps- Cottage Greetings; Paper- Sahara Sand, Very Vanilla, Timeless Elegance designer paper; Ink- Tuxedo black Momento ink, So Saffron, Pink Pirouette, Pear Pizzazz markers; Accessories- Sahara Sand lace trim, pearls, dimensionals

Monday, June 22, 2015

A Single Candle

Good morning everyone! I hope you had a fabulous weekend and a great Father's Day! It was really hot around here but we managed to go out for breakfast and then I shuttled Nick and Pat to the top of two bike runs so they could go downhill as it was much too hot to go uphill! Lol!! They had a lot of fun with that. And I got to sit in the air conditioned truck waiting for them! Then we came home and cooled off and had pizza for dinner! A very nice day! Now I need to figure out what I have to get done the next few days and get to work!

For today's card I chose to experiment with the Build a Birthday set. I am using it for a swap and was trying to get some ideas going.

  • Card base is Whisper White
  • On another piece of Whisper White adhere a strip of Cherry on Top washi tape along the left hand edge
  • Run a piece of Pool Party card stock through the Big Shot using the Ovals framelits then run through again using the Decorative Dots embossing folder
  • Place the oval over the the Whisper White panel to know where to stamp the candle image from Build a Birthday stamp set
  • Stamp the candle using Watermelon Wonder and the flame using Crushed Curry then adhere panel to card base
  • Adhere the oval panel to card with dimensionals
  • Stamp the greeting onto a strip of Whisper White using Bermuda Bay ink and flag the end
  • Tie some silver metallic thread around the strip and adhere to card
Thanks for stopping by and have a super day!

Card Recipe: Stamps- Build a Birthday; Paper- Whisper White, Pool Party; Ink- Bermuda Bay, Watermelon Wonder, Crushed Curry; Accessories- Cherry on Top washi tape, Decorative Dots embossing folder, Ovals framelits, silver metallic thread, dimensionals

Saturday, June 20, 2015

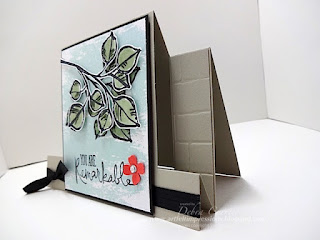
CCMC Saturday Blog Hop: Stair Step Card


Hello everyone! It's time again for the Create with Connie and Mary Saturday blog hop! This week the designers are showing you Stair Step cards! I am your stop after the fabulous Debbie Henderson!

I had fun making this card (even if it did take me several attempts to get the folds correct - lol)! So many different ways to make this type of card. Mine will fit in an A2 envelope!


Here is a side view so you can see how the folds work...

  • Card base is Sahara Sand cut at 8 1/2" x 5 1/2"
  • The center panel is cut 1" in from each side: start your blade at 5 1/4" to 1"
  • Score at the bottom 1" in from the side at 1" then at 2" then again at 5 1/4"
  • The final score line will be in the center at 4 1/4"
  • Fold all the score lines to create the card
  • Tie a piece of Basic Black stitched satin ribbon around the bottom of the card
  • Cut two pieces of Sahara Sand card stock at 7/8" x 3 1/8" and run through the Big Shot using the Brick Wall embossing folder and adhere to the sides of the card
  • Cut a piece of Whisper White 3 1/4" x 4" 
  • Stamp the leaf image from Remarkable You stamp set onto the panel using black StazOn ink and color in using an aqua painter and Mossy Meadow ink
  • After the image is dry, stamp the Watercolor Wash background stamp over the image using Soft Sky ink
  • Stamp the image again onto another piece of Whisper White using the same ink and color in the same way then cut image out
  • Stamp the greeting using black StazOn ink then adhere panel to a piece of Basic Black that is cut at 3 3/8" x 4 1/8" and then adhere to the card with dimensionals
  • Adhere the cut out leaf image to the card using dimensionals
  • Punch a flower from Watermelon Wonder card stock using the itty bitty accents punch pack and adhere to card
  • Add a rhinestone to flower center
This card was so fun to make! I hope you will try one out, too! But first you must go see what the talented Connie Babbert has created! Thanks for stopping by and have a great day!


Card Recipe: Stamps- Remarkable You, Watercolor Wash background; Paper- Sahara Sand, Basic Black, Watermelon Wonder, Whisper White; Ink- black StazOn, Mossy Meadow, Soft Sky; Accessories- Basic Black stitched satin ribbon, Brick Wall embossing folder, itty bitty accents punch pack, rhinestone, aqua painter, dimensionals


Friday, June 19, 2015

Control Freaks Blog Tour: New Stuff


Hello everyone! Welcome to another blog hop with the Freaks! This month we are showing off some new product! I am your stop after the fabulous LeeAnn Greff

You can see from these two cards what was one my first order - lol! And I love the new In Colors! So here is my first card:


I love the big bold flowers in this set! So fun and easy to watercolor!
  • Card base is Smoky Slate
  • Adhere a piece of Pool Party to the card base
  • On a piece of Whisper White stamp the flower image using black StazOn ink and color in using an aqua painter and Watermelon Wonder and Cucumber Crush inks
  • Stamp the image again onto another piece of Whisper White using the same ink and color in using the same method with the same colors then cut out
  • Stamp the splatter image from Gorgeous Grunge using Pool Party ink then stamp the greeting using black StazOn ink
  • Adhere a strip of the Watermelon Wonder dotted lace trim to the back side of the panel at the top and bottom
  • Tie a piece of Smoky Slate thick baker's twine around the panel and adhere to card with dimensionals
  • Adhere the cut out flower to the card using dimensionals
  • Add rhinestones to card
Card #2!


  • Card base is Pool Party
  • Stamp the blossoms image from Birthday Blossoms stamp set onto a piece of Pool Party using Pool Party ink then stamp the greeting using Tuxedo black Momento ink
  • Fold a piece of Watermelon Wonder dotted lace trim and tie it around the stamped panel then adhere panel to card base with dimensionals
  • Stamp the flower image twice onto a piece of Whisper White using black StazOn ink and stamp the leaves image twice using the same ink
  • Color the images using an aqua painter and Watermelon Wonder, Mossy Meadow and Hello Honey inks
  • Punch the flowers out using the Pansy punch and cut the leaves out
  • Adhere the leaves to the backs of the flowers
  • Adhere one flower to the card with glue dots in the center and the second flower using dimensionals in the center (of the flowers)
  • Add pearls to flower centers
Time to send you on to see what the talented Connie Babbert has to show you! Thanks for stopping by and have a super day!


Card Recipe: Stamps- Birthday Blossoms; Paper- Pool Party, Whisper White; Ink- black StazOn, Pool Party, Watermelon Wonder, Hello Honey, Mossy Meadow; Accessories- Watermelon Wonder dotted lace trim, Pansy punch, pearls, aqua painter, dimensionals

Minty Toad

Hello everyone! Are you ready for a great weekend? It should be a hot one around here! I will be glad to be inside my air conditioned house and working with my stamps! I also hope to get a lot sewing done as well!

Today's card uses a new stamp set and some new colors with a simple layout!

  • Card base is Mint Macaron
  • Run a piece of Mint Macaron through the Big Shot using the Large Polka Dot embossing folder then adhere to card base
  • Flag the ends of a strip of Tip Top Taupe and adhere to card
  • Flag the ends of a strip of Basic Black and adhere to card
  • Use the Deco Labels framelits to cut the shape from Cucumber Crush card stock and adhere to card with dimensionals
  • Stamp the frog image from You're Sublime stamp set onto Whisper White using black StazOn ink then color in using an aqua painter and Mint Macaron and Cucumber Crush inks
  • Punch the image out using the 2" circle punch and adhere to card
Super simple and a very mailable card! I love this set! Such cute images! Thanks for stopping by and have a super day!

Card Recipe: Stamps- You're Sublime; Paper- Mint Macaron, Cucumber Crush, Basic Black, Tip Top Taupe, Whisper White; Ink- black StazOn, Cucumber Crush, Mint Macaron; Accessories- Large Polka Dot embossing folder, Deco Labels framelits, 2" circle punch, aqua painter, dimensionals

Thursday, June 18, 2015

Tip Top Cottage Greetings

Hello everyone! Seems like my summer has been busy from the start! Things are starting to settle down a bit but will pick right back up soon. So much to pack into two short months of summer! I am so glad to start stamping again! And I am loving all the new stuff I have! So glad to have time to stamp a little than just for the Saturday blog hop! I hope to post more often, too.

Today's card is a blast from the past. I scrolled through some older posts and decided to copy some of those using new product!

  • Card base is Tip Top Taupe
  • Adhere a piece of Cherry on Top designer paper to another piece of Tip Top Taupe and tie a piece of Tip Top Taupe dotted lace trim around it
  • Adhere panel to a piece of Blushing Bride card stock and then adhere to card base with dimensionals
  • Stamp the flower image from Cottage Greetings onto Whisper White using Tuxedo black Momento ink three times and punch out using the large oval punch then color the images using Blushing Bride, So Saffron and Wild Wasabi markers
  • Adhere ovals to card with dimensionals
  • Stamp the greeting onto Whisper White using Tip Top Taupe ink and punch out using the Washi Label punch then adhere to card with dimensionals
  • Add rhinestones to flower centers
I hope your summer is going great! Thanks so much for stopping by and have a fabulous day!

Card Recipe: Stamps- Cottage Greetings; Paper- Tip Top Taupe, Blushing Bride, Whisper White, Cherry on Top designer paper; Ink- Tuxedo black Momento ink, Tip Top Taupe, Blushing Bride, So Saffron, Wild Wasabi; Accessories- Tip Top Taupe dotted lace trim, large oval punch, Washi Label punch, rhinestones, dimensionals
Sunday, June 14, 2015

The Stamp Review Crew: Petite Petals

Hello everyone! It's time for another great blog hop from The Stamp Review Crew! This time around we are featuring projects that use the Petite Petals stamp set! I am your stop after the fabulous Yapha Mason!

I went very clean and simple! I did use a few new products with this card!

  • Card base is Whisper White
  • Tie a piece of Smoky Slate thick baker's twine around a Whisper White panel and then adhere the panel to the card base using dimensionals
  • Stamp the flower from Petite Petals three times onto Whisper White using Pool Party, Watermelon Wonder and Bermuda Bay inks then punch out using the coordinating Petite Petals punch
  • Punch a scallop circle from vellum using the 2 3/8" scallop circle punch and adhere the flowers to the edges using glue dots
  • Punch a circle from Smoky Slate using the 2" circle punch and adhere to the back of the vellum scallop circle putting the adhesive only where the flowers will cover it up
  • Stamp the greeting from Cottage Greetings onto the vellum using black StazOn ink and adhere the element to the card with dimensionals
  • Add rhinestones to flower centers
Now it's time to send you on to the talented Bronwyn Eastley! Thanks for stopping by and have a super day! 


Card Recipe: Stamps- Cottage Greetings, Petite Petals; Paper- Whisper White, Smoky Slate, vellum; Ink- Bermuda Bay, Pool Party, Watermelon Wonder, black StazOn; Accessories- Smoky Slate thick baker's twine, 2 3/8" scallop circle punch, 2" circle punch, Petite Petals punch, rhinestones, dimensionals


Saturday, June 13, 2015

CCMC Saturday Blog Hop: Joy Fold Card


Hello everyone! It's time once again for a very fun and inspiring blog hop from the Create with Connie and Mary designers! This week we are featuring the Joy Fold card! I'm sure that you will find many creative ideas using this special fold! I am your stop after the very creative Debbie Henderson!

Today is Connie's birthday so be sure to stop by her blog and say 'happy birthday'! To honor her birthday, I decided to use the new Birthday Blossoms stamp set! I paired it with some other fun new products and came up with this!


And here it is slightly opened. I made my fold go up and down instead of side to side. The front flap is held closed by tucking the corner behind the flower.

  • Card base is Very Vanilla cut at 7 1/2" 5 1/2" and scored at 4 1/4"
  • Adhere a piece of Timeless Elegance designer paper to the inside back that measures 5 3/8" x 4 1/8"
  • Adhere a piece of Timeless Elegance designer paper to the front outside flap that measures 2 7/8" x 5 3/8"
  • Punch a scallop circle from Basic Black using the 2 3/8" scallop circle punch and adhere to front of card
  • Create the inside card and front flap by cutting a piece of Basic Black that measures 5 1/2" x 4 1/4" and score at 2 3/4" then adhere to the inside of card
  • Adhere a piece of Very Vanilla to the inside Basic Black card that measures 2 5/8" x 4 1/8"
  • Cut a piece of Very Vanilla that measures 4 1/8" x 2 5/8"
  • Stamp the greeting from Birthday Blossoms stamp set onto the Very Vanilla panel using Tuxedo black Momento ink then stamp the cluster of blossoms using Sahara Sand
  • Tie a piece of Basic Black stitched satin ribbon around the panel and adhere to the front of the Basic Black flap
  • Stamp the flower and leaf images onto a piece of Very Vanilla using Tuxedo black Momento ink and color in using a blender pen and Hello Honey, Sahara Sand and Wild Wasabi inks then cut out by hand
  • Use the Pansy punch to punch a flower from Hello Honey card stock 
  • Adhere the leaves behind the stamped flower then adhere stamped images to the punched flower with glue dots just in the center
  • Adhere flower to scallop circle using double thickness of dimensionals (make sure that the dimensionals are just on the bottom petals so that your card flap can tuck behind it)
  • Add a pearl to flower center
Now it's time to send you on to the birthday girl, Connie Babbert! Thanks for stopping by and have a fabulous day!


 Card Recipe: Stamps- Birthday Blossoms; Paper- Very Vanilla, Basic Black, Hello Honey, Timeless Elegance designer paper; Ink- Tuxedo black Momento ink, Hello Honey, Wild Wasabi, Sahara Sand; Accessories- Basic Black satin ribbon, Pansy punch, 2 3/8" scallop circle punch, blender pen, pearl, dimensionals


Saturday, June 6, 2015

CCMC Saturday Blog Hop: Pop Out Swing Fold Card


Hello everyone! It's time again for the Create with Connie and Mary Saturday blog hop! This week we are featuring Pop Out Swing Fold cards! I am your stop right after the fabulous Debbie Henderson!

I had never even heard of this type of card before - lol! This card is really easy to make! I had a lot of fun making this! The first picture shows the front of the card (it was hard to get a picture of it closed all the way). I also used some fun new products and colors!


And this is a picture of the inside!

  • Card base is Whisper White cut at 8 1/2" x  5 1/2" and fold in half
  • Use the Squares framelits to cut a square out of the front of the card making sure to keep the cut out square for the stamped panel
  • Cut another piece of Whisper White at 5" x 6" and score at 2" and 4" making sure the 6" side is at the top
  • Fold on the scored lines and adhere the last folded panel to the inside back of the card
  • Stamp the background stamp from the You've Got This stamp set onto the square panel using Soft Sky ink then adhere the panel to the first panel of the folded piece (hint: close the card and adhere so that the square fits inside the cut out square
  • Stamp the flower image onto a piece of Whisper White using Tuxedo black Momento ink and color using Watermelon Wonder, Cucumber Crush and Delightful Dijon inks and a blender pen
  • Cut the flower out and adhere to inside square panel with dimensionals
  • Stamp the greeting on the front of the card using Tuxedo black Momento ink
  • Punch a flower from Watermelon Wonder card stock using itty bitty accents punch pack and adhere to front of card
  • Add a rhinestone to the flower center
Time to send you on to see what fabulous creation Connie Babbert has to show us! Thanks for stopping by and have a super day!


Card Recipe: Stamps- You've Got This; Paper- Whisper White, Watermelon Wonder; Ink- Tuxedo black Momento ink, Watermelon Wonder, Cucumber Crush, Delightful Dijon, Soft Sky; Accessories- Squares framelits, itty bitty accents punch pack, rhinestone, dimensionals