Showing posts with label Remarkable You. Show all posts

Wednesday, July 8, 2015

Watermelon Wonder Flower

Good morning everyone! I am loving our "summer" weather right now! The temps are below 90 and it's even been a bit rainy! Looks like more of the same for today and possibly tomorrow! Great for riding bikes! I haven't ridden my bike but my son sure has! I've been indoors trying to catch up on stamping stuff and getting a lot of sewing done! I am loving summer!! School starts again is just a few short weeks so we need to get as much out of it as we can! Today I get to have a stitching afternoon with some friends and I am so excited about that!

Today's card was made for a recent swap I was in so I thought that I would show you all what I did!

  • Card base is Soft Sky
  • Emboss a slightly smaller piece of Soft Sky using the Brick Wall embossing folder and then adhere to card base with dimensionals
  • Stamp the greeting from Tin of Cards stamp set onto a piece of Whisper White using black StazOn ink then round the opposite corners using the Project Life corner rounder and adhere to card
  • Adhere a piece of Watermelon Wonder to card
  • Stamp the flower image from Remarkable You stamp set onto a piece of Whisper White using black StazOn ink then color in using an aqua painter and Watermelon Wonder and Cucumber Crush inks
  • Punch the flower out with the 2 1/2" circle punch
  • Stamp the speckle stamp from Gorgeous Grunge stamp set using Soft Sky ink then sponge the edges of the circle using the same ink
  • Adhere circle to card with dimensionals
  • Add rhinestones to card
Pretty simple card! And I think it would mail just fine! Thanks for stopping by and have a super day!

Card Recipe: Stamps- Remarkable You, Tin of Cards, Gorgeous Grunge; Paper- Soft Sky, Watermelon Wonder, Whisper White; Ink- black StazOn, Watermelon Wonder, Cucumber Crush; Accessories- Brick Wall embossing folder, rhinestones, 2 1/2" circle punch, Project Life corner rounder, aqua painter, sponge, dimensionals

Saturday, June 27, 2015

CCMC Saturday Blog Hop: Shadow Box Card


Hello everyone! It's time for another Create with Connie and Mary Saturday blog hop! This week we are featuring Shadow Box cards! I am your stop after the super talented Debbie Henderson!

These shadow box cards are so easy and so much fun to make! And they will fold flat so you can mail them! These cards make it possible to create a lot of dimension! Here is what I did:


And here is a top view to show all the different layers and dimension:

  • Back panel is Basic Grey cut at 4 1/4" x 5 1/2" then scored on both short ends at 1/2" and 1"
  • Front panel is Smoky Slate cut and score at the same dimensions as the Basic Grey panel
  • Use the Circles framelits to cut a circle out of the Smoky Slate panel then run through the Big Shot using the Brick Wall embossing folder and sponge all edges with Smoky Slate ink
  • Cut a Whisper White panel that measures 4 1/8" x 3 3/8" 
  • Stamp the leaf image from Remarkable You stamp set onto the Whisper White panel using Basic Grey ink and color in using an aqua painter and Cucumber Crush ink
  • Stamp the speckles image from the Gorgeous Grunge set using Soft Sky ink then adhere panel to the Basic Grey panel
  • Stamp the leaf image two more time onto a piece of Whisper White using Basic Grey ink and color in with and aqua painter and Cucumber Crush ink then carefully cut out
  • Stamp the greeting from Tin of Cards onto a piece of Whisper White using Basic Grey ink and punch out using the 2" circle punch
  • Put two strips of the tear away tape onto the ends of the Basic Grey panel and expose the adhesive
  • Cut apart the two branches and adhere two of them to the exposed adhesive 
  • Add two more branches to the back panel with dimensionals and one to the front panel
  • Adhere the front panel to the back panel matching up the edges
  • Adhere the greeting to the front using a dimensional
  • Punch a flower from Real Red card stock using the itty bitty accents punch pack and adhere to circle then adhere a rhinestone to the flower center
Take the complete tour and be inspired! Time to send you on to see what the super talented Connie Babbert has created! Thanks for stopping by and have a super day!


Card Recipe: Stamps- Remarkable You, Gorgeous Grunge, Tin of Cards; Paper- Basic Grey, Smoky Slate, Real Red, Whisper White; Ink- Basic Grey, Soft Sky, Smoky Slate, Cucumber Crush; Accessories- Brick Wall embossing folder, Circles framelits, aqua painter, 2" circle punch, itty bitty accents punch pack, rhinestones, sponge, dimensionals


Saturday, June 20, 2015

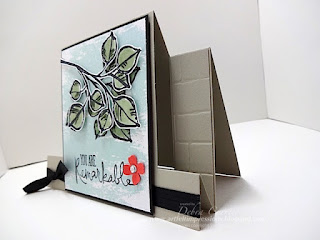
CCMC Saturday Blog Hop: Stair Step Card


Hello everyone! It's time again for the Create with Connie and Mary Saturday blog hop! This week the designers are showing you Stair Step cards! I am your stop after the fabulous Debbie Henderson!

I had fun making this card (even if it did take me several attempts to get the folds correct - lol)! So many different ways to make this type of card. Mine will fit in an A2 envelope!


Here is a side view so you can see how the folds work...

  • Card base is Sahara Sand cut at 8 1/2" x 5 1/2"
  • The center panel is cut 1" in from each side: start your blade at 5 1/4" to 1"
  • Score at the bottom 1" in from the side at 1" then at 2" then again at 5 1/4"
  • The final score line will be in the center at 4 1/4"
  • Fold all the score lines to create the card
  • Tie a piece of Basic Black stitched satin ribbon around the bottom of the card
  • Cut two pieces of Sahara Sand card stock at 7/8" x 3 1/8" and run through the Big Shot using the Brick Wall embossing folder and adhere to the sides of the card
  • Cut a piece of Whisper White 3 1/4" x 4" 
  • Stamp the leaf image from Remarkable You stamp set onto the panel using black StazOn ink and color in using an aqua painter and Mossy Meadow ink
  • After the image is dry, stamp the Watercolor Wash background stamp over the image using Soft Sky ink
  • Stamp the image again onto another piece of Whisper White using the same ink and color in the same way then cut image out
  • Stamp the greeting using black StazOn ink then adhere panel to a piece of Basic Black that is cut at 3 3/8" x 4 1/8" and then adhere to the card with dimensionals
  • Adhere the cut out leaf image to the card using dimensionals
  • Punch a flower from Watermelon Wonder card stock using the itty bitty accents punch pack and adhere to card
  • Add a rhinestone to flower center
This card was so fun to make! I hope you will try one out, too! But first you must go see what the talented Connie Babbert has created! Thanks for stopping by and have a great day!


Card Recipe: Stamps- Remarkable You, Watercolor Wash background; Paper- Sahara Sand, Basic Black, Watermelon Wonder, Whisper White; Ink- black StazOn, Mossy Meadow, Soft Sky; Accessories- Basic Black stitched satin ribbon, Brick Wall embossing folder, itty bitty accents punch pack, rhinestone, aqua painter, dimensionals


Friday, June 19, 2015

Control Freaks Blog Tour: New Stuff


Hello everyone! Welcome to another blog hop with the Freaks! This month we are showing off some new product! I am your stop after the fabulous LeeAnn Greff

You can see from these two cards what was one my first order - lol! And I love the new In Colors! So here is my first card:


I love the big bold flowers in this set! So fun and easy to watercolor!
  • Card base is Smoky Slate
  • Adhere a piece of Pool Party to the card base
  • On a piece of Whisper White stamp the flower image using black StazOn ink and color in using an aqua painter and Watermelon Wonder and Cucumber Crush inks
  • Stamp the image again onto another piece of Whisper White using the same ink and color in using the same method with the same colors then cut out
  • Stamp the splatter image from Gorgeous Grunge using Pool Party ink then stamp the greeting using black StazOn ink
  • Adhere a strip of the Watermelon Wonder dotted lace trim to the back side of the panel at the top and bottom
  • Tie a piece of Smoky Slate thick baker's twine around the panel and adhere to card with dimensionals
  • Adhere the cut out flower to the card using dimensionals
  • Add rhinestones to card
Card #2!


  • Card base is Pool Party
  • Stamp the blossoms image from Birthday Blossoms stamp set onto a piece of Pool Party using Pool Party ink then stamp the greeting using Tuxedo black Momento ink
  • Fold a piece of Watermelon Wonder dotted lace trim and tie it around the stamped panel then adhere panel to card base with dimensionals
  • Stamp the flower image twice onto a piece of Whisper White using black StazOn ink and stamp the leaves image twice using the same ink
  • Color the images using an aqua painter and Watermelon Wonder, Mossy Meadow and Hello Honey inks
  • Punch the flowers out using the Pansy punch and cut the leaves out
  • Adhere the leaves to the backs of the flowers
  • Adhere one flower to the card with glue dots in the center and the second flower using dimensionals in the center (of the flowers)
  • Add pearls to flower centers
Time to send you on to see what the talented Connie Babbert has to show you! Thanks for stopping by and have a super day!


Card Recipe: Stamps- Birthday Blossoms; Paper- Pool Party, Whisper White; Ink- black StazOn, Pool Party, Watermelon Wonder, Hello Honey, Mossy Meadow; Accessories- Watermelon Wonder dotted lace trim, Pansy punch, pearls, aqua painter, dimensionals