Showing posts with label Pictogram Punches. Show all posts

Saturday, April 25, 2015

CCMC Saturday Blog Hop: Celebrations Edition Week 2


Hello everyone! It's time for another Saturday Blog Hop from the Create with Connie and Mary design team! We have finished up Week 3 of the Cards "Create"tions Celebrations edition! Wow! Time flies when you're having fun! I hope you all were inspired by the fabulous projects that were shared! If you didn't get a chance to subscribe, it's not too late! You can still subscribe to the edition and see all the fabulous ideas that were shared over the last three weeks! I am your stop after the super talented Debbie Henderson!

I used the Pictogram Punches stamp set this past week. I love this set for its versatility and for the fact that it's so easy to use with the coordination punches - the itty bitty accents punch pack! We have gotten two graduation announcements! WOW! I can't believe that these young ones are old enough to graduate! One of them I taught when she was in fifth grade! Anyway, I thought that the sentiment "you're a star" was a perfect for a graduation card! So I used the school colors (blue and white) and added a bit of silver to make a money holder. What graduate doesn't want money?


And a picture of the inside where you can see I used the envelope punch board to make the tab...


  • The base is Pacific Point
  • Run another piece of Pacific Point through the Big Shot using the Lucky Stars embossing folder and then adhere to base
  • Cut the two stars from Whisper White using the Stars framelits and adhere to the money holder using dimensionals
  • Stamp the greeting from Pictogram Punches onto a piece of Whisper White using Pacific Point then flag the end and round the top left hand corner with the Project Life corner rounder then adhere to the holder
  • Add a strip of silver foil paper 
  • Punch a star from silver foil paper using the itty bitty and adhere to the sentiment

Now it's time to send you on to see what the fabulous Connie Babbert has to show you! If you would like to see a list of all the stamp sets that were used during our edition, you can find that at the Create with Connie and Mary website. And while you are there, why not sign up to see all the creations made with those sets! Thanks for stopping by and for all your support! Have a great day! 


Sunday, March 29, 2015

CCMC Card "Create"tions Preview Week: Day 1 and Blog Candy!


Hello everyone! I am so excited to announce that I will be a designer for the Create with Connie and Mary Card "Create"tions Celebrations edition! This week is Preview Week! Each day a new designer will be announced and there will be opportunities to win blog candy! So be sure to check out the Create with Connie and Mary site every day! And while you're there be sure to sign up for this edition! You won't be disappointed!

For my preview card today I am showing you a card that uses one of the stamp sets that I will be using during the edition, Pictogram Punches. This is such a fun set and great for anyone and any occasion! To see all the other cards I will make with this set you have to be a subscriber to the Card "Create"tions Celebrations! 


  • Card base is Whisper White cut at 5 1/2" x 8 1/2" and folded in half
  • Adhere a piece of Basic Black that is cut at 5" x 3 3/4" to the card base
  • Cut a piece of Whisper White at 4 7/8" x 3 5/8"
  • Use the Confetti Stars border punch to punch the stars along the top of the panel
  • Stamp the lines image from Gorgeous Grunge using Crushed Curry ink
  • Stamp the speckle image using Tuxedo black Momento ink and stamp the sentiment from Pictogram Punches using the same ink right over the lines image
  • Tie a piece of Basic Black 1/8" taffeta ribbon around the panel and adhere to card with dimensionals
  • Cut a star from Crushed Curry using the Stars framelits (the second one from the smallest)
  • Stamp the speckle stamp from Gorgeous Grunge onto the star using Crushed Curry ink then sponge the edges and adhere to card with dimensionals
  • Stamp the star image from the Pictogram Punches set onto Whisper White using Crushed Curry ink and punch out with the itty bitty accents punch pack and adhere to card then add a rhinestone to the star
If you want to win a FREE subscription to this edition all you have to do is leave a comment on my blog today to be entered into the drawing! I love to hear from you! And don't forget to check out all the details about the new Cards edition at Create with Connie and Mary! I hope to see you there! Thanks for stopping by and have a super day!


Card Recipe: Stamps- Pictogram Punches, Gorgeous Grunge; Paper- Whisper White, Basic Black, Crushed Curry; Ink- Tuxedo black Momento ink, Crushed Curry; Accessories- Basic Black 1/8" taffeta ribbon, Confetti Stars border punch, Stars framelits, itty bitty accents punch pack, rhinestones, sponge, dimensionals

Thursday, August 21, 2014

CCMC 317

Good morning everyone! It's time for another challenge from the Create with Connie and Mary team! This week we have a super fun sketch to work with!


I have to admit that all those different strips kind of threw me off. I knew washi tape would be great and even strips of dsp but could I make it look good? So I went with a stamp...


I love the Dotty Angles stamps! I had used the dots but not the angles and I thought this would work! I paired it with another great stamp set, Pictogram Punches and I really like how this turned out!

  • Card base is Bermuda Bay
  • Stamp the angles image from Dotty Angles onto the card base using Bermuda Bay ink
  • Use the circle framelits to cut a circle from Whisper White and stamp the vase and stems image from Pictogram Punches onto the circle using Mossy Meadow ink
  • Stamp the vase and stems image again onto a piece of Whisper White using Calypso Coral ink and cut out just the vase then adhere the vase to the circle over the Mossy Meadow one
  • Adhere the stamped circle to a starburst cut from Calypso Coral using the Starburst framelits and then adhere to card with dimensionals
  • Stamp the greeting from Teeny Tiny Wishes onto a strip of Whisper White using Bermuda Bay ink and flag both ends then adhere to card
  • Punch three flowers from Daffodil Delight using the itty bitty accents punch pack and adhere to card
  • Add three Bermuda Bay candy dots to the flower centers
Stop by the Create with Connie and Mary site to see all the wonderful creations! So many great ideas! I look forward to seeing yours!!

Before I sign off I want to tell you about the Create with Connie and Mary Card "Create"tions coming soon! I'm so excited to be sharing some great cards for the upcoming seasons! Visit the Create with Connie and Mary site to get full details! 

Card Recipe: Stamps- Dotty Angles, Pictogram Punches, Teeny Tiny Wishes; Paper- Bermuda Bay, Calypso Coral, Daffodil Delight, Whisper White; Ink- Bermuda Bay, Calypso Coral, Mossy Meadow; Accessories- Circles framelits, Starburst framelits, itty bitty accents punch pack, Brights candy dots, dimensionals

Wednesday, August 13, 2014

Pictogram Vase

Good morning, Friends! It's a shorter day for me today! So I hope to get home and be productive in my craft room! I need to get a birthday present finished and ready to go for tomorrow and I need to get a lot of stamping done! But it seems like I have just been so tired! It won't be long now and my days will be packed! But I am really loving the job!

Today's card was another that I did with my stamp club on Monday. Super easy!

  • Card base is Whisper White
  • Stamp the vase image from Pictogram Punches onto a piece of Whisper White using Wild Wasabi ink and adhere to a piece of Island Indigo card stock
  • Adhere the panel to a piece of Whisper White card stock and stamp the greeting from Four You at the bottom using Island Indigo ink
  • Adhere the panel to the card base with dimensionals
  • Stamp the vase again onto a piece of Whisper White using Island Indigo ink and cut the vase part out and adhere over green vase with dimensionals
  • Punch flowers from Tangelo Twist, Crushed Curry and Rich Razzleberry using the itty bitty accents punch pack and adhere to stems
  • Add rhinestones to flower centers
  • Tie a knot with Blushing Bride 1/4" cotton ribbon and adhere to vase
  • Flag the end of a piece of Rich Razzleberry card stock and adhere to card
Thanks for stopping by and have a super day!

Card Recipe: Stamps- Pictogram Punches, Four You; Paper- Whisper White, Island Indigo, Rich Razzleberry, Tangelo Twist, Crushed Curry; Ink- Island Indigo, Wild Wasabi; Accessories- Blushing Bride 1/4" cotton ribbon, itty bitty accents punch pack, rhinestones, dimensionals

Monday, August 4, 2014

TSSC 326

Hello everyone! I am able to take a lunch hour for myself and since I live so close to the school, I came home for an hour. I did make this card this morning after I took Nick to school. I had about an hour before I needed to leave. I had crossing guard duty this morning and it decided to rain. Thank goodness for a new umbrella! It's raining now. Sure is making it really humid! 

Thank goodness for a super simple and cute sketch from Techno Stamper! Love this one!!

  • Card base is Sahara Sand
  • On a piece of Moonlight designer paper stamp the sentiment from Pictogram Punches using Blackberry Bliss ink
  • Adhere the designer paper to a piece of Blackberry Bliss card stock and then adhere panel to card with dimensionals
  • Adhere a strip of Black Berry Bliss to card
  • Use the Stars framelits to cut a star from Hello Honey and adhere to card with dimensionals 
  • Add rhinestones to card
Thanks for stopping by and have a super day!

Card Recipe: Stamps- Pictogram Punches; Paper- Sahara Sand, Blackberry Bliss, Hello Honey, Moonlight designer paper; Ink- Blackberry Bliss; Accessories- Stars framelits, rhinestones, dimensionals

Monday, June 30, 2014

Simple Vase

Hello everyone! Here is a super simple card! But I do love it! Hope you do, too!!

  • Card base is Island Indigo
  • Scallop the top of a piece of Whisper White with the scallop edge border punch
  • Stamp the vase and stem image from the Pictogram Punches stamp set in Wild Wasabi onto the punched piece and stamp again onto another piece of Whisper White with Pool Party ink and cut the vase out
  • Adhere the Pool Party vase over the Wild Wasabi vase
  • Stamp the greeting from Petite Pairs onto the panel with Island Indigo ink
  • Tie a piece of Pool Party 1/4" cotton ribbon around panel and adhere to card with dimensionals
  • Punch three flowers from Crushed Curry ink with the itty bitty accents punch pack and adhere to card
  • Add rhinestones to flower centers
Thanks for stopping by and have a super day!


Card Recipe: Stamps- Pictogram Punches, Petite Pairs; Paper- Island Indigo, Crushed Curry, Whisper White; Ink- Pool party, Wild Wasabi, Island Indigo; Accessories- Pool Party 1/4" cotton ribbon, scallop edge border punch, itty bitty accents punch pack, rhinestones, dimensionals

Tuesday, June 24, 2014

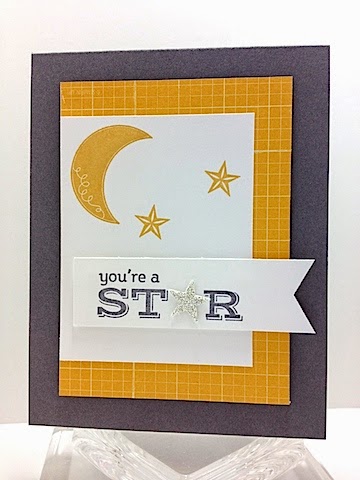
You're A Star

Hello everyone! Fun with a new stamp set! Enjoy!

  • Card base is Basic Grey
  • On a piece of Whisper White stamp the moon and stars images from Pictogram Punches with Hello Honey ink
  • Adhere stamped panel to a piece of Moonlight designer paper and then adhere to card with dimensionals
  • Stamp the sentiment onto a strip of Whisper White using Basic Grey ink and flag the end then adhere to card with dimensionals
  • Punch a star from silver glimmer paper with the itty bitty accents punch pack and adhere over the star in the sentiment with a glue dot
Thanks for stopping by and have a super day!


Card Recipe: Stamps- Pictogram Punches; Paper- Basic Grey, Whisper White, silver glimmer paper, Moonlight designer paper; Ink- Hello Honey, Basic Grey; Accessories- itty bitty accents punch pack, dimensionals