Showing posts with label More Merry Messages. Show all posts

Tuesday, December 24, 2013

Santa Hat Greetings

Good morning, Friends! And Merry Christmas Eve! Things are getting pretty exciting around here! It did snow a little more here yesterday and today it looks just plain cold out there! In fact the wind is blowing. I think we are going to go see a movie later today but otherwise it's another cozy day indoors - lol! 

Today's card was inspired by a few on Pinterest that used a punch art Santa hat. I thought it was just too cute not to try and recreate! To make the Santa hat use the extra large oval punch and punch an oval from Real Red. Then us the Word Window punch to make the little "crook" (just slide the red oval into the punch just a bit). Punch an oval scallop from Whisper White and then slide the scalloped oval into the extra large oval punch to make the lower curve. Adhere the Whisper White piece to the red piece. Use the 1/2" circle punch to punch a circle from silver glimmer paper and adhere to end of hat. Now for the rest of the card details:

  • Card base is Whisper White
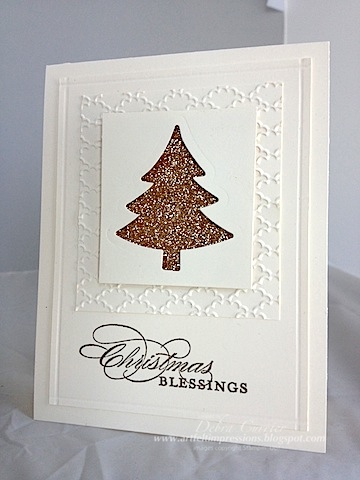
  • Layer of Whisper White that was run through the Big Shot using the Northern Flurry embossing folder
  • Stamp greeting from More Merry Messages in Real Red onto Whisper White layer and adhere to card with dimensionals
  • Adhere Santa hat to card with dimensionals
  • Add rhinestones to snowflake centers
Have a wonderful day and thanks for stopping by!

Card Recipe: Stamps- More Merry Messages; Paper- Whisper White, Real Red, silver glimmer paper; Ink- Real Red; Accessories- Northern Flurry embossing folder, extra large oval punch, scallop oval punch, 1/2" circle punch, Word Window punch, rhinestones, dimensionals

Sunday, December 22, 2013

Glimmered Greetings

Hello everyone! Well it snowed about 8 inches yesterday and into the night! It's so pretty!! And it's even better that we were able to get here before it got really bad! We will have to dig out the car in a while as Nick wants to go to the local rec center here and try out his new basketball. Otherwise it's kick back, snack and watch some football! Go Broncos!!

Today's card was inspired by one I had seen on Pinterest. A pretty simple card! Here are the details:

  • Card base is Crumb Cake
  • Layer of Cherry Cobbler that was run through the Big Shot with the Stylish Lines embossing folder then adhered to the card
  • Flag the end of a strip of silver glimmer paper and adhere to card
  • Stamp the tree image from Evergreen three times in Old Olive without re-inking onto Whisper White
  • Stamp greeting from More Merry Messages in black StazOn
  • Add two mini brads and then adhere panel to card with dimensionals
Thanks for stopping by and have a wonderful day!

Card Recipe: Stamps- Evergreen, More Merry Messages; Paper- Crumb Cake, Cherry Cobbler, Whisper White, silver glimmer paper; Ink- Old Olive, black StazOn; Accessories- Stylish Lines embossing folder, mini brads, dimensionals

Wednesday, December 18, 2013

Single Tree

Good morning, Friends! I am happy to report that I did get my Christmas shopping done yesterday! And I got almost everything wrapped! Woohoo! I think we will be ready to have Christmas before we leave to see my parents! Nick starts a few of his finals today. I think we will have a quiet couple of evenings as he doesn't have basketball practice. That will be nice. Seems like we have been running all over! 

Today's card is a simple one! I was able to get a card stamped yesterday before I set out to shop! Had to make it quick so this fit the bill! Here are the details:

  • Card base is Whisper White
  • Layer of Whisper White that has the tree stand from Pennant Parade stamped in Chocolate Chip and the greeting from More Merry Messages in Cherry Cobbler
  • Round the upper right hand corner of the layer with the 1" circle punch then adhere to card base with dimensionals
  • Stamp tree in Old Olive and cut out then adhere to card with dimensionals
  • Add a rhinestone to top of tree
There you have it! Thanks for stopping by and have a super day!

Card Recipe: Stamps- Pennant Parade, More Merry Messages; Paper- Whisper White; Ink- Chocolate Chip, Cherry Cobbler, Old Olive; Accessories- 1" circle punch, rhinestone, dimensionals

Monday, December 16, 2013

A Trio of Triangular Trees

Good morning, Friends! Wow! Here we are at another week! This is the last week of the semester for Nick. And he starts his basketball practices tonight! Yep! He made the team! Woohoo! He is really excited that his basketball playing will be extended! And I am happy for him! It looks like I need to get myself out into the cold and do a little Christmas shopping today or tomorrow. We leave Friday afternoon so I guess I had better get it done! 

Today's card was inspired by all the triangular trees that I have been seeing! I love them! And they are really easy to do! Especially when you have the Perfect Pennants die!! Here are the details:

  • Card base is Very Vanilla
  • Using the Perfect Pennants die cut one large triangle out of Etcetera designer paper, one middle size and one small triangle out of Old Olive card stock
  • Run the two Old Olive triangle through the Big Shot using the Stylish Stripes embossing folder and then adhere to card
  • Stamp greeting from More Merry Messages in Soft Suede onto largest triangle and sponge edges with Soft Suede
  • Adhere largest tree to card with dimensionals
  • Cut the star from champagne glimmer paper using the star thinlit from the Circle Card thinlit die pack and adhere to top of largest tree
Thanks for stopping by and have a super day!

Card Recipe: Stamps- More Merry Messages; Paper- Very Vanilla, Old Olive, champagne glimmer paper, Etcetera designer paper; Ink- Soft Suede; Accessories- Circle Card thinlits dies, Perfect Pennants die, Stylish Stripes embossing folder; sponge, dimensionals

Saturday, December 14, 2013

Hexie Tree

Good morning, Friends! Are you all ready for a great weekend? I know I am! I didn't get to do my regular stitching evening with my friend, Becky because she wasn't feeling well so my family and I ordered a pizza and watched a movie! Nick was home from school yesterday because he was sick. Thankfully he was feeling better by evening. I am hoping that he is even better today. I really hate when he is sick these last few days of the semester! We will see how much homework he has on Monday - ugh! And I can't even begin to tell you how far behind in Christmas shopping I am! But I refuse to go on the weekends! I just hate to fight the crowds. So I will try on Monday morning. Maybe :) For now, it's a nice quiet weekend!

Today's card was inspired by others that I had seen on Pinterest. I thought it was genius to make a tree from the hexagon punch and wanted to try one for myself! I love it! Here are the details:

  • Card base is Cherry Cobbler
  • Layer of Old Olive 
  • Use the scallop edge border punch to punch along the bottom of the Old Olive piece
  • Use the hexagon punch to punch 6 shapes from the Season of Style designer paper
  • Sponge the edges of each shape and the edges of the Old Olive piece with Crumb Cake
  • Use dimensionals to adhere the shapes to the Old Olive piece to make a tree
  • The trunk was made using Chocolate Chip card stock and adhered flat
  • Wrap a piece of Cherry Cobbler baker's twine twice and tie a bow
  • Stamp greeting from More Merry Messages in Cherry Cobbler and adhere panel to card base
  • Add rhinestones to each shape
Thanks for stopping by and enjoy your day!

Card Recipe: Stamps- More Merry Messages; Paper- Cherry Cobbler, Old Olive, Chocolate Chip, Season of Style designer paper; Ink- Cherry Cobbler, Crumb Cake; Accessories- Cherry Cobbler baker's twine, hexagon punch, scallop edge border punch, rhinestones, sponge, dimensionals

Thursday, December 5, 2013

CCMC 280

Good morning, Friends! The holiday season is in full swing! I did manage to finish one of my sewing projects and the other two are well on their way to getting there as well. But I need to finish up a few projects that I started earlier this summer and our get-together is next week! Yikes! Thankfully they were started and just need the finishing touches put on. But I am trying to get back into the stamping routine, too! I missed it! So I hope to have more cards to show you all! Thanks for sticking with me! You are the best!!

Today is the Thursday challenge at Create with Connie and Mary! And they have a fantastic and festive color challenge! Take a look!


And my card!


This card is really very simple and very elegant! Love how regal the gold embossing looks on the Night of Navy! Here are the details:

  • Card base is Night of Navy
  • Stamp tree from Evergreen using VersaMark ink and emboss with gold emboss powder
  • Cut a panel of Night of Navy card stock and use the Ovals Collection framelits to cut an oval in the panel
  • Stamp greeting from More Merry Messages using VersaMark and emboss with gold emboss powder
  • Sponge the inside edge of the oval with Whisper White craft ink
  • Tie a piece of Whisper White taffeta ribbon around panel
  • Adhere panel to card base using dimensionals
These two stamp sets are carry over sets and I am SO glad because I really like them!! I hope you are inspired by my card but be sure to check out the rest of the cards from the fabulous design team at the Create with Connie and Mary website! I hope you will play along this week! Thanks for stopping by and have a super day!

Card Recipe: Stamps- Evergreen, More Merry Messages; Paper- Night of Navy; Ink- VersaMark, Whisper White craft ink; Accessories- Whisper White taffeta ribbon, Ovals Collection framelits, gold emboss powder, dimensionals

Monday, December 24, 2012

Happy Christmas Tree

Good morning everyone! Well, tomorrow is Christmas! Are you all ready? We will be doing part two of our Christmas with my parents today. Since my sister has to work we will be going down to her place to have dinner and do gifts. Then we will go to their Christmas Eve service and then drive home. I am sad that we won't get to spend as much time with them. My brother drives home tomorrow and we will be going home on Friday. Geesh! It all goes by so quickly!! So I will enjoy today!

Today's card is another easy Christmas card. I will have to remember some of these easy ones for next year so I can get them made! This is also a good one to mail as it doesn't have any embellishments! I like the simplicity of it, too! I ran a piece of Cherry Cobbler through the Big Shot with the Chevron embossing folder and then popped it up onto a card base of Cherry Cobbler. Then I used my Ovals Collection framelits dies to cut an oval from Whisper White. This is also popped up onto the card. I stamped the tree from Scentsational Season in Gumball Green onto a piece of Whisper White and cut it out using the Holiday Collection framelits dies and popped it up onto the oval. I punched a star from silver glimmer paper using the Merry Minis punch pack and adhered it to the top of the tree. I stamped the greeting from More Merry Messages in Cherry Cobbler onto a strip of Whisper White and flagged both ends. This is adhered to the tree. Thanks for stopping by and have a great day!!

Card Recipe: Stamps- Scentsational Season, More Merry Messages; Paper- Cherry Cobbler, Whisper White, silver glimmer paper; Ink- Gumball Green, Cherry Cobbler; Accessories- Chevron embossing folder, Holiday Collection framelits dies, Ovals Collection framelits dies, Merry Minis punch punch pack, dimensionals

Sunday, December 23, 2012

Frosty Friends Christmas

Good Sunday morning, Friends! I hope your weekend is going just great! We will be doing Christmas tonight with my brother and parents. A little unconventional but tomorrow we will drive to my sister's house to do Christmas there and then my brother has to go home on Christmas day. This is the first time that my brother's and sister's jobs have prevented us from doing Christmas all together. Yes, it's a bummer but at least we can see each other for a bit. And for that, I am very thankful!

Today's card uses the Frosty Friends single stamp. Such a cute stamp! There isn't much to this one but I wanted to use it for a Christmas card so here is what emerged. I took a piece of Whisper White and ran it through the Big Shot with the Northern Flurry embossing folder. Then I stamped the greeting from More Merry Messages in black StazOn. This is then popped up onto the card base of Whisper White. Then I stamped the image onto a piece of Whisper White in black StazOn and cut it out using the Ovals Collection framelits dies (these will be available in the new spring mini catalog to debut in January). I colored the image using Real Red, Old Olive, Sahara Sand, Pool Party, and Pumpkin Pie markers. Then I popped the oval up onto the card. Thanks for stopping by and have a super day! Go Broncos!!

Card Recipe: Stamps- Frosty Friends, More merry Messages; Paper- Whisper White; Ink- black StazOn, Pool Party, Pumpkin Pie, Sahara Sand, Old Olive, Real Red; Accessories- Northern Flurry embossing folder, Ovals Collection framelits dies, dimensionals

Friday, December 21, 2012

SFF 122112

Good Friday morning everyone! It's Sketch Frenzy Friday time! This week's sketch was created by Robbie Rubala. Take a look!


Simple enough, right? Well, I struggled with what to do but here is what I finally came up with.


I decided to keep it very simple. I took a piece of Crumb Cake and cut it into three pieces. These pieces are adhered to a piece of Cherry Cobbler and then to a card base of Crumb Cake. Then I punched two Crumb Cake squares using the Postage Stamp punch and sponged the edges with Crumb Cake These are adhered to the card. I stamped the greeting from More Merry Messages in Cherry Cobbler. Then I punched two ornaments from Cherry Cobbler using the Merry Minis punch pack. These are popped up onto the squares. I tied bows using linen thread and adhered them to the ornaments. Then I added pearls and called it done!

Be sure to visit the Sketch Frenzy Friday site to see what the rest of the team did with this sketch! I do hope that you will be able to find some time to play along with us this week! We always love to see what you do with our challenges! Thanks so much for stopping by and have a Merry Christmas and a Happy New Year!

Card Recipe: Stamps- More Messages; Paper- Crumb Cake, Cherry Cobbler; Ink- Cherry Cobbler, Crumb Cake; Accessories- Postage Stamp punch, Merry Minis punch pack, linen thread, pearls, sponge, dimensionals

Thursday, December 13, 2012

CCMC 230

Good morning, Friends! Create with Connie and Mary have another fabulous challenge for us this week! They are challenging us with color. Take a look!


This week Connie and Mary want us to use the beautiful and most elegant combination of Very Vanilla and Champagne glimmer paper! Love it! And here is what I created!


I kept my card very simple and let the colors speak for themselves. I love that this would be a super card to mass produce for the holidays! I have several layers of Very Vanilla so let me take you through them. The top layer was run through the Big Shot using the Holiday Collections framelits dies. This is then popped up onto a piece of Champagne glimmer paper. Then this adhered to the second piece of Very Vanilla that was run through the Big Shot using the Fancy Fan embossing folder. I then adhered this to the third layer of Very Vanilla. The third layer was scored with the Simply Scored tool 1/8" from the edge to create a "frame". I also stamped the sentiment from More Merry Messages in Soft Suede at the bottom. Finally, I popped all of this up onto the card base of - you guessed it, Very Vanilla! 

Find more inspiration using these fabulous colors by visiting the Create with Connie and Mary website. I hope that you will play along with us this week and show us your fabulous creations using these great colors! We always love to see what you do! Thanks for stopping by and have a great day!

Card Recipe: Stamps- More Merry Messages; Paper- Very Vanilla, champagne glimmer paper; Ink- Soft Suede; Accessories- Holiday Collections framelits dies, Fancy Fan embossing folder, Simply Scored tool, dimensionals

Monday, December 10, 2012

Snowflake Blessings

Good morning, Friends! Another week is here - ugh! I'm not ready (yes, I am whining - lol). But here it is. So I guess I will rejoice and be glad!! After I have some coffee and wake up a bit - lol! I am excited as I get my haircut and I have a workshop! That will be fun! Nick is sure acting like he is getting sick. Not cool! He has basketball tryouts this week. And with the end of the quarter coming up, he has a projects that need finishing and tests that need taking. I am hoping that he can make it all day. I know the crud is going around. Ugh!!

Today's card was inspired by one that I have saved on my Pinterest board. I stamped the sentiment from More Merry Messages in black StazOn onto Whisper White. Then I attached this to a piece of silver glimmer paper that was punched with the scallop edge border punch. This is popped up onto a card base of Wisteria Wonder that has a piece of Pool Party designer paper adhered to it. Then I cut two snowflakes using the Snow Flurry die - one from silver glimmer paper and one from Whisper White. I punched a hole through both and inserted a Pool Party brad. These are popped up onto the card.

Card Recipe: Stamps- More Merry Messages; Paper- Wisteria Wonder, Whisper White, silver glimmer paper, In Color designer paper stack; Ink- black StazOn; Accessories- In Color brads, Snow Flurry die, scallop edge border punch, dimensionals

Friday, December 7, 2012

SFF 120712

Good morning everyone! Thank goodness it's FRIDAY!! It's time for another challenge from the Sketch Frenzy Friday team. This week's sketch was created by Maria Vanderform. Take a look!


Pretty simple and straight forward. And I had fun creating with this one! Here is what I did with it!


I started out by stamping the greeting from More Merry Messages in black StazOn onto a piece of Always Artichoke. Then I tied a piece of Crumb Cake seam binding ribbon around this and popped it up onto a card base of Always Artichoke. Then I stamped the image from Snow Much Fun in black StazOn onto a piece of watercolor paper and watercolored the image with a variety of ink pads and an aqua painter. Then I used the scallop edge border punch on the side. I adhered this to a piece of Cherry Cobbler and then popped this up onto the card. Finally I added a strip of champagne glimmer paper. 

For more inspiration visit the Sketch Frenzy Friday site to see what the other designers did with this sketch. I hope that you will play along with us! We always love to see what you do with our sketches! Thanks for stopping by and have a super day!

Card Recipe: Stamps- More Merry Messages, Snow Much Fun; Paper- Always Artichoke, Cherry Cobbler, watercolor paper, champagne glimmer paper; Ink- black StazOn, Pool Party, Always Artichoke, Cherry Cobbler, Early Espresso; Accessories- Crumb Cake seam binding ribbon, scallop edge border punch, aqua painter, dimensionals

Thursday, December 6, 2012

CCMC 229

Hello everyone! It's time for another Thursday challenge from the Create with Connie and Mary team! This week we have a sketch challenge! Take a look!


Such a fun sketch and I had a great time creating my card! I tried my very best to get away from the traditional Christmas colors and here is what I came up with!


I was still able to use the Festival of Prints and picked a fun print! So I started by adhering a piece of the Festival of Prints paper to a piece of Island Indigo and then tied a piece of Crumb Cake seam binding ribbon around this. This panel is then popped up onto a card base of Crumb Cake. I punched a 1 3/4" circle from Crumb Cake and then ran it through the Big Shot with the Perfect Polka Dot embossing folder. This is adhered to a 2 3/8" scallop circle of Cherry Cobbler. Then I used the Essential Paper Piercing pack and punched an outline around the Crumb Cake circle. This is popped up onto the card. Then I stamped the image from Scentsational Season in Early Espresso onto Very Vanilla and used the Holiday framelits dies to cut it out. This is popped up onto the circle. I stamped the greeting from More Merry Messages in Early Espresso onto a strip of Very Vanilla and flagged the end. I tucked the other end behind the image. Then I added a heart that was punched from Cherry Cobbler with the Owl builder punch and a little rhinestone.

Be sure to visit the Create with Connie and Mary website to see what the other designers did with this fabulous sketch! I hope you get inspired and find some time to play along with us! We always love to see what you come up with! Thanks for stopping by and have a super day!

Card Recipe: Stamps- Scentsational Season, More Merry Messages; Paper- Crumb Cake, Island Indigo, Cherry Cobbler, Very Vanilla, Festival of Prints designer paper; Ink- Early Espresso; Accessories- Crumb Cake seam binding ribbon, 2 3/8" scallop circle punch, 1 3/4" circle punch, Essentials Paper Piercing pack, Owl builder punch, rhinestone, dimensionals