Showing posts with label Teeny Tiny Wishes. Show all posts

Friday, April 3, 2015

CCMC Preview Week Day 6!

Hello everyone! It's a bright sunny day today! And it makes me happy! I hope your day is a good one so far! I did get the mountain of laundry done yesterday and that feels so good! Not sure what we are doing today but it's nice to have time to just sit and relax!

Today's card is a fun Easter card! I can't believe that Easter is Sunday! Wow!! I was inspired by last week's sketch at Freshly Made. A super simple one!

  • Card base is Smoky Slate cut at 11" x 4 1/4" and fold in half
  • Cut a piece of Whisper White at 3 1/4" x 4" and round the two left hand corners with the Project Life corner rounder
  • Stamp the bunny image from Cheerful Critters onto the Whisper White panel using Tuxedo black Momento ink and stamp the greeting in the sign from Teeny Tiny Wishes using Tuxedo black Momento ink
  • Color the bunny using Smoky Slate marker and a blender pen and the dress using Strawberry Slush marker (I also added some Strawberry Slush to her ears)
  • Cut a strip of Pistachio Pudding at 1 1/4" x 4" and fringe the edge using the fringe scissors
  • Adhere fringed strip to the stamped panel
  • Tie a piece of Whisper White cotton twine from the Painted Blooms cotton twine pack around the panel and adhere to card base with dimensionals
  • Punch a flower from Strawberry Slush using the itty bitty accents punch pack and adhere to card
  • Add a rhinestone to flower center
Be sure to visit the Create with Connie and Mary site! Nicole has a super fun project to share with you today! She is also giving away blog candy!! And while you're there, don't forget to sign up for the Cards "Create"tions Celebration edition! We are getting ready to have some fun!! I hope to see you there! Thanks for stopping by and have a super day!


Card Recipe: Stamps- Cheerful Critters, Teeny Tiny Wishes; Paper- Smoky Slate, Pistachio Pudding, Whisper White, Strawberry Slush; Ink- Smoky Slate, Strawberry Slush, Tuxedo black Momento ink; Accessories- Painted Blooms cotton twine, fringe scissors, itty bitty accents punch pack, rhinestones, Project Life corner rounder, dimensionals

Thursday, August 21, 2014

CCMC 317

Good morning everyone! It's time for another challenge from the Create with Connie and Mary team! This week we have a super fun sketch to work with!


I have to admit that all those different strips kind of threw me off. I knew washi tape would be great and even strips of dsp but could I make it look good? So I went with a stamp...


I love the Dotty Angles stamps! I had used the dots but not the angles and I thought this would work! I paired it with another great stamp set, Pictogram Punches and I really like how this turned out!

  • Card base is Bermuda Bay
  • Stamp the angles image from Dotty Angles onto the card base using Bermuda Bay ink
  • Use the circle framelits to cut a circle from Whisper White and stamp the vase and stems image from Pictogram Punches onto the circle using Mossy Meadow ink
  • Stamp the vase and stems image again onto a piece of Whisper White using Calypso Coral ink and cut out just the vase then adhere the vase to the circle over the Mossy Meadow one
  • Adhere the stamped circle to a starburst cut from Calypso Coral using the Starburst framelits and then adhere to card with dimensionals
  • Stamp the greeting from Teeny Tiny Wishes onto a strip of Whisper White using Bermuda Bay ink and flag both ends then adhere to card
  • Punch three flowers from Daffodil Delight using the itty bitty accents punch pack and adhere to card
  • Add three Bermuda Bay candy dots to the flower centers
Stop by the Create with Connie and Mary site to see all the wonderful creations! So many great ideas! I look forward to seeing yours!!

Before I sign off I want to tell you about the Create with Connie and Mary Card "Create"tions coming soon! I'm so excited to be sharing some great cards for the upcoming seasons! Visit the Create with Connie and Mary site to get full details! 

Card Recipe: Stamps- Dotty Angles, Pictogram Punches, Teeny Tiny Wishes; Paper- Bermuda Bay, Calypso Coral, Daffodil Delight, Whisper White; Ink- Bermuda Bay, Calypso Coral, Mossy Meadow; Accessories- Circles framelits, Starburst framelits, itty bitty accents punch pack, Brights candy dots, dimensionals

Thursday, August 7, 2014

CCMC 315

Good morning, Friends! It's time for a new challenge at Create with Connie and Mary! This week we have a sketch to work with! Take a look!


I have to admit that the lines in the background kind of threw me off but then I pulled out my favorite stamp set and went to work!


  • Card base is Calypso Coral
  • Stamp the dots image Kinda Eclectic on the card base using Calypso Coral ink
  • Flag the end of a strip of Moonlight designer paper and adhere to card
  • Stamp the greeting from Teeny Tiny Wishes onto a strip of Whisper White using Calypso Coral ink, flag the end and adhere to card
  • Stamp the sun image from Kinda Eclectic onto a piece of Whisper White using Hello Honey ink and cut out using the Circles framelits then adhere to card with dimensionals
  • Stamp the butterfly image onto Blushing Bride card stock using Blushing Bride ink and punch out using the Elegant Butterfly punch then adhere to card
  • Add a Calypso Coral candy dot to butterfly
Be sure to visit the Create with Connie and Mary site to see more great samples using this sketch! I hope you will join us this week! We always love to see what you create! Thanks for stopping by and have a super day!

Card Recipe: Stamps- Kinda Eclectic, Teeny Tiny Wishes; Paper- Calypso Coral, Blushing Bride, Whisper White, Moonlight designer paper; Ink- Calypso Coral, Hello Honey, Blushing Bride; Accessories- Circles framelits, Elegant Butterfly punch, Subtles candy dots, dimensionals

Monday, July 28, 2014

Eclectic Framed

What a great weekend! Looks like it kinda wore me out! But I had woken up at 5:15. I said 'nope'! Fell back asleep and here I am! I have to do at least one load of laundry as I have an interview today!! Yep! I am looking at possibly getting back into the work place. I would like to earn a little extra money to help with a few bills and have some 'fun' money, too! So wish me luck!

For today's card I pulled out one of my favorite sets! I took my colors from the All Abloom designer paper. 

  • Card base is Whisper White
  • Stamp the sun image from Kinda Eclectic onto the card base using Daffodil Delight
  • Stamp the leaf image several times using Mossy Meadow
  • Stamp the dots image using Lost Lagoon
  • Cut the from from Whisper White using the On Film framelits
  • Stamp the greeting from Teeny Tiny Wishes onto the frame using Lost Lagoon ink
  • Wrap a piece of linen thread around the frame twice then adhere to card with dimensionals
  • Tie a piece of linen thread through a Basic Metal button and adhere to frame
  • Stamp the butterfly image onto a piece of Whisper White using Strawberry Slush ink and punch out with the bitty butterfly punch then adhere to card
  • Add rhinestones to butterfly
Thanks for stopping by and have a super day!

Card Recipe: Stamps- Kinda Eclectic, Teeny Tiny Wishes; Paper- Whisper White; Ink- Daffodil Delight, Mossy Meadow, Lost Lagoon, Strawberry Slush; Accessories- On Film framelits, Bitty Butterfly punch, Basic Metal button, linen thread, rhinestones, dimensionals

Thursday, July 3, 2014

CCMC 310

Good morning, Friends! It's time for another fabulous Thursday challenge from the Create with Connie and Mary team! This week we have these fabulous colors to work with! Take a look!


Real Red, Coastal Cabana and Night of Navy! Love these!! And my first thought was something nautical. Here's my card.


I did throw in Crumb Cake for my neutral. I do have to admit that I really like how this one turned out! It was really fun to put these colors together!

  • Card base is Crumb Cake
  • On the card base stamp the coral image from By the Tide using Crumb Cake ink
  • Flag the ends of a strip of Night of Navy and Coastal Cabana card stock then adhere to card
  • Stamp the lobster image using Real Red ink onto Crumb Cake and cut out then adhere to card with dimensionals
  • Stamp the circle image onto Crumb Cake using Coastal Cabana ink and cut out with snips (you can use the circle punch to punch it out but I like the look of it hand cut)
  • Insert a mini brad at the top of the anchor in the punched circle and then adhere to card with dimensionals
  • Stamp the greeting from Teeny Tiny Wishes onto the card base using Night of Navy ink
Pretty simple card! More inspiration using these great colors are at Create with Connie and Mary! Week 2 of the Create with Connie and Mary Summer Collection is well underway! I hope you haven't missed any of these beautiful projects! You can still sign up and enjoy all the projects that have been shared! Don't delay! You won't be disappointed!


So what is Create with Connie and Mary Summer Collection 2014 all about? 
  • 4 FABULOUS weeks filled with wonderful ideas featuring the products from the NEW 2014-15 catalog!
  • 18 EXCLUSIVE 3D projects suitable for classes and stamp camps...most completed within 2 hours!
  • PLUS 24 card ideas seen ONLY by our subscribers (6 stamp sets with 4 cards each)
As with ALL of our collections...
  • Our projects are ONLY available to our subscribers...we never show the collection projects online (ONLY the Preview Projects are shown)
  • EACH project has a full downloadable PICTURE tutorial that continues all the information you need to recreate the project!
  • Less than $1 per project!

Summer Collection runs June 22-July 12!

Thanks for stopping by and have a super day!

Card Recipe: Stamps- By the Tide; Paper- Crumb Cake, Night of Navy, Coastal Cabana; Ink- Coastal Cabana, Crumb Cake, Real Red, Night of Navy; Accessories- mini brad, dimensionals

Saturday, June 21, 2014

Kinda Just for You

Good morning everyone! I am pre posting the next couple of weeks of posts because I am in Brazil!! Woohoo!! So I won't say a lot. I don't know how much access I will have to internet so that's the reason for the pre posting. If I do have access then I will try to update my posts so you all know what we are doing down here! 

Today's card was inspired and CASE'd from the recent Stampin' Success magazine. The design in the magazine was actually on a treat bag. I just transferred it to a card! I just love this stamp set and they had three great designs for me to copy - lol! 

  • Card base is Crumb Cake
  • Stamp the sunburst image from Kinda Eclectic onto the card base using the Whisper White craft pad
  • Run a strip of Garden Green through the Big Shot using the Decorative Dots embossing folder and flag both ends then adhere to card base
  • Stamp the dots image onto a banner Essentials Wooden Element using Lost Lagoon ink and adhere to card
  • Stamp the larger butterfly image onto Crushed Curry card stock using Crushed Curry ink and punch out with the Elegant Butterfly punch then adhere to card
  • Add a small string of sequins to butterfly body
  • Stamp the greeting from Teeny Tiny Wishes onto card with black StazOn ink
Create with Connie and Mary are getting ready to kick off the Summer Collection! Don't miss out! Early Bird pricing is ending soon!! Hope to see you there!


Thanks for stopping by and have a super day!

Card Recipe: Stamps- Kinda Eclectic; Paper- Crumb Cake, Garden Green, Crushed Curry; Ink- Crushed Curry, Lost Lagoon, Whisper White craft; Accessories- Essentials Wooden Elements, Decorative Dots embossing folder, Elegant Butterfly punch, gold sequins

Friday, June 20, 2014

colourQ challenge 245

Hello everyone! In a few short hours my son and I will be on a plane with other boys from the soccer team and some of their parents and flying to Brazil! Woohoo! We are so excited!! We actually get there tomorrow morning so that will throw our bodies into some kind of weirdness but it will all be worth it! We can't wait!! I hope you are enjoying Preview Week at Create with Connie and Mary! Today Natasha and Debbie have blog candy to share so be sure to check that out!

Today's card was inspired by the color challenge at colourQ. I substituted Hello Honey for Summer Starfruit and I thought that this stamp set would work great with these colors!

  • Card base is Hello Honey
  • Adhere a piece of Moonlight designer paper to the card base
  • Stamp the sunburst image from Kinda Eclectic onto a piece of Whisper White using Hello Honey ink
  • Adhere stamped panel to a piece of Pacific Point and then adhere to card with dimensionals
  • Stamp the butterfly image onto Whisper White using Coastal Cabana ink and punch out with the Elegant Butterfly punch then adhere to card with dimensionals
  • Stamp the greeting from Teeny Tiny Wishes onto a strip of Whisper White using Pacific Point ink and adhere to butterfly
  • Punch a flower from Calypso Coral using the itty bitty accents punch pack and adhere to butterfly
  • Add a Pacific Point candy dot to flower center

Thanks for stopping by and have a super day!

Card Recipe: Stamps- Kinda Eclectic, Teeny Tiny Wishes; Paper- Hello Honey, Pacific Point, Calypso Coral, Whisper White, Moonlight designer paper; Ink- Hello Honey, Coastal Cabana, Pacific Point; Accessories- Elegant Butterfly punch, itty bitty accents punch pack, Brights candy dots, dimensionals

Tuesday, May 6, 2014

Golden Mother

Good morning, Friends! I hope your week is off to a great start! My son is counting the days till school is out! We have had some really warm days around here! And at Nick's soccer game this past weekend, I even got a pretty good sunburn! Now it looks to cool off a bit and I am ok with that! I didn't get much stamping done yesterday. I managed one card so I do hope that the mojo flows better today! I should be getting some new toys this week, too! 

Today's card was inspired by a sketch I saw on the Hero Arts blog. Don't really know how closely I followed it but it did help create this.

  • Card base is Very Vanilla
  • Adhere three strips of Watercolor Wonder washi tape to card base
  • Stamp the greeting from Teeny Tiny Wishes in black StazOn
  • Stamp the splatter stamp from Gorgeous Grunge in gold Encore ink
  • Use the Beautiful Wings embosslit to cut a butterfly from Soft Sky
  • Tie a piece of gold twine around the middle of the butterfly to form the antenna and then adhere to card with dimensionals
  • Add gold sequins to card
Super simple! Thanks for stopping by and have a super day!

Card Recipe: Stamps- Teeny Tiny Wishes, Gorgeous Grunge; Paper- Very Vanilla, Soft Sky; Ink- black StazOn, gold Encore; Accessories- Watercolor Wonder washi tape, Beautiful Wings embosslit, gold twine, gold sequins, dimensionals

Friday, April 18, 2014

Easter Florets

Good morning, Friends! Oh thank goodness it's Friday! It was a great time of sewing yesterday! I got a lot done on my project! So I signed up for two more days of sewing next week and I could potentially have it all done by then! But we will see… Lol! Tonight I am looking forward to a nice bbq with friends! 

Today's card was another one that I did with my stamp club this month. I wanted to show off some of the beautiful vellum that we sell as well as some of the other gold products. 

  • Card base is Very Vanilla
  • Adhere a piece of the gold designer vellum to another piece of Very Vanilla
  • Stamp the greeting from Teeny Tiny Wishes in black StazOn just above the vellum piece
  • Tie a piece of gold twine around the panel (I wrapped mine around the panel twice)
  • Adhere panel to card base with dimensionals
  • Stamp the stem from Fabulous Florets in Pear Pizzazz onto a piece of Very Vanilla and adhere to card with dimensionals
  • Stamp the flower images onto a piece of Very Vanilla with Blushing Bride and cut out then adhere to card with dimensionals
  • Add gold sequins to the card
Lots of layers and dimension! Thanks for stopping by and have a super day!

Card Recipe: Stamps- Fabulous Florets, Teeny Tiny Wishes; Paper- Very Vanilla, gold designer vellum; Ink- black StazOn, Pear Pizzazz, Blushing Bride; Accessories- gold twine, gold sequins, dimensionals

Thursday, April 17, 2014

CCMC 299

Good morning, Friends! It's time for another fun challenge from Create with Connie and Mary! This week week we have a sketch to work with!


This is definitely a fun sketch! Lots of possibilities!


I stayed pretty true to the sketch. 

  • Card base is Whisper White
  • Three squares were cut from a piece of Fresh Prints designer paper and the corners rounded with the corner rounder then adhered to a piece of Crumb Cake
  • This panel is then adhere to a piece of Real Red and then adhered to the card base with dimensionals
  • Use the Little Leaves sizzlet to cut a stem from Coastal Cabana card stock
  • Stamp the larger flower from Flower Shop in Real Red onto Whisper White and punch out using the Pansy punch and adhere the stem to the back side of the flower then adhere to card with dimensionals
  • Stamp the smaller flower from Petite Petals in Coastal Cabana onto Coastal Cabana card stock and punch out using the Petite Petals punch
  • Stamp the greeting from Teeny Tiny Wishes onto a strip of Whisper White using Coastal Cabana ink and flag the end then adhere to card
  • Adhere the smaller flower to card and add a Crumb Cake candy dot to flower center
Make sure to check out what the rest of the designers did with this fabulous sketch at the Create with Connie and Mary website! I hope you will play along with us this week! And don't forget about the Create with Connie and Mary card "Create"tions! We are finishing up our last week of cards! But you can still see all of the projects shared in this edition and download all the tutorials! Find out more at the Create with Connie and Mary website! And thanks to all of you that have shared such positive comments! Have a super day, everyone!


Card Recipe: Stamps- Flower Shop, Petite Petals, Teeny Tiny Wishes; Paper- Whisper White, Crumb Cake, Real Red, Coastal Cabana, Fresh Prints designer paper; Ink- Real Red, Coastal Cabana; Accessories- Pansy punch, Petite Petals punch, Little Leaves sizzlet, Neutrals candy dots, corner rounder, dimensionals

Friday, March 21, 2014

Washi Easter Eggs

Good morning, Friends! The school kiddos are excited around here! Today is the last day of school before spring break! Woohoo! Then they will have two weeks off before finishing off the year! I'm so excited for all of them, too! Nick is looking forward to riding his new bike! So I am a BIG March Madness fan! And I am so excited that it has started! It has been really fun to watch all the games. I have my remote control programmed with the channels to make switching a bit easier - lol! Today is a big day for me as three of my Kansas teams play! So excited to see what will happen!

Today's card was one that I did with my shoebox club this month. I had seen a canvas project that made a washi egg and thought that I could do that with our products!! 

  • Card base is Whisper White
  • To make the washi eggs, I cut a piece of Whisper White and adhered strips of the Gingham Garden washi tape down at a diagonal until the whole thing was covered then I used the extra large oval punch to punch the three eggs out
  • To make the grass I cut a strip of Pear Pizzazz card stock and used the fringe scissors to make the cuts
  • The grass is adhered to a piece of Whisper White
  • Tie a piece of white baker's twine around the bottom part of the grass then adhere the panel to a piece of Night of Navy
  • Adhere the panel to the card base with dimensionals
  • Adhere the eggs to the front panel just behind the fringed grass part
  • Stamp the greeting from Teeny Tiny Wishes in Night of Navy onto the card base
  • Add rhinestones wherever you wish - lol (mine are on the eggs and beside the greeting)
Thanks for stopping by and have a super day!

Card Recipe: Stamps- Teeny Tiny Wishes; Paper- Whisper White, Night of Navy, Pear Pizzazz; Ink- Night of Navy; Accessories- White baker's twine, fringe scissors, Gingham Garden washi tape, extra large oval punch, rhinestones, dimensionals

Friday, February 14, 2014

SSSC 205 - Happy Valentine's Day!

Happy Valentine's Day everyone! We will be on our way to Las Vegas in a while! Got a soccer tournament this weekend! I'm looking forward to getting out of town and seeing some warmer temperatures and sunshine!! Good luck Fire FC Premier Boys!!

Today's card was inspired by Karen Giron's sketch from a few weeks ago. Her sample card for the sketch got me thinking about the Circle Card thinlits and this is what I came up with! Here are the details:

  • Card base is Whisper White
  • On a layer of Whisper White use the Occasions paper piercing pack to pierce a heart (really hard to see in photo)
  • Use the "xoxo" die from the Circle Card thinlits to cut the image three times - two from Pink Pirouette and once from Real Red
  • Adhere the "xoxo" images to Whisper White layer using dimensionals
  • Stamp the greeting from Teeny Tiny Wishes in Real Red ink onto Whisper White layer
  • Adhere layer to card with dimensionals
  • Punch a banner from Real Red using the Bitty Banner punch and adhere to card
  • Punch a heart from Real Red using the Owl builder punch and adhere to card
  • Add small rhinestone to heart
I hope you all have a wonderful day today and a great weekend! Thanks for stopping by!

Card Recipe: Stamps- Teeny Tiny Wishes; Paper- Whisper White, Real Red, Pink Pirouette; Ink- Real Red; Accessories- Circle Card thinlits, Occasions paper piercing pack, Owl builder punch, Bitty Banner punch, rhinestone, dimensionals

Thursday, February 13, 2014

CCMC 290

Good morning, Friends! It's time for another Thursday challenge from the Create with Connie and Mary team! This week we have a fun color challenge! Take a look at these fabulous colors!


Island Indigo, Daffodil Delight and Smoky Slate. Love these bright cheerful colors! And here is how I used them!


I kept my card very simple! 

  • Card base is Daffodil Delight
  • A strip of Gingham Garden designer paper with the bottom flagged is adhered to the card base
  • Stamp the Vivid Vases image onto Whisper White with black StazOn
  • Use Island Indigo, Daffodil Delight and Smoky Slate ink pads and an aqua painter to color the images (be sure to work fast as Whisper White doesn't like to be watercolored on - lol)
  • I did use the same colors of markers to create some highlights in the images
  • Adhere stamped piece to a piece of Island Indigo
  • Tie a piece of Daffodil Delight seam binding ribbon around the panel and then adhere to card with dimensionals
  • Stamp the greeting from Teeny Tiny Wishes in Island Indigo onto the card base
Super simple! Find more fabulous inspiration from the rest of the designer team at the Create with Connie and Mary site! I hope you will play along with us this week and show us your beautiful creations using these colors! Thanks for stopping by and have a super day!

Card Recipe: Stamps- Vivid Vases, Teeny Tiny Wishes; Paper- Daffodil Delight, Island Indigo, Whisper White, Gingham Garden designer paper; Ink- black StazOn, Smoky Slate, Island Indigo, Daffodil Delight; Accessories- Daffodil Delight seam binding ribbon, aqua painter, dimensionals

Monday, February 10, 2014

Retro Fox

Good morning, Friends! I can't believe that Monday is here all over again! Time for a new week! I am hoping to get over my head cold this week! Ugh! I went to bed early last night after taking some night time stuff to help me sleep. And I think I slept pretty well. Now to get the day going! It is raining pretty hard right now so it will be a good day to get some stamping done!! I have stamp club tonight so that will be fun!! Always love to get together with the ladies!

Today's card was inspired by one I had pinned. Here are the details:

  • Card base is Baked Brown Sugar
  • Take a piece of Whisper White and round the two top corners
  • Take a piece of the Retro Fresh designer paper and round the top right corner then adhere to Whisper White panel
  • Take a strip of Coastal Cabana and punch the edge with the scallop edge border punch then adhere to the back of the panel
  • Adhere panel to card with dimensionals
  • Flag the end of a strip of Retro Fresh designer paper and adhere to card
  • Punch a circle from Baked Brown Sugar with the 1 3/8" circle punch and a circle from So Saffron with the 1 1/4" circle punch
  • Adhere circles together and then adhere them to the card with dimensionals
  • Stampe the greeting from Teeny Tiny Wishes in Baked Brown Sugar onto a strip of Very Vanilla and flag the end then adhere to card
  • Stamp the fox from Life in the Forest in black StazOn onto Very Vanilla
  • Color the fox with a Tangerine Tango marker and cut out then adhere to card with dimensionals
  • Add two Tangerine Tango candy dots to card
There you have it! Thanks for stopping by and have a super day!

Card Recipe: Stamps- Life in the Forest, Teeny Tiny Wishes; Paper- Very Vanilla, Baked Brown Sugar, Coastal Cabana, So Saffron, Retro Fresh designer paper; Ink- black StazOn, Tangerine Tango, Baked Brown Sugar; Accessories- scallop edge border punch, corner rounder, 1 3/8" circle punch, 1 1/4" circle punch, Brights candy dots, dimensionals

Monday, January 27, 2014

Washi Hearts

Good morning, Friends! Is another week really starting? And was there a weekend in between - lol? I guess ready or not here is Monday! At least it looks to be a quiet week with the normal practices but that's about it. I was able to get a lot of quilting done on my plus quilt and I should finish it up today. Then I need to quilt my snowman quilt and get the binding sewn on both. But that may have to wait till next week? We will see. Have to figure out the rest of my schedule first…

Today's card was inspired by a card I did at card class with Becky this month. I really like the way Pink Pirouette and Melon Mambo look together! Here are the details:

  • Card base is Whisper White
  • On a layer of Whisper White adhere three strips of Gingham Garden washi tape
  • Tie a piece of Pink Pirouette taffeta ribbon around this then stamp the greeting from Teeny Tiny Wishes in Melon Mambo
  • Adhere panel to card with dimensionals
  • Stamp heart from Hearts a Flutter in Melon Mambo onto Pink Pirouette and cut out with Hearts a Flutter framelits
  • Adhere heart to card with dimensionals
  • Use the Hearts a Flutter framelits to cut a heart from Melon Mambo and adhere to card
  • Adhere a Pink Pirouette candy dot to heart
A very simple Valentine's card! Thanks for stopping by and have a super day!

Card Recipe: Stamps- Hearts a Flutter, Teeny Tiny Wishes; Paper- Whisper White, Pink Pirouette, Melon Mambo; Ink- Melon Mambo; Accessories- Pink Pirouette taffeta ribbon, Hearts a Flutter framelits, Gingham Garden washi tape, Subtles candy dots, dimensionals

Wednesday, January 22, 2014

Mojo Monday 329

Good morning, Friends! I hope your week is going as you like! It was a little hard for me to get up this morning - ugh!! At least my headache went away by noon yesterday! That was a relief and I was able to get some things done. It's back to work on designing today. Thankfully I have a quiet week so I should be able to get a lot done, right? :)

Today's card was inspired by the Mojo Monday sketch. Card details:

  • Card base is Whisper White
  • Use the fringe scissors to cut into a strip of Gumball Green card stock and adhere to the back of a piece of Epic Day designer paper
  • Flag both ends of a strip of Basic Black and adhere to panel
  • Add two mini brads then adhere panel to card
  • Use the 2 1/2" circle punch to punch a circle from Whisper White
  • Stamp trees image from Life in the Forest in black StazOn and then stamp raccoon onto a piece of Whisper White
  • Color images with Gumball Green, Baked Brown Sugar (for tree trunks which you can't see), Smoky Slate and Basic Grey markers
  • Cut out raccoon
  • Use the Perfect Pennants die to cut the scallop circle from Basic Grey card stock and adhere stamped circle to scallop circle then adhere to card with dimensionals
  • Adhere raccoon to card with dimensionals
  • Stamp greeting from Teeny Tiny Wishes in black StazOn
I sure had fun creating this one! These little critters are really cute and I thought this could even be considered a little more masculine. Thanks for stopping by and have a super day!

Card Recipe: Stamps- Life in the Forest, Teeny Tiny Wishes; Paper- Whisper White, Basic Grey, Gumball Green, Basic Black, Epic Day designer paper; Ink- black StazOn, Gumball Green, Baked Brown Sugar, Smoky Slate, Basic Grey; Accessories- Perfect Pennants die, 2 1/2" circle punch, fringe scissors, mini brads, dimensionals

Sunday, January 5, 2014

The Stamp Review Crew: Hearts a Flutter


Good morning, Friends! I am so excited! I was asked to be a part of a wonderful group of stampers that do a blog hop twice a month! We call ourselves the The Stamp Review Crew. Each hop will showcase many wonderful ideas of how to use just one stamp set! Isn't that awesome?!! I love that idea! And there are really SO many wonderful ideas because of all the very talented people in this group! 

This month The Stamp Review Crew is featuring the stamp set Hearts a Flutter. I really love this set and matching framelits! Really makes for easy card making! I am showing a card that I did with my stamp club last month. 


This card is really very simple! I love the clean and simple style of stamping and I love how Crumb Cake and Real Red look together! Here are my card details:
  • Card base is Crumb Cake 
  • Run the card base through the Big Shot using the Adorning Accents embossing folder
  • Flag the bottom of a piece of Real Red and adhere to the card base with dimensionals
  • Stamp the heart image from Hearts a Flutter in Real Red onto Crumb Cake and cut out using the Hearts a Flutter framelits then adhere to card with dimensionals
  • Punch a heart from red glimmer paper with the small heart punch and adhere to card with a dimensional
  • Stamp greeting from Teeny Tiny Wishes in Real Red onto the card base
Super simple! I hope you enjoyed my card! Thanks so much for stopping by! Click the link below to visit the next stop on the hop. If you get lost you can go to the main blog here to get a list of the designers participating in today's hop. Have a super day!


Thursday, December 19, 2013

CCMC 282

Good morning, everyone! I hope your week is going great and that you are enjoying the anticipation of Christmas! Create with Connie and Mary have another great challenge for us this week! Take a look at these fabulous colors!


And my card...


Notice anything different? Yep! I used the WRONG color! UGH!! I used Very Vanilla instead of Whisper White. But the card would look really pretty with Whisper White. Here are the details:

  • Card base is Very Vanilla (should be Whisper White)
  • Layer of Very Vanilla (again, should be Whisper White) that was pierced with the Occasions paper piercing pack
  • Stamp greeting from Teeny Tiny Wishes in Cherry Cobbler and adhere panel to card base with dimensionals
  • Punch heart with Full Heart punch from Cherry Cobbler and adhere to card
  • Punch bird and bird wing from silver glimmer paper using the Bird Builder punch NOTE: Make sure to punch one of the birds and its wing from the back side of the glimmer paper so that they will face each other
  • Adhere the birds and their wings to the card with dimensionals
Be sure to visit the Create with Connie and Mary site to see what the other designers did with these fabulous colors! I hope you will be able to find some time during this busy time of year to play along with us! We always love to see what you come up with! Thanks for stopping by and have a fabulous day!!

Card Recipe: Stamps- Teeny Tiny Wishes; Paper- Very Vanilla (should be Whisper White), Cherry Cobbler, silver glimmer paper; Ink- Cherry Cobbler; Accessories- Occasions paper piercing pack, Full Heart punch, Bird Builder punch, dimensionals

Thursday, November 21, 2013

CCMC 278

Good morning everyone! It's time for the Thursday challenge at Create with Connie and Mary! This week's challenge is a color challenge! Take a look!


Tangerine Tango, Always Artichoke and Sahara Sand are the fabulous colors that we have to play with! These colors made me think of fall and here's what I decided to make!


Very simple fall card! Details:

  • Card base is Sahara Sand
  • On the card base stamp the splotches from Gorgeous Grunge in Sahara Sand
  • Flag the bottom of a piece of Always Artichoke and run through the Big Shot using the Woodgrain embossing folder then adhere to card
  • Stamp leaves from Wonderfall in Tangerine Tango and Always Artichoke onto Whisper White, cut out and adhere to card with dimensionals
  • Stamp greeting from Teeny Tiny Wishes in Always Artichoke
  • Tie a bow with a piece of linen thread and adhere to leaves
  • Adhere a Tangerine Tango candy dot to bow center
I hope you enjoyed my fall card today! Be sure to see what the other designers did with these colors at the Create with Connie and Mary site! I hope you will play along with us this week! Thanks for stopping by and have a fabulous day!

Card Recipe: Stamps- Wonderfall, Teeny Tiny Wishes, Gorgeous Grunge; Paper- Sahara Sand, Always Artichoke, Whisper White; Ink- Sahara Sand, Always Artichoke, Tangerine Tango; Accessories- Woodgrain embossing folder, linen thread, Brights candy dots, dimensionals

Thursday, November 14, 2013

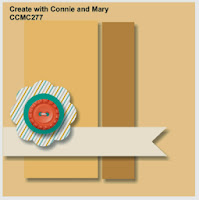
CCMC 277

Good morning, Friends! Once again I am lacking in my daily postings. I am still sewing away on Christmas gifts! My parents arrived yesterday to watch Nick play some basketball games this weekend! His birthday is on Tuesday (OMG - 14 years old) so there is a lot going on right now! But it's all good and I am happy to have at least my challenge cards posted for you all!!

Today's Thursday challenge from the Create with Connie and Mary team is a sketch challenge! Take a look!


And my card...


Love all the possibilities with this sketch! I decided to make a Thanksgiving card. Seems like we overlook that holiday. What a shame! Here are the card details:

  • Card base is Sahara Sand
  • Layer of Sahara Sand was run through the Big Shot using the Woodgrain embossing folder
  • Adhere a strip of Sweater Weather to the right hand side of layer and then adhere to card base with dimensionals
  • Stamp leaf image from Wonderfall in Tangerine Tango onto Whisper White and cut out then pop up onto card
  • Stamp greeting from Teeny Tiny Wishes in Chocolate Chip onto a strip of Whisper White and flag the end then adhere to leaf
  • Tie a piece of linen thread through a Natural designer button and adhere to card
Pretty simple card but I love the pop of that orange against the neutral card stock! It really pops! Reminds me of the fall colors here in Colorado!! I hope you are inspired to play along with us this week! For more wonderful inspiration, be sure to check out the other creations at Create with Connie and Mary!

Have you subscribed to the Create with Connie and Mary Winter Collection? We are on our last week of creations! But it's not too late to sign up and see ALL the wonderful projects and creations! You will get all the downloadable tutorials, too! Great ideas for the upcoming holidays! Thanks for stopping by and have a super day!!

Card Recipe: Stamps- Wonderfall, Teeny Tiny Wishes; Paper- Sahara Sand, Whisper White, Sweater Weather designer paper; Ink- Tangerine Tango, Chocolate Chip; Accessories- Woodgrain embossing folder, Naturals designer button, linen thread, dimensionals