Showing posts with label Halloween Cards. Show all posts

Thursday, October 8, 2015

Spider Boo!

Hello everyone! It's fall break around here but it is going way to fast for me! I have been having a lot of fun doing all kinds of different things! I even got to visit a friend for a few days! And she helped me spend money - lol! Soon it will be back to work so I will enjoy these last few days! Nick went mountain biking and camping with friends. We even let him drive himself out to the camping spot! Yikes! But I know he is having fun and making memories! Two more bike races and then it will be over until the snow melts. I sure do enjoy these times!

Today's card was one I did for a recent swap I participated in. Super easy and so fun!

  • Card base is Very Vanilla
  • Adhere a piece of Old Olive to card base
  • Adhere a piece of Happy Haunting designer paper to a piece of Basic Black card stock
  • Adhere panel to card with dimensionals
  • Adhere a spider web doily to card
  • Punch a circle from Crushed Curry card stock using the 2" circle punch and sponge the edges with Crushed Curry ink then adhere to center of spider web
  • Cut the "boo!" from black glimmer paper using the Boo to You framelits and adhere to card with dimensionals
  • Stamp the spider from Howl-o-Ween Treat stamp set onto a piece of Very Vanilla using Momento ink and cut out using the Boo to You framelits then adhere to card with a dimensional
Have you signed up for the upcoming Create with Connie and Mary October mini edition? We have some awesome projects for the upcoming holidays! You won't want to miss these great creations! But the only way to see them is to subscribe! Here is a snippet of what will be showcased:

OCTOBER 2015 MINI SESSION 

* Includes FIVE step-by-step tutorials for projects...THREE card sets, each with 4 cards and TWO 3D items...perfect for your club or stamp camp!

* All FIVE projects are available once the mini collection opens so you immediately have all projects (and tutorials)

* Plus BONUS cards done by Connie and Mary throughout the month!

*Mini session is available beginning on Oct. 11th
Sets used for this collection:
    • Holly Jolly Greetings
    • Vintage Leaves
    • Your Presents
    • Happy Scenes
    • Thankful Forest Friends
    • BONUS:  Reason for the Season

Don't miss out! Sign up at Create with Connie and Mary! I hope to see you all there! Thanks for stopping by and have a super day!

Card Recipe: Stamps- Howl-o-Ween Treat; Paper- Very Vanilla, Old Olive, Basic Black, Happy Haunting designer paper, black glimmer paper; Ink- Momento ink, Crushed Curry; Accessories- Boo to You framelits, 2" circle punch, spider web doilies, sponge, dimensionals


Tuesday, September 22, 2015

Trick or Treat!

Hello everyone! I hope your week is off to a great start! I seemed to drag yesterday but I was still able to get through it. Fall break is coming. Hang on!! Lol! I am hoping that I can get myself focused before then. I have things that I need to get finished so I can enjoy my time away!

Today's card was one that I did for a recent swap I was in. 

  • Card base is Crumb Cake
  • Adhere a piece of Basic Black to the card base
  • On a piece of Very Vanilla stamp the greeting from Howl-o-Ween Treat stamp set using Momento ink
  • Adhere a piece of Happy Haunting designer paper to the bottom part of the panel
  • Adhere a strip of Happy Haunting designer washi tape along the bottom of the panel
  • Sponge panel with Crumb Cake ink
  • Adhere panel to a piece of Tangelo Twist card stock then adhere to card with dimensionals
  • Adhere a strip of black glimmer paper to the card
  • Stamp the pumpkin image onto a piece of Very Vanilla card stock using Tangelo Twist ink and cut out using the Boo to You framelits
  • Adhere pumpkin to card with dimensionals
  • Add a black star sequin from the Metallic sequins assortment to the pumpkin
Thanks for stopping by and have a super day!

Card Recipe: Stamps- Howl-o-Ween Treat; Paper- Basic Black, Crumb Cake, Tangelo Twist, Very Vanilla, black glimmer paper, Happy Haunting designer paper; Ink- Crumb Cake, Momento ink, Tangelo Twist; Accessories- Happy Haunting designer washi tape, Boo to You framelits, Metallic sequins assortment, sponge, dimensionals

Saturday, September 19, 2015

CCMC Saturday Blog Hop: Halloween Treat/Favor


Hello everyone and welcome to another fun Saturday blog hop! The Create with Connie and Mary designers are showing you all some fun little treat projects for Halloween! I am your stop after the fabulous Debbie Henderson!

I found a great tutorial from Becky Roberts that showed how to make these fun little file folder treat holders! It's the perfect size to hold a little chocolate! I didn't have any candy to put in it. We try not to have any candy around the house as I tend to eat it all - yikes! So this one is empty but I look forward to finding a special treat to put inside!

  • Cut a piece of Happy Haunting designer paper at 3" x 5" then score at 2 1/4" x 2 1/2"
  • Use the Envelope Punch Board and the paper trimmer to create the file folder tabs on each side of the paper
  • Cut a spider web doily into fourths and adhere to the front of the treat holder
  • Wrap a piece of Very Vanilla thick baker's twine around the holder and tie a bow
  • Stamp the spider image from Howl-o-Ween Treat stamp set using Basic Black archival ink onto a piece of Very Vanilla and cut out using the Boo to You framelits
  • Stamp the greeting from And Many More stamp set onto a strip of Very Vanilla using Basic Black archival ink and flag one end then adhere to back of spider and adhere to treat holder
Super easy and a fun treat to give anyone! I might think about doing this for my students! Time to send you on to see what the fabulous Connie Babbert has created! Thanks for stopping by and have a super day!


Card Recipe: Stamps- Howl-o-Ween Treat, And Many More; Paper- Very Vanilla, Happy Haunting designer paper; Ink- Basic Black archival ink; Accessories- spider web doilies, Boo to You framelits, Envelope Punch Board, Very Vanilla thick baker's twine, dimensionals


Thursday, September 17, 2015

A Haunting Kitty

Good morning, Friends! It's only Thursday. Ugh! But if I make it through then it will be Friday! Yay!! Lol! No bike races this weekend so I will be able to get a lot of stuff done! And I need to!

Today's card was inspired by the super simple sketch at Freshly Made!

  • Card base is Crumb Cake
  • Adhere a piece of Happy Haunting designer paper to card base
  • On a piece of Very Vanilla, stamp the greeting from Haunt Ya Later stamp set using Basic Black archival ink
  • Adhere panel to a piece of Basic Black card stock
  • Tie a piece of Basic Black stitched satin ribbon around panel and adhere to card with dimensionals
  • Stamp the kitty image onto a piece of Very Vanilla using Basic Black archival ink
  • Color the kitty in using an aqua painter and Smoky Slate ink
  • Use Cucumber Crush and Watermelon Wonder to add color to the ears and eyes and use a Basic Black marker for the nose
  • Cut the kitty out and adhere to card with dimensionals
Super simple!

Have you heard about this month's Create with Connie and Mary edition?
 

Both Connie and Mary have created a REMAKE of a couple of the Halloween projects with CHRISTMAS stamp sets!  Yep!  You really are getting a BONUS of two more tutorials.  Below is a SNEAK PEEK of the project that I did from Debbie Henderson’s darling tutorial!
With our September mini session we are featuring fall and Halloween sets from the Holiday Catalog…
  • Sweet Hauntings
  • Cheer All Year
  • Howl-o-ween Treats (or I used Snow Place…see below!)
  • Haunt Ya Later (Mary used Jolly Christmas!)
  • Lighthearted Leaves
  • BONUS:  Acorny Thank You
Now is a GREAT time to subscribe for only $8.95 US…yes, for all SIX (really EIGHT!) tutorials!   Check out Create with Connie and Mary for all the information on how to sign up!


Thanks for stopping by and have a super day!

Card Recipe: Stamps- Haunt Ya Later; Paper- Crumb Cake, Basic Black, Very Vanilla, Happy Haunting designer paper; Ink- Basic Black archival ink, Smoky Slate, Cucumber Crush, Watermelon Wonder, Basic Black marker; Accessories- Basic Black stitched satin ribbon, aqua painter, dimensionals

Monday, September 14, 2015

Happy Howl-o-Ween!

Good morning everyone! Are you all ready for another week? Ready or not, here it comes! Two more full weeks of school and then it's a short week for us because our fall break will start! Woohoo! I can hang on till then, right? I am so ready for our fall break! We had a great weekend of high school bike racing! Two more weeks and we will have another! I love those weekends! We even went for a ride last night! The evenings are a little cooler and that makes riding more enjoyable! It is supposed to rain the next couple of days so we will see how much riding we can do. I am ready for the cooler fall temperatures!

Today's card was one I did with our shoebox group this month. I needed something pretty quick and easy.

  • Card base is Crumb Cake
  • Stamp the dots from the Perpetual Calendar stamp set onto the card base a few times using Basic Black archival ink
  • Punch a circle from Crushed Curry using the 2" circle punch and sponge the edges using Crushed Curry ink
  • Adhere the circle to the center of a spider web doily and adhere the doily to the card
  • Stamp the owl image from Howl-o-Ween Treat onto Very Vanilla card stock using Blackberry Bliss ink and cut out using the Boo To You framelits
  • Adhere owl to card with dimensionals
  • Stamp the greeting from And Many More onto a strip of Very Vanilla and flag the end then adhere to card 
Don't forget that the Create with Connie and Mary September mini session has started! We are featuring some great projects for the upcoming holidays! You can still sign up to see all the wonderful ideas! Thanks for stopping by and have a super day!

Card Recipe: Stamps- Howl-o-Ween Treat, And Many More, Perpetual Calendar; Paper- Crumb Cake, Crushed Curry, Very Vanilla; Ink- Basic Black archival ink, Blackberry Bliss, Crushed Curry; Accessories- 2" circle punch, Boo to You framelits, spider web doilies, sponge, dimensionals

Saturday, September 12, 2015

CCMC Saturday Blog Hop: Halloween Card - Howl-o-Ween Treat


It's another Saturday blog hop with the Create with Connie and Mary designers! This week are continuing the theme of Halloween! I am your stop after the fabulous Debbie Henderson

Did I tell you how much I love Halloween? Lol! When I saw this set, Howl-o-Ween Treat with the coordinating framelits, I knew I would be having some fun! And how fabulous are these spider web doilies??!! My card turned out kind of busy but I still liked it! And I hope you do, too!

  • Card base is Rich Razzleberry
  • On another slightly smaller piece of Rich Razzleberry, adhere a strip of the Happy Haunting designer washi tape then adhere to card base
  • Adhere a piece of Crushed curry to a piece of Basic Black and then adhere to card with dimensionals
  • Adhere a spider web doily to the Crushed Curry card stock
  • Stamp the owl image from Howl-o-Ween Treat stamp set onto a piece of Very Vanilla using Basic Black archival ink and cut out using the Boo to You framelits then adhere to card with dimensionals
  • Stamp the greeting from And Many More stamp set onto a strip of Very Vanilla using Basic Black archival ink
  • Flag both ends of the strip and adhere to card
  • Punch two small stars from silver glimmer paper using the star punch from the itty bitty accents punch pack and adhere to card
  • Punch the larger star from silver glimmer paper using the medium star punch and adhere to card with dimensionals
The September mini edition starts tomorrow! The designers have put together some great projects that use the fabulous new products from the new Holiday mini catalog! You won't want to miss this! Here is just a little snippet of what you can expect:


Time to send you on to see what awesomeness Connie Babbert has to show you! Thanks so much for stopping by and have a super day!


 Card Recipe: Stamps- Howl-o-Ween Treat, And Many More; Ink- Basic Black archival ink; Paper- Rich Razzleberry, Crushed Curry, Basic Black, Very Vanilla, silver glimmer paper; Accessories- Happy Haunting designer washi tape, Boo to You framelits, Medium star punch, itty bitty accents punch pack, spider web doilies, dimensionals


Saturday, September 5, 2015

CCMC Saturday Blog Hop: Halloween Card - Haunt Ya Later!


Hello everyone and welcome to another Create with Connie and Mary Saturday blog hop! This week we are all making a Halloween card! I am your stop after the fabulous Debbie Henderson!

Halloween is one of my favorite holidays! I am not the gory kind of Halloween person but I love the cute Halloween images! And Stampin' Up! has some super cute Halloween stamp sets! Like this one, Haunt Ya Later. I love this set!! Here is a super simple card that I created for this hop with the help of the Freshly Made sketch!

  • Card base is Whisper White
  • Cover the front of the card base with a piece of Happy Haunting designer paper
  • On a piece of watercolor paper, stamp the cat image from the Haunt Ya Later stamp set with the Basic Black archival ink
  • Use a blender pen and Smoky Slate ink to color in the cat, Cucumber Crush for the eyes and Soft Sky for the "ground"
  • Stamp the greeting onto a strip of Tangelo Twist card stock and use the Washi Label punch on the ends of the strip
  • Adhere the strip to the top of the panel and adhere panel to card base using dimensionals
  • Thread a piece of linen thread through a silver basic metal button and adhere to card
Before I send you on to see what the fabulous Connie Babbert has created, I wanted to share a little snippet of what's to come in the next Create with Connie and Mary mini edition! You won't want to miss this!


Thanks so much for stopping by and have a super day!


Card Recipe: Stamps- Haunt Ya Later; Paper- Whisper White, Tangelo Twist, Happy Haunting designer paper, watercolor paper; Ink- Basic Black archival ink, Smoky Slate, Cucumber Crush, Soft Sky; Accessories- Washi Label punch, linen thread, silver basic metal button, blender pen, dimensionals

Monday, August 31, 2015

Boo! From the Owl

Good morning, Friends! Boy it feels like it has been quite a while since I posted!! Yes, I do the regular Saturday posts but I haven't done anything else for quite some time. I have been stamping but it has been for some other projects that are coming up. And school has been kicking my butt!! Wow! I can't believe that this will be week number 5! And we haven't had any breaks yet. Thank goodness for Labor Day! And not to mention that we have been very busy with bike races and practices. I haven't been able to make a family meal since school started! We are all running in different directions! It's crazy! But Nick did great in his first high school race! He started out in 28th place and finished 10th out of 71 Sophomores! So proud! He sure is moving slow this morning!

Today's card was one that I did for a recent swap I was in. I just love this set and coordinating framelits! They make for a fun and easy card!

  • Card base is Very Vanilla
  • Adhere a piece of Happy Haunting designer paper to another piece of Very Vanilla card stock
  • Adhere a strip of Happy Haunting designer washi tape to the bottom of the panel
  • Adhere panel to card
  • Cut a circle from Crushed Curry card stock using the circles framelits and sponge the edges with Crushed Curry ink then adhere to card with dimensionals
  • Stamp the owl image from Howl-o-Ween Treat onto a piece of Very Vanilla using Basic Black archival ink and cut out using the Boo to You framelits then adhere him to the card with dimensionals
  • Cut the "boo!" from black glitter paper using the Boo to You framelits and adhere to card
  • Add three rhinestones
Thanks for stopping by and have a super day!

Card Recipe: Stamps- Howl-o-Ween Treat; Paper- Very Vanilla, Crushed Curry, Happy Haunting designer paper, black glitter paper; Ink- Crushed Curry, Basic Black archival ink; Accessories- Circles framelits, Boo to You framelits, Happy Haunting designer washi tape, sponge, rhinestones, dimensionals

Friday, October 31, 2014

Happy Halloween!!!

Good morning, Friends! The last day of October. Hmmm... I think I am in denial that it is getting so close to Christmas! Yikes! So much to do!! And today is Halloween! Wow! My school kiddos are so excited! I have been hearing about it all week - lol! We will see how much I can accomplish at school. The weather here will be super nice for our little trick-or-treaters! I think that's why I am in a little bit of denial. Oh and don't forget to turn those clocks back this weekend! I really don't like it getting dark so early. But I guess I will deal with it - lol! 

Today's card was a quickie that I put together last night. I had to have a card for Halloween!!

  • Card base is Whisper White
  • Run a piece of Basic Black through the Big Shot using the ghost die from the Fun Fall framelits
  • Lay the Basic Black panel onto the card base and stamp the face from Fall Fest using Tuxedo black Momento ink then adhere the black panel to the card with dimensionals
  • Cut the word bubble from Whisper White card stock using the Word Bubbles framelits
  • Stamp the "boo!" onto the word bubble using the Skinny Mini Alphabet and Tuxedo black Momento ink then adhere the word bubble to the card with dimensionals
  • Adhere three rhinestones to the card
Thanks for stopping by and have a super scary Halloween!!


Card Recipe: Stamps Fall Fest, Skinny Mini Alphabet; Paper- Whisper White, Basic Black; Ink- Tuxedo black Momento ink; Accessories- Fun Fall framelits, Word Bubbles framelits, rhinestones, dimensionals

Thursday, October 31, 2013

CCMC 275

Good morning, Friends and HAPPY HALLOWEEN!! How fun that Halloween lands on Thursday! The same day as the Create with Connie and Mary weekly challenge! This week we have a sketch to play with! Take a look!


And my card...


I love the banners! It was a great way to use up some of those designer paper scraps that we all seem to have! Here are the details:

  • Card base is Very Vanilla cut at 4 1/4" x 11" and folded in half
  • Layer of Very Vanilla cut at 4" x 5 1/4"
  • Strips of designer paper were cut and flagged at the bottom and then adhered to Very Vanilla layer
  • Stamp greeting from Teeny Tiny Wishes in black StazOn and add two mini brads then adhere layer to card base using dimensionals
  • Adhere a strip of Basic Black card stock along the top of banners
  • Use the 1 3/8" circle punch to punch a circle from Summer Starfruit and sponge edges with Summer Starfruit ink then adhere to card with dimensionals
  • Stamp bat image from Halloween Hello using black StazOn ink onto Very Vanilla, cut out and adhere him to card with dimensionals
A pretty simple card! I hope your Halloween is safe and FUN! 

Be sure to check out the Create with Connie and Mary site for more wonderful inspiration using the sketch! And don't forget about Create with Connie and Mary's Winter Collection! Have you subscribed? Don't worry if you haven't! You still can and enjoy all the wonderful projects that have been shared so far! Week 2 is underway with awesome projects for the upcoming holidays! Thanks for stopping by and have a super day!


Card Recipe: Stamps- Halloween Hello, Teeny Tiny Wishes; Paper- Very Vanilla, Basic Black, Summer Starfruit, Witch's Brew designer paper; Ink- black StazOn, Summer Starfruit; Accessories- 1 3/8" circle punch, mini brads, sponge, dimensionals

Tuesday, October 29, 2013

Washi Bats

Good morning, Friends! I hope your week is off to a great start! I woke up this morning to hear the sound of rain! And the wind is blowing, too. So glad that I now have a garage! I won't have to walk outside in this to my car to take Nick to school! Would have been a great day to sleep in but no such luck this time. I do get my hair cut and colored today - yea!! And Nick has a basketball game this afternoon. Looking forward to that!

Today's card was inspired as I was surfing through Pinterest. I think the other card used stamps for the background but I thought that washi tape would be really cute! Here are the details:

  • Card base is Very Vanilla
  • Layer of Very Vanilla
  • Adhere three strips of Witch's Brew washi tape to Very Vanilla layer and then pop up onto card base
  • Layer of Basic Grey
  • Sponge layer with Basic Grey ink
  • Stamp greeting from Halloween Hello in black StazOn onto layer
  • Tie a piece of Basic Black 1/8" taffeta around layer and pop up onto card
  • Stamp bat image from Halloween Hello onto Very Vanilla in black StazOn, cut out and pop up onto card
Super simple! Thanks for stopping by and have a super day!

Card Recipe: Stamps- Halloween Hello; Paper- Very Vanilla, Basic Grey; Ink- black StazOn; Accessories- Basic Black 1/8" taffeta ribbon, Witch's Brew washi tape, sponge, dimensionals

Friday, October 25, 2013

SFF 102513

Good Friday morning! Woohoo! Another day off for the kiddos around here. So we all got to sleep in a little! It will also be a nice day to do some sewing and then I will finally be able to get together with Becky for some stitching! It's been way too long! Today's Sketch Frenzy Friday sketch was created by me!! Take a look!


And my card:


Halloween is right around the corner so I thought I would use up some of my Halloween supplies. Here are the details:

  • Card base is Basic Black
  • A piece of Witch's Brew designer paper
  • Two strips of Pumpkin Pie card stock that was cut with the Tasteful Trim die then adhere to the back of the designer paper and then adhere to the card
  • Punch a scallop circle from silver glimmer paper using the 1 3/4" scallop circle punch and pop up onto card
  • Stamp the bat image from Halloween Hello in black StazOn onto Very Vanilla and cut out then pop up onto scallop circle
  • Use the Modern Label punch to punch from Pumpkin Pie and adhere to card
  • Stamp greeting from Teeny Tiny wishes in black StazOn onto Summer Starfuit and punch out with the Word Window punch then pop up onto Pumpkin Pie piece
  • Add two rhinestones
I hope you enjoy my super fun Halloween card! Be sure to check out the other creations from the design team at the Sketch Frenzy Friday blog! I hope you will play along with us this week!

Card Recipe: Stamps- Halloween Hello, Teeny Tiny Wishes; Paper- Basic Black, Pumpkin Pie, Summer Starfruit, Very Vanilla, silver glimmer paper, Witch's Brew designer paper; Ink- black StazOn; Accessories- 1 3/4" scallop circle punch, Modern Label punch, Word Window punch, rhinestone, dimensionals

Friday, October 4, 2013

SFF 100413

Good morning everyone! It's F R I D A Y!! We are off to Denver so that Nick can try out for the state soccer team! Go Nick!! So much is going on in my life at the moment. But that will all wait for another day. Right now I want to show you this week's challenge from the Sketch Frenzy Friday team! This week's sketch was created by Sharon Wheet. Take a look!


And here's my creation:


I decided to do a Halloween card. I just love this bat image! Card details:

  • Card base is Very Vanilla
  • Adhere a strip of Witch's Brew washi tape to a piece of Witch's Brew designer paper and then a strip of Witch's Brew designer paper is adhered over this
  • This panel is then adhered to the card
  • A tag was made from Summer Starfruit
  • On the tag stamp the greeting from Halloween Hello in black StazOn
  • Punch a hole at the top of the tag and tie a piece of Basic Black 1/8" taffeta ribbon
  • Pop tag up onto card
  • Stamp bat image onto Very Vanilla card stock, cut out and pop up onto card
A fun and simple sketch! I hope that you are inspired to play along with us this week! Find more inspiration at the Sketch Frenzy Friday blog! Thanks for stopping by and have a super day!

Card Recipe: Stamps- Halloween Hello; Paper- Very Vanilla, Summer Starfruit, Witch's Brew designer paper; Ink- black StazOn; Accessories- Basic Black 1/8" taffeta ribbon, Witch's Brew washi tape, dimensionals

Friday, September 27, 2013

SFF 092713

Good morning, Friends! Woohoo! Another Friday! I am off to visit my very good friend, Sherry! We are going to have a LOT of fun sewing this weekend! I'm hoping to get a nice cozy quilt sewed up! Sketch Frenzy Friday has a new sketch for you all to try this week! I do hope you will play along with us! This week's sketch was created by Robbie Rubula. Take a look!


It's a pretty clean and simple sketch! Love it! Here's what I created!


I made a pretty simple Halloween card. Summer Starfruit can be a scary color for some people. I happen to love it but what a better time to get out that "scary" color and use it for Halloween projects!! Lol!! Here are the details:

  • Card base is Summer Starfruit
  • Layer of Summer Starfruit that has the top corner torn then sponge layer with Summer Starfruit ink
  • Stamp lines image from Gorgeous Grunge in Summer Starfruit
  • Adhere a piece of Witch's Brew designer paper behind the torn corner and then adhere panel to card
  • Use the Apothecary Accents framelits to cut the shape from Basic Black card stock
  • On a piece of Witch's Brew designer paper, stamp the greeting from Halloween Hello in black StazOn and then adhere piece to Basic Black die cut shape
  • Add two mini brads to the ends of the die cut shape and then pop up onto card
  • Stamp bat in black StazOn onto Very Vanilla, cut out and pop up onto card
Be sure to visit the Sketch Frenzy Friday blog to see what the other designers did with this sketch! I hope you will be inspired to play along with us this week! We always love to see what you do with our sketches! Thanks for stopping by and have a super day!

Card Recipe: Stamps- Halloween Hello, Gorgeous Grunge; Paper- Summer Starfruit, Basic Black, Very Vanilla, Witch's Brew designer paper; Ink- black StazOn, Summer Starfruit; Accessories- Apothecary Accents framelits, mini brads, sponge, dimensionals

Friday, September 6, 2013

SFF 090613

Good morning, Friends! It's Friday!! Woohoo! The Sketch Frenzy Friday team has a new sketch challenge this week! Jennifer Weide has provided this week's sketch! Check it out!


LOTS of possibilities with this one! Sometimes I get so overwhelmed with all the ideas I have going on so I settled on something very simple. 


I thought this sketch would be great fun to show off the wonderful designs of the designer paper! And this sketch would be perfect for any of them! But I chose paper that had coordinating washi tape as I thought that would be perfect for the borders. Here are the details:

  • Card base is Very Vanilla
  • On a layer of Very Vanilla adhere a piece of Witch's Brew designer paper and then two strips of the Witch's Brew washi tape
  • Pop panel up onto card base
  • Use the 2 3/8" scallop circle punch to punch a scallop circle from Basic Black card stock (I put the scallop back into the punch, turned it and punched it again to get the points)
  • Punch a circle from silver glimmer paper using the 1 3/4" circle punch and adhere to scallop circle then pop up onto card
  • Punch a circle from Pumpkin Pie using the 1 3/8" circle punch
  • Stamp the skull image from the Halloween Hello set onto the circle with Pumpkin Pie and then the greeting in black StazOn then pop up onto card
  • It's hard to see but I added four rhinestones to each corner of the designer paper
Very simple! And nothing to cut out! I hope you check out what the other fabulous designers did with this sketch on the Sketch Frenzy Friday blog! Won't you play along with us this week? We love to see what you come up with! Thanks for stopping by and have a fabulous day!

Card Recipe: Stamps- Halloween Hello; Paper- Very Vanilla, Basic Black, Pumpkin Pie, silver glimmer paper, Witch's Brew designer paper; Ink- black StazOn, Pumpkin Pie; Accessories- Witch's Brew washi tape, 2 3/8" scallop circle punch, 1 3/4" circle punch, 1 3/8" circle punch, rhinestones, dimensionals

Wednesday, September 4, 2013

Retro 79

Good morning, Friends! It was kind of hard getting back into the routine yesterday. I really enjoyed the days off as I know Nick did, too! We made it through and now we are already half way through the week! Sweet! I had to buy a new iron yesterday as mine broke. No, I don't use it for clothes - lol! I use it for my stitching and sewing! And boy oh boy do I need to update my sewing blog! Geesh! It's been a whole year! And I have stuff to share! What's my deal? I will try to work on that this week.

Today's card was inspired by the sketch at Retro Sketches. Here are the card details:

  • Card base is Very Vanilla
  • Layer a piece of Witch's Brew designer paper to a piece of Summer Starfruit to a piece of Basic Black
  • Pop panel up onto card
  • Adhere a piece of Witch's Brew washi tape
  • On a strip of Very Vanilla, stamp greeting from Halloween Hello set then adhere to card
  • On Very Vanilla, stamp the bat image three times and cut out
  • The top bat is adhered with glue dots and the other two are popped up
Thanks for stopping by and have a super day!

Card Recipe: Stamps- Halloween Hello; Paper- Very Vanilla, Basic Black, Summer Starfruit, Witch's Brew designer paper; Ink- black StazOn; Accessories- Witch's Brew washi tape, dimensionals

Saturday, August 31, 2013

CCMCFALL 13-01

Good morning, Friends! Have you been checking out the fabulous projects that are part of the Create with Connie and Mary Fall Collection? Oh MY!! They are just fantastic! If you are not a part of the subscription you can still join!! It's never too late! You can join now and still see ALL of the projects that have been offered this past week! I hope you will join us! 

At the end of each week during the special edition, Connie and Mary offer a challenge. This week they have a great color challenge! 


Pumpkin Pie, Summer Starfruit and Basic Black are colors that are found in the Witch's Brew designer paper. Week one of the Create with Connie and Mary Fall Collection is Halloween week. So I used the challenge colors along with the Witch's Brew designer paper to make a Halloween card!


A truly simple Halloween card that is easily mailable! Love this little bat from the Halloween Hello set!

  • Stamp bat image from Halloween Hello set onto a Pumpkin Pie card base three times
  • Punch a circle from Summer Starfruit and from a piece of the Witch's Brew designer paper using the 2 1/2" circle punch
  • Trim the designer paper down and adhere to the Summer Starfruit circle
  • Stamp greeting from Halloween Hello in black StazOn
  • Tie a piece of 1/8" Basic Black taffeta ribbon around the "seam" and pop up onto card
  • Stamp bat onto Very Vanilla card stock using black StazOn ink, cut out and pop up onto card
Check out the other creations from the fabulous designers at the Create with Connie and Mary website! And make sure to sign up for the Create with Connie and Mary Fall Collection! You won't be sorry!! Have a super day!

Card Recipe: Stamps- Halloween Hello; Paper- Pumpkin Pie, Summer Starfruit, Very Vanilla, Witch's Brew designer paper; Ink- black StazOn, Pumpkin Pie; Accessories- 1/8" Basic Black taffeta ribbon, 2 1/2" circle punch, dimensionals

Friday, August 30, 2013

SFF 083013

Good morning, Friends! Woohoo! It's Friday! And we don't have to travel for any games this weekend! In fact there are no games which means we get to have a super relaxing time at home!! And we have Monday off! I hope you all get to do something great this weekend! Today's Sketch Frenzy Friday sketch was created by ME!! 


I hope you like it as much as I do! Lots of possibilities with this one! I actually had a different idea in mind when I created the sketch but the washi tape was calling out to me and I thought it would work perfectly on this card. So here's what I came up with!


A super simple card! 

  • Card base is Very Vanilla
  • Adhere two strips of the Witch's Brew washi tape
  • Adhere a piece of the Witch's Brew designer paper to a piece of Basic Black card stock
  • Tie a piece of 1/8" Basic Black taffeta ribbon around this panel and pop up onto card
  • Stamp the candy image from Halloween Hello in black StazOn onto Pumpkin Pie card stock, cut out and pop up onto card
  • Ink the greeting using the Basic Black and Pumpkin Pie markers and stamp onto card
There you have it! Be sure to check out the other great creations at the Sketch Frenzy Friday blog! I hope you are inspired to play along with us this week! Have a super day!

Card Recipe: Stamps- Halloween Hello; Paper- Very Vanilla, Basic Black, Pumpkin Pie, Witch's Brew designer paper; Ink- black StazOn, Basic Black and Pumpkin Pie markers; Accessories- 1/8" Basic Black taffeta ribbon, Witch's Brew washi tape, dimensionals

Friday, August 23, 2013

SFF 082313

Good morning, Friends! Woohoo! It's finally Friday! And the Sketch Frenzy Friday team has a fun sketch for us! Angela Walters is the creator for this week's sketch. Check it out!


Lots of possibilities with this one! The lines made me think washi tape! So here's what I came up with!


A very simple Halloween card that is very mailable! Here are the card details:

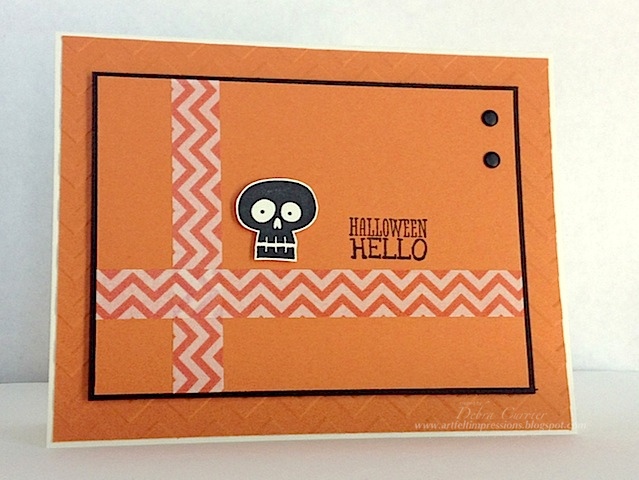
  • Card base is Very Vanilla
  • Layer of Pumpkin Pie that was run through the Big Shot using the Chevron embossing folder and then adhere to card base
  • On a layer of Pumpkin Pie adhere two strips of the Witch's Brew washi tape and stamp the greeting from Halloween Hello in black StazOn
  • Adhere this panel to a piece of Basic Black and pop up onto card
  • Stamp skull image in black StazOn onto Very Vanilla, cut out and pop up onto card
  • Add two Basic Black candy dots
Super simple! Be sure to visit the Sketch Frenzy Friday blog to see what the other fabulous designers came up with! I hope you will play along with us this week! We always love to see what you come up with! Thanks for stopping by and have a super day!

Card Recipe: Stamps- Halloween Hello; Paper- Very Vanilla, Pumpkin Pie, Basic Black; Ink- black StazOn; Accessories- Witch's Brew washi tape, Chevron embossing folder, Neutrals candy dots, dimensionals

Wednesday, August 21, 2013

CCMC Fall Collection 2013 Preview Week and Blog Candy!


What is the Create with Connie and Mary Fall Collection?
  • NEW card sets and projects that can be completed in about two hours...perfect for classes and camps?
  • FREE Preview Projects August 19 - 24 (so you can see what we're all about)!
  • Fall Collection runs August 24 - September 21
  • Features Holiday AND 2013-2014 Catalog Products
  • 24 EXCLUSIVE projects and 24 EXCLUSIVE cards
  • Step-by-step DOWNLOADABLE PHOTO tutorials
  • Only available to subscribers
  • Demonstrators and Customers welcome!
Create with Connie and Mary
Fall Collection 2013
Regularly $24.95 US

EARLY BIRD PRICE only $19.95 US

Good morning, Friends! It's my day to show off a project for Preview Week of Create with Connie and Mary Fall Collection 2013! I have done a card set using the Halloween Hello. 


I am showing you the card set here. To see each individual card and to get the complete FREE step by step tutorial for each card, you will need to visit the Create with Connie and Mary site. 

I just love this Halloween set from the Holiday mini catalog! And all the coordinating products that go with this set are so much fun to use! I tried to use the Witch's Brew washi tape in unique ways. These cards are easily duplicated and great for mailing! 

Now are you ready for some blog candy? Yippee!! My blog candy is a FREE subscription to the Create with Connie and Mary Fall Collection 2013!! All you have to do to qualify is to leave me a comment. Easy, right? Just make sure to leave me a comment TODAY! I will be picking the winner from the comments that are left here today! The winner will be announced on the Create with Connie and Mary website on Sunday! Good luck everyone! Thanks for stopping by and have a super day!