Showing posts with label Card Creations. Show all posts

Saturday, April 20, 2013

CCMC Card "Create"tions Week 3 Favor

Good morning, Friends! It's the third and final week of the Create with Connie and Mary Card "Create"tions for all Occasions. Wow! That went by quickly! Have you seen all the beautiful and wonderful card creations? The only way you get to see them is to be a subscriber of this special edition. Think it's too late? Nope! You can subscribe today and still enjoy ALL of the creations along with the downloadable instructions! I had such a great time creating these special projects and I know the other designers did as well!

Today is day that the designers reveal a favor that was made with their assigned stamp set. So as you can see, I used the Summer Silhouettes stamp set this past week. I love this set! For today's favor I made a luminary. I cut the Midnight Muse card stock at 10 3/8" x 5 1/2" and then scored at 2 1/2", 5", 7 1/2" and 10". Then I turned it and scored at 1 1/2". I folded all the scored lines and cut the short scored lines. The vellum panels are cut at 3 7/8" x 2 3/8". I used the Ovals framelits dies to cut the panels. The vellum panels are stamped with the leaf image in Gumball Green and then adhered to the inside of the luminary. I used the scallop trim punch to punch the top and then I used sticky strip to adhered the bottom and side together. I stamped the flower image onto Very Vanilla in Summer Starfruit and the flower center in Midnight Muse. I cut these out and adhered them with a dimensional to the luminary. Each flower center also received a rhinestone to finish it all off! 

Be sure to visit the Create with Connie and Mary website to see what the other designers made for their favor this week and to see what stamp set they used! Thanks for stopping by and have a super day!

Card Recipe: Stamps- Summer Silhouettes; Paper- Midnight Muse, Very Vanilla, vellum; Ink- Gumball Green, Midnight Muse, Summer Starfruit; Accessories- Ovals framelits dies, scallop trim punch, rhinestones, dimensionals

Saturday, April 13, 2013

Card "Create"tions Week 2 Favor

Good morning, Friends! It's Saturday and time to show you my favor for the Create with Connie and Mary Card "Create"tions for all Occasions! This past week I used the Rain or Shine stamp set. I had a great time designing a card set using this set! But the only way to see the cards is to be a subscriber to this special edition. You will also get complete instructions and measurements for each card! And it's not too late to join! Join now and you will still enjoy all of the previous week's cards from all of the fabulous designers!

My favor was inspire by searching the internet for ideas on baby showers. I haven't been to one in quite a while and wondered what people were doing these days. Seems like little favors are given out at wedding and baby showers. I used the sentiment that came with the set but it would be very cute and appropriate to include the name and birth date of the new little one or if doing a wedding, of the special day. I had some of these window tins in my cupboard and decided it would be fun to make a little insert for candy and a sort of belly band. I say "sort of" because it doesn't go all the way around the tin like a typical belly band.

Here is a look at the inside and you can see that I adhered the strip of paper to the inside of the lid. You can also see that I made my insert from vellum card stock and then embossed the top part with the Cloudy Day embossing folder. My candy tin is filled with white beans (didn't have any candy around and I really don't need any - lol). I did use sticky strip to adhere the paper to the tin. The umbrella top was stamped in Daffodil Delight and the handle in Basic Grey. These were carefully cut out and adhered together and then popped up onto the strip. I stamped the sentiment in Basic Grey onto Whisper White and punched it out with the Modern Label punch. I used Pacific Point card stock and a strip of Sunshine and Sprinkles designer paper. 

Be sure to visit the Create with Connie and Mary website to get more ideas for favors to make! You will also see which stamp sets were used this past week for our special edition! Thanks for stopping by and have a super day!

Card Recipe: Stamps- Rain or Shine; Paper- Pacific Point, Whisper White, Vellum, Rain or Shine designer paper; Ink- Daffodil Delight, Basic Grey; Accessories- Cloudy Day embossing folder, Modern Label punch, itty bitty shapes punch pack, rhinestone, dimensionals

Monday, April 8, 2013

Bonus Sketch and Blog Candy


Good morning, everyone!! Another week has come and we are on week 2 of Create with Connie and Mary Card "Create"tions for All Occasions! If you are not a subscriber it is not too late to join us for this special edition! You can still subscribe today and receive all of the first week's ideas complete with downloadable instruction sheets! These are cards you will only see if you are a subscriber to this edition! And you can subscribe at Create with Connie and Mary! So what are you waiting for? My week two cards will be live tomorrow! I hope you like them :) Here are few more details:

  • 3 weeks of FABULOUS card ideas - 18 different sets (not including our two Preview sets). 
  • Each SET is presented with 4 cards...one based on the weekly sketch, one the designers choice then one simple and one 'stepped up' version of the same card...so 4 cards for EACH set - 72 EXCLUSIVE card ideas NOT SEEN ANYWHERE ELSE!
  • Each Saturday we will each do a small favor using the same set we use during the week as a bonus item.  These WILL be displayed publicly but only subscribers will see the cards!
AND...are designers are:  Elizabeth Price, Melissa Davies, Debbie Henderson, Deb Currier, Connie Babbert, and Mary Brown
    The Create with Connie and Mary Card "Create"tions mini session started March 31 and runs thru April 20!


    So today the designers have a special sketch to share with you all today. Mary has worked up another great little preview of what the Card "Create"tions for all Occasions is all about! You will also find this at the Create with Connie and Mary website but if you go to Mary's blog, you will also have a chance to win some blog candy!! We know how much you love blog candy!! So be sure to visit her website to find out how to win!

    So how did I use Mary's sketch? Well, check this out!


    A friend let me borrow her Secret Garden set and coordinating framelits dies. So I have been having some fun using this set as much as possible before I return it to her! Now this is not one of my sets for the special edition (so I really hope you subscribe so you can see those). I kept my card really simple just like the sketch! I adhered a strip of Wisteria Wonder designer paper with the end flagged to a card base of Whisper White. Then I adhered a strip of Elegant Eggplant with the end flagged to the card. Right above these I stamped the sentiment from Teeny Tiny Wishes in Elegant Eggplant. Then I used an oval framelit die to cut an oval from Whisper White. I stamped two flowers from the Secret Garden set in Wisteria Wonder and then popped the oval up onto the card. Then I cut two leaves from Lucky Limeade designer paper using the Secret Garden framelits dies. I adhered these to the oval. I stamped the solid flower in Pink Pirouette onto a scrap of Whisper White and cut it out. This is popped up onto the card. Then I threaded some white baker's twine through a Regals designer button and adhered it to the flower center. Finally I added some rhinestones to the oval. 

    Be sure to visit the Create with Connie and Mary website to find out how to subscribe to the Cards "Create"tions for all Occasions edition! You will also find Mary's special downloadable project sheet and don't forget about her blog candy! Have a super day!!

    Card Recipe: Stamps- Teeny Tiny Wishes, Secret Garden; Paper- Whisper White, Elegant Eggplant, In Color designer paper; Ink- Elegant Eggplant, Wisteria Wonder, Pink Pirouette; Accessories- Secret Garden framelits dies, Ovals framelits dies, Regals designer buttons, white baker's twine, rhinestones, dimensionals


    Saturday, April 6, 2013

    Card "Create"tions Week 1 Favor

    Good morning, Friends! I can't believe that we have come to the end of week 1 over at Create with Connie and Mary Card "Create"tions for All Occasions! So many amazing cards were shown this week! I hope that you are a subscriber so that you can see them, too! Remember that your subscription includes full color photos with instructions and measurements! And it's not too late to sign up! You will still get all of the first week's creations!
    On Saturdays during this special edition, the designers will be showing you all a little "favor" that uses our assigned stamp set of the week. My stamp set was Oh, Hello. Love this set! And my favor is a decoration for a door or wall. I thought the sentiment "Oh, Hello" was perfect for that!

    This is pretty simple to make. I cut 6" x 6" pieces of designer paper from the Tea for Two dsp pack. These were then cut in half to measure 3" x 6". Then I pinched one short end together and adhered it. I did this to all the pieces and then adhered the "half cones" together using glue dots, staples and tape. I threaded some Calypso Coral ruffled ribbon through the back to hand. Then I made the center part of the wreath/hanger.


    I used the Oval framelits dies to cut ovals from Island Indigo and Calypso Coral card stock. The Calypso Coral oval was run through the Big Shot using the Square Lattice embossing folder and is adhered to the Island Indigo one that was pierced with the Occasions paper piercing pack. This is adhered to the hanger using dimensionals. Then I stamped the oval image from Oh, Hello in So Saffron onto Very Vanilla and cut it out using the Ovals framelits dies. The sentiment is stamped in Early Espresso and the oval is popped up onto the others. Then I stamped the flower image twice onto Very Vanilla using Island Indigo and Lucky Limeade markers. I cut these out and adhered one and popped the other up. I threaded some linen thread through a button and adhered it to the flowers.

    Be sure to check out what the other designers did for their favors and to find out what stamp sets they used this past week at the Create with Connie and Mary website! Thanks for stopping by and have a fabulous day!

    Card/Favor Recipe: Stamps- Oh, Hello; Paper- Island Indigo, Calypso Coral, Very Vanilla, Tea for two designer paper; Ink- So Saffron, Early Espresso, Lucky Limeade, Island Indigo; Accessories- Ovals framelits dies, Occasions paper piercing pack, Square Lattice embossing folder, Neutrals buttons, linen thread, dimensionals

    Thursday, April 4, 2013

    CCMC 246

    Good morning, Friends! It's Thursday and time for the Create with Connie and Mary Thursday challenge! This week we are being challenged with color. Take a look at these fabulous colors!


    Real Red, Calypso Coral, and Island Indigo are the colors to use this week! I never thought I would put Real Red with Calypso Coral but I like the way it really goes together! Check it out!


    This is a very simple card but I thought it worked well for these challenge colors. I used the layout from Mama Elephant - a very simple layout and I love it! I layered a piece of Real Red onto a card base of Calypso Coral. Then on another piece of Calypso Coral I stamped the doilies from Delicate Doilies in Calypso Coral (I stamped off once before stamping onto the card stock). Then I ran a strip of Island Indigo through the Big Shot using the Argyle embossing folder. This is adhered to the side of the stamped panel. Then I stamped the greeting from Perfectly Penned in Real Red. I added three silver brads and popped the panel up onto the card. Then I punched a flower from Real Red using the itty bitty shapes punch pack. This is adhered to the card and a rhinestone was added to the flower center. 

    Be sure to visit the Create with Connie and Mary website to see what the other fabulous designers did with these beautiful colors. I hope you are inspired to play along with us this week! We always love to see what you do with our challenges!!

    Don't forget about the Create with Connie and Mary Card "Create"tions for All Occasions! We are well into our first week and the ideas are overflowing!! You will only get to see these great ideas by being a subscriber so don't delay! I hope to see you over there! Thanks for stopping by and have a super day!

    Card Recipe: Stamps- Delicate Doilies, Perfectly Penned; Paper- Calypso Corals, Real Red, Island Indigo; Ink- Calypso Coral, Real Red; Accessories- Argyle embossing folder, silver brads, itty bitty shapes punch pack, rhinestone, dimensionals


    Monday, April 1, 2013

    Freshly Made 79


    Good morning, Friends! Wow! It's April already! And the weather seems to be finally cooperating! It should be getting nice and warm this week! I do hope that there will be some great spring storms but the outlook for the month does not look good for that. Bummer. Nick's schedule will get really busy now but that will just make the rest of the school year go by that much faster! Pat starts back to work full time and I will need to keep everyone's schedule in order so that we get to where we are supposed to be - lol!! Now to make sure that I am not fooled by a certain 13 year old today...

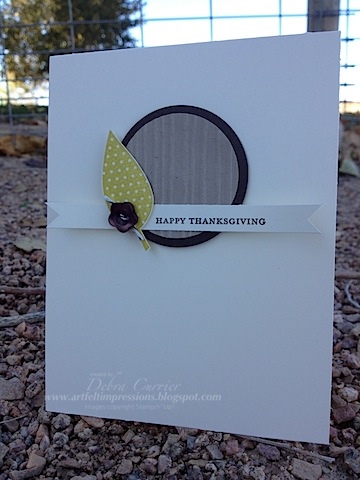
    Today's card was inspired by the sketch challenge at Freshly Made. I haven't pulled this stamp set out in quite a while. I adhered a strip of Wisteria Wonder designer paper with the end flagged to a piece of Naturals Ivory. A strip of Lucky Limeade was punched with the dotted ribbon scallop punch and adhered over that. Then I tied a piece of Wisteria Wonder ruffled ribbon around this and popped the panel up onto a card base of Naturals Ivory. Then I stamped the image from Apothecary Art in black StazOn onto a piece of Naturals Ivory. I used the stamp-a-ma-jig to help me place the sentiment and stamped that in black StazOn. Then I fussy cut the image out. The image is then colored with a blender pen using Lucky Limeade and Wisteria Wonder inks. I layered this onto a piece of Basic Black that was cut using the Labels framelits dies and then popped this up onto the card. I added pearls to the flower centers. Thanks for stopping by and have a super day! Don't forget to check out Create with Connie and Mary and sign up for the Card "Create"tions for All Occasions 2013 Edition!! We just went live this week and you can still get in! Hope to see you there!


    Card "Create"tions for All Occasions has started!  Have you signed up?  If not...what are you waiting for?  We will be sharing 18 sets with 4 cards for EACH of those sets!  What could be better than that? Here is a listing of the 18+ sets we will be featuring!
    For the Birds, Easy Events, Up Up and Away, Kidoodles,
    Lacy & Lovely, Oh Hello!, Henry Says, Love & Laughter,
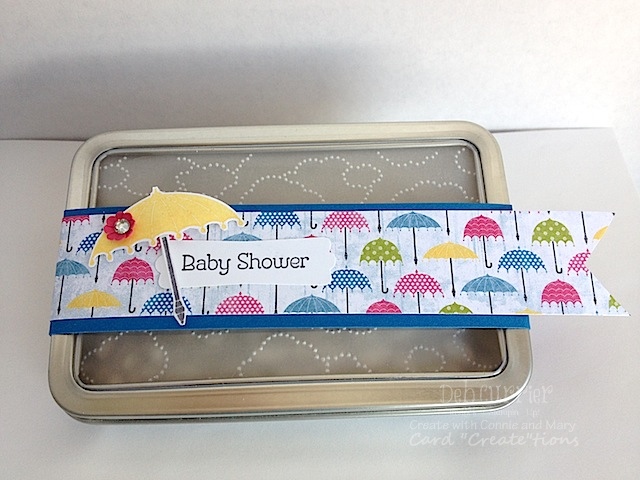
    Blue Ribbon, Patterned Party, Rain or Shine, Topsy Turvy,
    By the Tide, Swallowtail, Papaya Collage, 
    Stippled Blossoms, Summer Silhouette, Flowering Flourishes,
    Little Friends (Preview Week), Take Care (Preview Week)
    Here are some additional details:
    • 3 weeks of FABULOUS card ideas - 18 different sets (not including our two Preview sets). 
    • Each SET is presented with 4 cards...one based on the weekly sketch, one the designer's choice then one simple and one 'stepped up' version of the same card...so 4 cards for EACH set - 72 EXCLUSIVE card ideas NOT SEEN ANYWHERE ELSE!
    • Each Saturday we will each do a small favor using the same set we use during the week as a bonus item.  These WILL be displayed publicly but only subscribers will see the cards!
    AND...who are our designers?  Your favorites are on board!
    • Elizabeth Price
    • Melissa Davies
    • Debbie Henderson
    • Deb Currier
    • Connie Babbert
    • Mary Brown
    Want a taste of what this is all about?  Check out the two FREE PREVIEW Project Sheets in prior posts that Mary and Connie did...then sign up today!  The Create with Connie and Mary Card "Create"tions mini session runs March 31 thru April 20!

    Card Recipe: Stamps- Apothecary Art; Paper- Naturals Ivory, Lucky Limeade, Basic Black, In Color designer paper; Ink- black StazOn, Wisteria Wonder, Lucky Limeade; Accessories- Wisteria Wonder ruffled ribbon, Labels framelits dies, dotted ribbon scallop punch, blender pen, pearls, dimensionals

    Sunday, March 31, 2013

    CAS(E) This 21

    Woohoo!! Today is the first day of the Create with Connie and Mary Card "Create"tions for All Occasions! Have you signed up yet? You still can and you will have access to ALL of the cards and their project sheets complete with instructions and measurements! You will see my projects on Tuesday! Be sure to visit the Create with Connie and Mary website to sign up! I hope to see you on the "other" side - lol!

    Good Sunday morning everyone and HAPPY EASTER! What a wonderful day today is!! I love Easter and what it truly means! And for me it means victory over death! What a great thing to celebrate! We will be celebrating with family and of course the Easter bunny has to come and bring a little something along with hiding a few eggs. Even my 13 year old is looking forward to that - lol! My sister-in-law says you are never to old to hunt for eggs! I have to agree with her. My son said that as you get older you can get more creative with the hiding spots!! Hmmm... I feel a challenge coming on - lol! 

    Today's card was inspired by the sketch challenge at CAS(E) This Sketch. And since I don't have any Easter stamps (sad, I know), I tried my best with what I had. On a card base of Primrose Petals I stamped the swirl stamp from Everything Eleanor in Primrose Petals. Then I layered a strip of designer paper from the Tea for Two dsp pack that has the end flagged. I rounded the two bottom corners of a piece of Basic Grey and adhered that to the card. On Very Vanilla I stamped the label in So Saffron and cut it out. I stamped the sentiment from Teeny Tiny Wishes in Basic Grey and added three mini brads. This is popped up onto the card. Then I stamped the flower twice onto Very Vanilla in Primrose Petals and cut them out. One flower is adhered flat and the other is popped up. And there is my Easter card! May you all have a very blessed Easter! Thanks for stopping by and have a super day!!

    Card Recipe: Stamps- Teeny Tiny Wishes, Everything Eleanor; Paper- Primrose Petals, Basic Grey, Very Vanilla, Tea Two designer paper; Ink- Primrose Petals, Basic Grey, So Saffron; Accessories- mini brads, corner rounder, dimensionals

    Thursday, March 28, 2013

    CCMC 245

    Good morning, Friends! It's time for the Create with Connie and Mary Thursday challenge! This week we are being challenged with a sketch. Take a look at this fabulous, very versatile sketch!


    I just love the simplicity of this! I had the hardest time trying to figure out how I would use it for this week's challenge because there are SO many possibilities!  I changed by mind three times - lol! Here is what I finally decided on.


    I am really loving the fun bright colors in the Sunshine and Sprinkles designer paper! I took a piece of the designer paper and ran it through the Big Shot using the Cloudy Day embossing folder. This ended up being a little tricky as I wanted the clouds to go the right direction and I could only get half the paper in the folder. That part was fine. I thought I could just put the rest of the paper in the folder and run it through again but I ended up having to put more of the paper into the folder causing the middle part to get double embossed. No big deal. With this designer paper, you can't even tell! Cool! So the dsp was adhered to a piece of Whisper White and then a piece of Melon Mambo 3/8" striped organdy ribbon was tie around this. I popped this panel up onto a card base of Whisper White. I stamped the sentiment from Rain or Shine in Basic Grey onto a strip of Whisper White and flagged one end. This is adhered to the card. I cut a piece of Whisper White with the Labels framelits dies and then pierced around the inside of it with the Festive paper piercing pack. Then I stamped the handle of the umbrella in Basic Grey. The label is popped up onto the card. I stamped the top of the umbrella in Melon Mambo onto a scrap of Whisper White and cut it out. This is popped up onto the card. I used the itty bitty shapes punch pack to punch a flower from Daffodil Delight and adhered it to the umbrella and added a rhinestone.

    Be sure to visit the Create with Connie and Mary website to see what the other designers did with this sketch! There are SO many variations of this sketch!! Too fun!! And while you are there be sure to sign up for the Card "Create"tions for All Occasions edition! I am so excited to be a part of this design team! 


    JOIN US for a the NEW Cards "Create"tions for All Occasions Edition using occasions, nature and celebration stamp sets from the Main and Spring Mini catalogs!

    * Over 72 EXCLUSIVE cards with 18 stamp sets featured! 
    * March 31 - April 20
    * Printable supply lists, measurements and DIRECTIONS!
    * 24/7 access
    * Perfect for classes or personal cards!
    * Designers Elizabeth Price, Melissa Davies, Debbie Henderson and Deb Currier are joining us!

    Create with Connie and Mary
    Card "Create"tions for All Occasions Edition
    Only $19.95 US

    Thanks for stopping by and have a super day!

    Card Recipe: Stamps- Rain or Shine; Paper- Whisper White, Sunshine and Sprinkles designer paper; Ink- Basic Grey, Melon Mambo; Accessories- Melon Mambo 3/8" striped organdy ribbon, Labels framelits dies, Festive paper piercing pack, Cloudy Day embossing folder, itty bitty shapes punch pack, rhinestone, dimensionals

    Wednesday, March 27, 2013

    TSSC 256

    JOIN US for a the NEW Cards "Create"tions for All Occasions Edition using occasions, nature and celebration stamp sets from the Main and Spring Mini catalogs!

    * Over 72 EXCLUSIVE cards with 18 stamp sets featured! 
    * March 31 - April 20
    * Printable supply lists, measurements and DIRECTIONS!
    * 24/7 access
    * Perfect for classes or personal cards!
    * Designers Elizabeth Price, Melissa Davies, Debbie Henderson and Deb Currier are joining us!

    Create with Connie and Mary
    Card "Create"tions for All Occasions Edition
    Only $19.95 US


    Good morning, Friends! I am pushing the Create with Connie and Mary Card "Create"tions for All Occasions hard this week as we go live on Sunday!! We are all SO excited! We have been working hard on our projects that will be just for our subscribers eyes only! So don't miss out! Today over at the Create with Connie and Mary website, Connie has a preview for you! And her cards are just the sweetest!! She also has a project sheet for you to download! Oh and she also has blog candy!! So be sure to check that all out and sign up for the Card "Create"tions edition!!

    Today's card was inspired by Mary Jo's lunchtime sketch challenge. It was an easy sketch and that is just what I needed with the busy day I had yesterday! I was glad to be able to make it a masculine card, too! I adhered a piece of Print Poetry designer paper to a card base of Midnight Muse. Then I stamped the coral image from By the Tide in Crumb Cake onto a piece of Crumb Cake. I also stamped the sentiment from Made for You in Midnight Muse and then I sponged the edges with Crumb Cake ink. I added three brads and popped this piece onto the card. Then I stamped the fish in Midnight muse and cut it out. This is popped up onto the card. Done! I told you it was easy!! Thanks for stopping by and have a super day!

    Card Recipe: Stamps- By the Tide, Made for You; Paper- Midnight Muse, Crumb Cake, Very Vanilla, Print Poetry designer paper; Ink- Midnight Muse, Crumb Cake; Accessories- metallic brads, sponge, dimensionals


    Tuesday, March 26, 2013

    STB 11


    JOIN US for a the NEW Cards "Create"tions for All Occasions Edition using occasions, nature and celebration stamp sets from the Main and Spring Mini catalogs!

    * Over 72 EXCLUSIVE cards with 18 stamp sets featured! 
    * March 31 - April 20
    * Printable supply lists, measurements and DIRECTIONS!
    * 24/7 access
    * Perfect for classes or personal cards!
    * Designers Elizabeth Price, Melissa Davies, Debbie Henderson and Deb Currier are joining us!

    Create with Connie and Mary
    Card "Create"tions for All Occasions Edition
    Only $19.95 US

    Good morning, Friends! Have you been to the Create with Connie and Mary website to see Mary's Card "Create"tions preview? Wow! She even has a project sheet for you to download! I am so excited for this edition! I do hope you will join us as I am positive that you will love all the projects that the designers are working up just for our subscribers! 

    I have to say that Nick is really taking FULL advantage of his spring break! I have hardly seen him since last Thursday! But I am so glad for him! I am so happy that he has such wonderful friends to get together with and that they enjoy doing physical outdoor activities as much as he does! No couch potato, t.v. watching, video games, "I'm bored" kid here! Love that about him! For me, I finally get my hair cut and colored today! Yea!! I always love to have that done! Then I need to shop for some necessary items to finish a few birthday gifts and then home to get some stamping done!

    Today's card was inspired by the Seize the Birthday challenge. I also did this card for a recent swap that I participated in. Love the fun bright colors on this! And it's fairly simple to put together! I punched a strip of Island Indigo with the dotted ribbon scallop punch and adhered it to the back of a piece of Summer Smooches designer paper. This is adhered to a piece of Whisper White. Then I tied a piece of Daffodil Delight seam binding ribbon around this. The sentiment from Friendly Phrases was stamped in Island Indigo and then the panel was adhered to a card base of Island Indigo. I stamped the flower from Mixed Bunch in Daffodil Delight and punched it out with the Blossom punch. The flower center was stamped in Island Indigo and fussy cut with the paper snips. I added a brad and popped this up onto the flower. I punched two leaves from Lucky Limeade using the Blossom Petals builder punch and adhered them to the back of the flower. The flower is popped up onto the card. I added two rhinestones to the greeting - just because :) Thanks so much for stopping by and have a fabulous day!

    Card Recipe: Stamps- Mixed Bunch, Friendly Phrases; Paper- Whisper White, Island Indigo, Lucky Limeade, Summer Smooches designer paper; Ink- Daffodil Delight, Island Indigo; Accessories- Daffodil Delight seam binding ribbon, Blossom punch, Blossom Petals builder punch, dotted ribbon scallop punch, silver brad, rhinestones, dimensionals


    Monday, March 25, 2013

    Preview Week Has Begun and CAS-ual Fridays 95

    Good morning, Friends! Before I get to today's card I am so excited to announce that Preview Week has begun for Create with Connie and Mary Card "Create"tions for all Occasions 2013!! Mary is giving you all an idea of what the subscription will be like. On Wednesday, Connie will give you all another little preview with another stamp set. Mary has a full project sheet for you to download and use so make sure you check it out! I do hope I will see you during this special edition! Here is a little more information.


    JOIN US for a the NEW Cards "Create"tions for All Occasions Edition using occasions, nature and celebration stamp sets from the Main and Spring Mini catalogs!

    * Over 72 EXCLUSIVE cards with 18 stamp sets featured! 
    * March 31 - April 20
    * Printable supply lists, measurements and DIRECTIONS!
    * 24/7 access
    * Perfect for classes or personal cards!
    * Designers Elizabeth Price, Melissa Davies, Debbie Henderson and Deb Currier are joining us!

    Create with Connie and Mary
    Card "Create"tions for All Occasions Edition
    Only $19.95 US


    O.k. now to today's card! 

    Today's card was inspired by the challenge at CAS-ual Fridays. The challenge is to make a card with NO stamps. Yikes! But then I remembered this beautiful paper from the Occasions mini catalog that had this quote on it. I thought I would never be able to use that part of the paper. I love the quote and I love the look of the writing but how to use it? This challenge is perfect! And it could be used for a wedding or anniversary card. Doesn't have to be Valentine's! I cut the More Amore designer paper to size and layered it onto a piece of Primrose Petals then popped it up onto a card base of Basic Grey. Then I took a piece of Primrose Petals to the Big Shot and used the Hearts a Flutter framelits dies to cut a scallop heart. Then I used the smaller heart framelit die and cut it out. This heart "frame" is popped up onto the card. I used the small heart punch and punched a heart from Primrose Petals. This is adhered to the card and a rhinestone was added. I guess you can make a card with no stamps! Give it a try!! Thanks for stopping by and have a super day!

    Card Recipe: Stamps- none; Paper- Basic Grey, Primrose Petals, More Amore designer paper; Ink- none; Accessories- Hearts a Flutter framelits dies, small heart punch, rhinestone, dimensionals

    Thursday, March 21, 2013

    CCMC 244

    Good morning, Friends! I hope you are ready for another fabulous challenge from the Create with Connie and Mary team! This week we are being challenged with color. Take a look!


    Not Quite Navy, Marina Mist and Daffodil Delight. Beautiful! I love to experiment with color. I thought these colors might be good for a more masculine card and this is what emerged.


    I had seen a sample similar to this in the Occasions mini catalog and thought I could recreate it. I don't know if I am completely happy with it but it works. Being sick this week has really thrown me off. I am glad to be on the mend and stamping on a regular basis again! For this card I embossed a piece of Whisper White with the Honeycomb embossing folder, Then I adhered a piece of Daffodil Delight to the back and popped the panel up onto a card base of Not Quite Navy. Then I ran scraps of Not Quite Navy, Marina Mist, Polka Dot Parade designer paper, Summer Smooches designer paper and Sunshine and Sprinkles designer paper through the Big Shot using the Honeycomb embossing folder and cut out several hexagons. I adhered some of these hexagons flat and some I popped up. I tried to put them on in a random manner (no thinking needed - lol). Then I stamped the sentiment from Friendly Phrases in Not Quite Navy onto a strip of Whisper White and flagged one end. I added two silver brads and popped it up onto the card.

    Be sure to visit the Create with Connie and Mary website to see what the other designers did with these colors! Lots of great inspiration! I hope that you will play along with us this week! We always love to see what you do with the challenges!

    Before I sign off I would like to announce that I am a designer for the Create with Connie and Mary Card "Create"tions for All Occasions! I am so excited! Here are the details!


    JOIN US for a the NEW Cards "Create"tions for All Occasions Edition using occasions, nature and celebration stamp sets from the Main and Spring Mini catalogs!


    * Over 72 EXCLUSIVE cards with 18 stamp sets featured! 
    * March 31 - April 20
    * Printable supply lists, measurements and DIRECTIONS!
    * 24/7 access
    * Perfect for classes or personal cards!
    * Designers Elizabeth Price, Melissa Davies, Debbie Henderson and Deb Currier are joining us!


    Create with Connie and Mary
    Card "Create"tions for All Occasions Edition
    Only $19.95 US

    Thanks for stopping by and have a super day!

    Card Recipe: Stamps- Friendly Phrases; Paper- Not Quite Navy, Daffodil Delight, Marina Mist, Whisper White, Sunshine and Sprinkles designer paper, Polka Dot Parade designer paper; Ink- Not Quite Navy; Accessories- Honeycomb embossing folder, silver brads, dimensionals

    Saturday, November 17, 2012

    Card "Create"tions Favor Week 3

    Good morning everyone! I hope you are ready for a super weekend! I know we are!! We are so super excited as Nick will have is District Basketball Finals today and he is looking forward to getting his birthday present (a little early) and then we get ready to go on a little vacation to see my family for Thanksgiving!!! So excited!! 

    Today marks the last of the Create with Connie and Mary Card "Create"tions Holiday Edition. :( I have had the best time being a part of this and I feel so honored that I was asked! Thank you Connie and Mary!! As you know, on Saturday we show you all a small favor that we have created using our featured stamp set. I used Frosty Friends this week. What a truly adorable stamp! I am all about snowmen! I really haven't met a snowman I didn't like - lol! My favor today is a little ornament. I had some trouble coming up with something using just this one stamp but I think that this turned out really sweet! I used the Oval Accent die to cut two shapes from muslin. On one piece I stamped the image in black StazOn and colored it in using a blender pen and ink pads. I used Real Red, Gumball Green, Pool Party, Pumpkin Pie and Crumb Cake. Then I put the two shapes together and used some linen thread and a needle to sew the two shapes together. Before sewing the whole thing closed, I stuffed some poly fill into it to make a little poofy. Then I sewed it shut. I found some old wire and weaved it through the stitches and shaped it. Then I added some Victoria crochet trim, linen thread and a bronze button. Too fun!!

    You can see what the other designers created by visiting the Create with Connie and Mary website. If you haven't subscribed to the "Create"tions Edition, why not do so now? You will still have access to ALL of the cards that each designer created including the downloadable pdf files on supplies and measurements! For those of you who did subscribe, I just want to say "Thank You"!! I hope you had as much fun as I did! Thank you all for stopping by and have a super day!

    Card Recipe: Stamps- Frosty Friends; Paper- muslin fabric, poly fill; Ink- black StazOn, Real Red, Crumb Cake, Gumball Green, Pool Party, Pumpkin Pie; Accessories- Victoria crochet trim, linen thread, bronze button, blender pen

    Thursday, November 15, 2012

    CCMC 227

    Hello everyone!! Time for another Thursday challenge from the Create with Connie and Mary team! This week Connie and Mary have a little "twist" to go along with the sketch challenge! First, take a look at this very fun sketch!


    Great sketch, huh!!! But this week's challenge is not just about the sketch. It's also about making a shaped card! I don't usually do these kind of cards but I was really excited about using a new die. I got this die right when the new catalog came out but I haven't used it yet! Perfect time!


    I took an 8 1/2" x 5 1/2" piece of Very Vanilla and folded it in half - which makes a regular card. Then I placed it on the Oval Accent die where the fold of the card was just under the top of the die. Then I ran it through the Big Shot to cut out the shape. Then I added two strips of champagne glimmer paper. I used my snips to cut the strips to the shape of the card. Then I stamped the verse from Rejoicing with You in Elegant Eggplant onto the card and the image also in Elegant Eggplant onto a scrap of Very Vanilla. I cut the image out and popped it up onto the card. I added five pearls that spray out of the trumpet. Simple! I do love how this turned out and it will fit inside a regular envelope! 

    To get more inspiration be sure to visit the Create with Connie and Mary website! I hope you will find some time to play along with us this week! We always love to see what you do with the challenges! This challenge will go for two weeks (due to the Thanksgiving holiday). 

    I also want to put one more shout-out to the Create with Connie and Mary Card "Create"tions Holiday Edition! We are on our last week. However, when you subscribe, you will get ALL the downloadable sheets and access to all the blog post entries! Thanks for stopping by and have a super day!

    Card Recipe: Stamps- Rejoicing with You; Paper- Very Vanilla, champagne glimmer paper; Ink- Elegant Eggplant; Accessories- Oval Accents die, pearls dimensionals

    Saturday, November 10, 2012

    Card "Create"tions Favor Week 2


    Good morning everyone! I am so excited to show you my favor for week 2 of the Create with Connie and Mary Card "Create"tions! Are you a subscriber? It's not too late to become a subscriber and still enjoy ALL the projects and downloadable sheets! This past week I used the Rejoicing with You stamp set!


    This is such a beautiful and elegant set! I loved working with this set! And I hope that you enjoyed my projects! For my favor, I decided to use the Petal Cone die and the Naturals Composition specialty designer paper. I thought that the musical notes of the designer paper would work perfectly with this set! And I love how it turned out! My only regret is that I don't have anything Christmas-y to put in it. But I used two pieces of the designer paper and ran it through the Big Shot with the Petal Cone die. Then I used sticky strip to adhered the two pieces together. I punched two holes on either side and used Victoria crochet trim to make a handle. Then I stamped the image from Rejoicing with You in VersaMark onto Very Vanilla and embossed it with gold embossing powder. I cut it out and adhered it to the front with dimensionals. I cut the banner from the Petal Cone die in Very Vanilla and stamped the sentiment in black StazOn. This is adhered to the image on the box. And the box is ready to be filled with some fun Christmas goodies! Or it could be a beautiful ornament!

    Be sure to visit the Create with Connie and Mary website to see what the other designers have come up with! Thanks for stopping by and have a super day!

    Card Recipe: Stamps- Rejoicing with You; Paper- Very Vanilla, Naturals Composition specialty designer paper; Ink- VersaMark, black StazOn; Accessories- Victoria crochet trim, Petal Cone die, gold embossing powder, dimensionals

    Saturday, November 3, 2012

    Card "Create"tions Favor Week 1


    Good morning everyone! I hope your weekend is off to a great start! Have you been enjoying the Card "Create"tions Edition over at Create with Connie and Mary? If you haven't signed up, it's not too late! You can sign up now and still enjoy all the creations! We are just finishing up week 1! On Saturday we show you all a small favor using the set that we used for our projects. I used the Evergreen set so my favor features that set, too. But the only way you will get to see my cards and download the project sheets is to be a subscriber to the Create with Connie and Mary Cards "Create"tions Edition


    My favor is very simple! I had ordered the Ghoulish Googly designer kit and it came with these really cool vellum sacks. I filled it up with Wintergreen mints. Then I took some Cherry Cobbler card stock and ran it through the Big Shot with the Two Tags die. I used the tag with the scallop top. I folded this over the bag and stapled it into place. Then I stamped the solid part of the tree in Lucky Limeade (stamping off once) and then the detail part on top. I cut it out and popped it up onto the tag. Then I stamped the greeting from Teeny Tiny Wishes in Cherry Cobbler onto a strip of Whisper White. Both ends were flagged and the strip is adhered to the tree. Very simple!

    You can see what the other designers used for their stamp set this week and the favors they created at Create with Connie and Mary! Thanks for stopping by and have a super day!

    Card Recipe: Stamps- Evergreen, Teeny Tiny Wishes; Paper- Cherry Cobbler, Whisper White, vellum sacks; Ink- Cherry Cobbler, Lucky Limeade; Accessories- Two Tags die, dimensionals

    Sunday, October 28, 2012

    Thanksgiving Leaf

    Good Sunday morning everyone! Once again it is cold this morning! And in about an hour, I am needed for a soccer fundraiser at the park. Brrr!!! Got my thick socks on and a nice coat. Now to find some gloves!! The people who worked it yesterday (cold yesterday morning, too) said that the coffee and hot chocolate were the most valued commodities! I believe it! And I think they will be again today! But it will warm up a little. Eventually. I hope! 

    Today's card was inspired by a card I had pinned on my Pinterest board. So clean and simple! I do apologize for the photo. It seems that I took the picture after the sun had gone to the other side of the house. But here are the details. I used the circles #2 die to cut a circle from Early Espresso. On top of this is a Crumb Cake circle that was punched with the 1 3/4" circle punch and then run through the Big Shot with the Woodgrain embossing folder. Then they are popped up onto a card base of Very Vanilla. I took a strip of Very Vanilla and stamped the greeting from Teeny Tiny Wishes in Early Espresso, flagged both ends and adhered it to the card. Then I stamped the leaf from Wonderfall in Summer Startfruit and cut it out. This is popped up onto the card. I adhered an Early Espresso button with some Early Espresso baker's twine tied in it. I wanted to use linen thread but I couldn't find my brand new package that I just bought! Ugh!! Guess I will order more. 

    So have you signed up for the Create with Connie and Mary Card "Create"tions yet? Today is day one!! I am so excited to be a part of this venture! You will only see my creations for this very special edition when you subscribe! And it's not too late! Here is what you will get for $19.95!

    • These cards are EXCLUSIVE to our subscription and won't be shown anywhere else. 
    • 3 week mini-edition that is only cards, October 28 - November 17
    • Each designer will choose a holiday or winter set each week and make 3 different cards using that one set.
    • Total of 45 unique card ideas from 15 different sets. 
    • Each card set includes a printable supply list with card measurements and photos.
    • Perfect for your classes and stamp camps or to make for your own holiday cards!
    AND...as a bonus on Saturdays, each designer will be sharing a little 3D favor that matches the holiday or winter set they chose that week.  We will be sharing this favor on our personal blogs, too, but you can easily tie it into your class offering!

    Thanks for stopping by and have a super day!!

    Card Recipe: Stamps- Teeny Tiny Wishes, Wonderfall; Paper- Very Vanilla, Early Espresso, Crumb Cake; Ink- Early Espresso, Summer Starfruit; Accessories- Early Espresso baker's twine, neutrals buttons, 1 3/4" circle punch, Woodgrain embossing folder, circles #2 die, dimensionals

    Saturday, October 27, 2012

    A Scentsational Tag

    Good morning, Friends! The morning is off to a cold start around here! Wow!! I am glad to have my SmartWool socks on right now - lol! It should warm up nicely but you can tell that the seasons are changing! I am getting ready to have a stitching day today and I am so excited! A friend opened a new wool store and she will be providing classes and product! I wanted to go last month but I got the shingles and couldn't make it. Next month I will be making a pair of slippers! I can't wait! Tonight Pat and I will double date with some friends that we haven't seen in a while and Nick is off to a friend's to spend the night. Great weekend!!

    Today's card is one that I sort of copied from a recent PaperCrafts magazine. The part that I copied is the tag. I just switched the product line and turned it into a card. I thought it turned out pretty cute! I cut a banner shape from Early Espresso. For the top part of the tag, I used the Apothecary Accents framelits and cut the shape out from Very Vanilla. This is folded in half lengthwise and put over the top of the tag. Then I punched and 3/4" circle from Lucky Limeade and adhered that to the tag. I used my crop-a-dile to punch a hole for my Cherry Cobbler seam binding ribbon. Then the tag is popped up onto a card base of Crumb Cake. I adhered a 2 1/2" circle that was punched from Very Vanilla to a scallop circle of Lucky Limeade that was cut using the Perfect Pennants die. This is then popped up onto the card. Then I cut the tree using the Holiday framelits from Cherry Cobbler and a piece of designer paper from the Festival of Prints. Using various sizes of hole punches, I punched holes into the green tree. Then I used glue dots to adhere it to the Cherry Cobbler tree. The tree is then popped up onto the card. Thanks for stopping by and have a super day!

    Don't forget that the new Card "Create"tions goes live tomorrow! Have you signed up? Don't delay! You can sign up today!!


    Here's what you will get for $19.95!

    • These cards are EXCLUSIVE to our subscription and won't be shown anywhere else. 
    • 3 week mini-edition that is only cards, October 28 - November 17
    • Each designer will choose a holiday or winter set each week and make 3 different cards using that one set.
    • Total of 45 unique card ideas from 15 different sets. 
    • Each card set includes a printable supply list with card measurements and photos.
    • Perfect for your classes and stamp camps or to make for your own holiday cards!
    AND...as a bonus on Saturdays, each designer will be sharing a little 3D favor that matches the holiday or winter set they chose that week.  We will be sharing this favor on our personal blogs, too, but you can easily tie it into your class offering!

    Hope to see you there!!

    Card Recipe: Stamps- none; Paper- Crumb Cake, Early Espresso, Lucky Limeade, Cherry Cobbler, Very Vanilla, Festival of Prints designer paper; Ink- none; Accessories- Holiday framelits, Apothecary Accents framelits, Perfect Pennants die, Cherry Cobbler seam binding ribbon, hole punches, 3/4 circle punch, crop-a-dile, dimensionals