Showing posts with label Wishing You. Show all posts

Sunday, December 15, 2013

Angular Gifts

Good Sunday morning everyone! I hope your weekend is going swell! It's been a lot of fun to stay in and watch movies with the family this weekend! Nick is feeling much better and should be able to finish out these last few days of the semester. This week shouldn't be quite as crazy - thank goodness! As I do have quite a bit of shopping to do! Pat and I finally decided on a gift for our son but we had to have it shipped to my parents because we weren't sure if it would get here in time. Yep! Last minute!! Oh well. He's older now and it works for us! Love my family!!

Today's card was inspired by a few cards I had seen with these angles. I thought it made for an interesting layout and wanted to give it a try. Well it is not as easy as it looks! I had to try three times before I could get it this way - lol! Here are the details:

  • Card base is Whisper White
  • Layer of Cherry Cobbler
  • Layer of Season of Style designer paper
  • Stamp greeting from Wishing You in Chocolate Chip onto a strip of Whisper White and flag both ends then adhere to card
  • Stamp gifts image onto a piece of Whisper White using Baked Brown Sugar, Old Olive and Cherry Cobbler markers, cut out and adhere to card with dimensionals
  • Add rhinestone to center gift
Thanks for stopping by and have a super day!

Card Recipe: Stamps- Wishing You; Paper- Whisper White, Cherry Cobbler, Season of Style designer paper; Ink- Baked Brown Sugar, Old Olive, Cherry Cobbler, Chocolate Chip; Accessories- rhinestone, dimensionals

Friday, December 13, 2013

SFF 121313

Hello everyone! Thank goodness is FRIDAY!! I am looking forward to a relaxing weekend after a very crazy week!! Whew!! It's also time for a new challenge from the Sketch Frenzy Friday team! This week's sketch was created by Tammy Fite. Take a look!


And my card...


A very simple sketch with lots of possibilities! Here are the details:

  • Card base is Crumb Cake
  • Layer of Crumb Cake with two strips of Season of Style washi tape adhered
  • Stamp the greeting from Wishing You in Chocolate Chip then adhere panel to card base with dimensionals
  • Stamp the gifts image onto Whisper White using Baked Brown Sugar, Old Olive and Cherry Cobbler markers then cut out
  • Use the Ovals framelits to cut an oval from Cherry Cobbler and one from silver glimmer paper
  • Adhere the two ovals together and then pop up onto card
  • Adhere the gifts with dimensionals
  • Add a rhinestone to middle package
Be sure to see the other creations at the Sketch Frenzy Friday blog! I hope to see your creations uploaded, too! Thanks for stopping by and have a super day!

Card Recipe: Stamps- Wishing You; Paper- Crumb Cake, Whisper White, Cherry Cobbler, silver glimmer paper; Ink- Baked Brown Sugar, Old Olive, Cherry Cobbler, Chocolate Chip; Accessories- Season of Style washi tape, Ovals Collection framelits, rhinestones, dimensionals

Tuesday, December 10, 2013

FMS 115

Good morning, Friends! I hope your week is off to a great start! It's a very cold start around here!! At this rate it will take quite a while for all this snow to melt off! At least the sun is supposed to shine. It's a busy week for us around here but today and tonight I have some time to catch up - laundry, stamping and wrapping a few presents! Lots to get done in the next two weeks!

Today's card was inspired by the sketch at Freshly Made. It's their sketch from last week. Here are the details:

  • Card base is Baked Brown Sugar
  • Layer of Old Olive that was run through the Big Shot using the Stylish Stripes embossing folder and then strips of Season of Style washi tape are adhered to the panel between embossed lines (a little hard to see)
  • Adhere this panel to a piece of Cherry Cobbler and then adhere to card base
  • Make a tag from Whisper White by flagging the bottom and rounding the top with the 1 3/4" circle punch then punch a hole in the top
  • Stamp the gifts image from Wishing You using Baked Brown Sugar, Old Olive and Cherry Cobbler markers
  • Thread some Cherry Cobbler seam binding ribbon through the hole and tie together using Cherry Cobbler baker's twine then adhere tag to card with dimensionals
  • Stamp greeting in Cherry Cobbler onto Whisper White and punch out with the extra large oval punch and adhere to card
And there you have it! Thanks for stopping by and I hope you all have a fantastic day!

Card Recipe: Stamps- Wishing You; Paper- Baked Brown Sugar, Old Olive, Cherry Cobbler, Whisper White; Ink- Baked Brown Sugar, Old Olive, Cherry Cobbler; Accessories- Cherry Cobbler seam binding ribbon, Cherry Cobbler baker's twine, Season of Style washi tape, Stylish Stripes embossing folder, extra large oval punch, 1 3/4" circle punch, dimensionals

Friday, November 1, 2013

SFF 110113

Good morning everyone! Woohoo!! It's Friday and we don't have to go anywhere this weekend! I am so looking forward to sleeping in and enjoying the weekend at home! Tonight I will be enjoying some time with my friend Becky! I think she needs a little break from all the packing she has been doing! Today the Sketch Frenzy Friday team has a new sketch for you to try! This week's sketch was created by Jennifer Weide. Take a look!


And my card...


I just got the new Deco Label framelits and thought I could use them for this sketch. I replaced the diamond shape for the Deco Label. Here are the details:

  • Card base is Crumb Cake
  • Layer of Cherry Cobbler adhered to card base
  • Strip of Season of Style designer paper flagged at both ends and then adhere to card
  • Use Deco Labels framelits to cut shape from Crumb Cake and sponge edges with Whisper White craft ink then adhere to card using dimensionals
  • Stamp greeting from Wishing You in Chocolate Chip
  • Stamp gifts image onto Whisper White using Baked Brown Sugar, Cherry Cobbler and Old Olive markers
  • Cut image out and adhere to card with dimensionals
  • Add a rhinestone to center gift
There you have it! Simple card!! Be sure to check out the Sketch Frenzy Friday blog for more inspiration! I do hope you will play along with us this week! Thanks for stopping by and have a super day!

Card Recipe: Stamps- Wishing You; Paper- Crumb Cake, Cherry Cobbler, Whisper White, Season of Style designer paper; Ink- Chocolate Chip, Whisper White craft, Baked Brown Sugar, Cherry Cobbler, Old Olive; Accessories- Deco Labels framelits, rhinestone, sponge, dimensionals

Monday, October 21, 2013

Christmas Washi Tape

Good morning, Friends! Well, we made it home and in plenty of time to watch the football game. But I don't want to talk about that! Yuck! We did drive through snow on the way home! In fact, there were some people even skiing!! Now that our soccer season is over, it can snow all it wants on the passes! Actually, I had better not speak too soon as Nick still has his third tryout next weekend. And if he makes the state team, then we will be driving over every Sunday. Hmmm... He has a basketball game today. I'm looking forward to that!

Today's card was the last of the cards that we did for stamp club this month. This one is pretty easy! Here are the details:

  • Card base is Whisper White
  • On a layer of Whisper White adhere two strips of Season of Style washi tape on the left hand side, then stamp the greeting from Wishing You in Chocolate Chip
  • Adhere this panel to a layer of Cherry Cobbler and pop up onto card base
  • Stamp gifts image onto Whisper White using Baked Brown Sugar, Old Olive and Cherry Cobbler markers, cut out and pop up onto card
  • Add rhinestone to center package
Pretty simple! A great one for mass producing and mailing! 

Have you subscribed to the Create with Connie and Mary Winter Collection? It started today! And it's not too late to join! You can sign up anytime and get all the ideas along with the downloadable tutorials! And you will get fabulous ideas from the very talented design team! So what are you waiting for??


Card Recipe: Stamps- Wishing You; Paper- Whisper White, Cherry Cobbler; Ink- Chocolate Chip pad, Baked Brown Sugar, Old Olive, Cherry Cobbler markers; Accessories- Season of Style washi tape, rhinestone, dimensionals

Thursday, October 17, 2013

CCMC 273

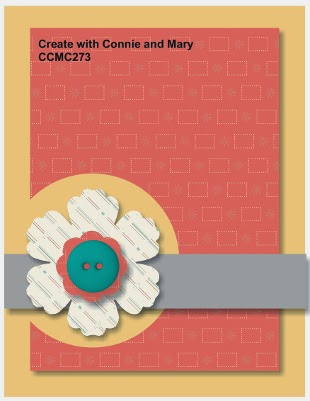
Good morning, Friends! It's Thursday and time for another fun challenge from the Create with Connie and Mary team! This week we have a sketch challenge! Take a look!


And my card:


I had fun creating this one! Love the cut out circle! Here are the details:

  • Card base is Cherry Cobbler cut at 4 1/4" x 11" and folded in half
  • Layer of Old Olive cut at 4 1/2" x 3 1/4" and run through the Big Shot using the Styled Stripes embossing folder
  • Layer of Season of Style designer paper and punched with the 2 1/2" circle punch then adhered to Old Olive layer
  • Adhere panel to card base
  • Stamp greeting from Wishing You in Chocolate Chip onto a strip of Crumb Cake cut at 1 1/4" x 5 1/2" and adhere to card
  • Use the Circles #2 die to cut a 2" circle from silver glimmer paper then pop up onto card
  • Stamp gifts image from Wishing You onto Whisper White using Baked Brown Sugar, Cherry Cobbler, and Old Olive markers, cut out and pop up onto card
  • Add a rhinestone to the bow on the center gift
Be sure to visit the Create with Connie and Mary site to see what the other designers did with this fabulous sketch! I hope that you will be inspired to play along with us this week! 

Have you signed up for the Create with Connie and Mary Winter Collection 2013 yet? Check out the details! You are sure to love what you see from the fabulous designers!

 Create with Connie and Mary Winter Collection 2013
Save $5 with our EARLY BIRD PRICE - Only $24.95 US 
Regular $29.95 US
4 weeks of daily Christmas and Winter project ideas for decorating or gift giving that can be completed in about 2 hours...
perfect for classes and stamp camps!
*        Includes our popular Card "Create"tions Week...designers will feature six Christmas or Winter stamp sets with four cards using that set, over 24 exclusive card ideas! 
*        Also including one week of Last Minute Gift Ideas
*        Winter Collection runs October 20 - November 16
*        Features 2013-14 Holiday & Catalog Products
*        18 EXCLUSIVE projects AND 24 card ideas
*        See what we are all about during our FREE Preview Week October 13-19
*        Projects include step-by-step downloadable PHOTO tutorials
*        Fabulous Design Team
*        Saturday Creative Challenges for everyone
*        Projects only available to subscribers
*        Demonstrators & Customers welcome
Card Recipe: Stamps- Wishing You; Paper- Whisper White, Cherry Cobbler, Old Olive, Crumb Cake, Seasons of Style designer paper; Ink- Chocolate Chip, Baked Brown Sugar, Cherry Cobbler, Old Olive; Accessories- Styled Stripes embossing folder, 2 1/2" circle punch, Circles #2 die, rhinestone, dimensionals

Monday, October 14, 2013

Wishing You Swap

Good morning, Friends! Another Monday... (sigh). I really wanted to sleep a little longer! But there is still so much to do! And I have a workshop tonight that I have to get ready for. Most of my stamping supplies are still in boxes so I will need to hunt for the things I will need and that will take some time. Can't wait for that to be all unpacked and organized! But we have started our new routine in our new house and it feels good! I just hope that my husband's business will run smoothly with this new way of doing things.

Today's card is one that I did for the Control Freaks winter/Christmas swap this month. I just love this set! Such clean lines and makes for very clean and simple cards!


Here are the card details:
  • Card base is Cherry Cobbler cut at 4 1/4" x 11"
  • Layer of Old Olive cut at 4" x 5 1/4" run through the Big Shot using the Style Stripes embossing folder
  • Layer of Season of Style designer paper cut at 2" x 5 1/4"
  • Layer a strip of Chocolate Chip that is cut at 5 1/4" and run through the Big Shot using the Tasteful Trim die
  • Layer a piece of Season of Style washi tape
  • Layer of Crumb Cake that is cut at 3 1/2" x 2 1/2" and has all four corners rounded with corner rounder
  • Sponge edges of Crumb Cake piece with Whisper White craft ink
  • Stamp greeting from Wishing You in Chocolate Chip
  • Stamp image from Wishing You onto Whisper White using Baked Brown Sugar, Cherry Cobbler and Old Olive markers, cut out and pop up onto Crumb Cake layer
  • Pop Crumb Cake layer onto card and add a rhinestone to bow on middle package
  • Tie a piece of Cherry Cobbler baker's twine around a folded piece of Cherry Cobbler seam binding ribbon and adhere to card with a glue dot
Lots of layers on this one but a pretty easy card! 

Be sure to stop by the Create with Connie and Mary site! You will find out how to win Blog Candy!! And you can see the first Preview Week tutorial complete with downloadable instructions! Early bird pricing is going on right now, too! Here are the details:


Create with Connie and Mary Winter Collection 2013
Save $5 with our EARLY BIRD PRICE - Only $24.95 US 
Regular $29.95 US
4 weeks of daily Christmas and Winter project ideas for decorating or gift giving that can be completed in about 2 hours...
perfect for classes and stamp camps!
*        Includes our popular Card "Create"tions Week...designers will feature six Christmas or Winter stamp sets with four cards using that set, over 24 exclusive card ideas! 
*        Also including one week of Last Minute Gift Ideas
*        Winter Collection runs October 20 - November 16
*        Features 2013-14 Holiday & Catalog Products
*        18 EXCLUSIVE projects AND 24 card ideas
*        See what we are all about during our FREE Preview Week October 13-19
*        Projects include step-by-step downloadable PHOTO tutorials
*        Fabulous Design Team
*        Saturday Creative Challenges for everyone
*        Projects only available to subscribers
*        Demonstrators & Customers welcome
Card Recipe: Stamps- Wishing You; Paper- Cherry Cobbler, Old Olive, Chocolate Chip, Crumb Cake, Whisper White, Season of Style designer paper; Ink- Chocolate Chip, Baked Brown Sugar, Cherry Cobbler, Old Olive, Whisper White craft ink; Accessories- Cherry Cobbler seam binding ribbon, Cherry Cobbler baker's twine, Tasteful Trim die, Style Stripes embossing folder, Season of Style washi tape, corner rounder, rhinestone, sponge, dimensionals

Sunday, October 13, 2013

CCMC Winter Collection/Guest Designer

Good morning, Friends! It has just been crazy around here lately! Our family moved from our house in the country to a house in the small town of Fruita. And we pretty much did it ourselves! Not that we couldn't have help because we did have friends that wanted to help. But it just worked out that way and we are so happy to be where we are! Nick has already enjoyed being closer to his friends and now he can walk to school as it is practically right across the street! We are looking forward to cutting down on driving time and gas! My craft room is still in boxes but last night I got some things out to create. 

Create with Connie and Mary is starting their Preview Week for the Winter Collection 2013! And guess what?! I'm a guest designer!! Woohoo!! Be sure to check back here or their website for special surprises everyday! Also, when you subscribe to the Winter Collection during Preview Week you save $5 on your subscription! If you're looking for great ideas on cards, gifts or home decor, this is the place! I will give you more information at the bottom of my post. For now, here's my card.


I used the sketch from Retro Sketches to help me create this card. It's hard to believe that Christmas is just a few months away! This would be a great card to mass produce and it is very mailable! Here are the details:

  • Card base is Baked Brown Sugar cut at 11" x 4 1/4" then folded in half
  • Layer of Seasons of Style designer paper cut at 2" x 4 1/4" and adhere to card base
  • Layer of Whisper White cut at 2 1/2" x 3 1/2"
  • Stamp greeting from Wishing You on Whisper White in Chocolate Chip
  • Cut a strip of Cherry Cobbler 1" x 3 1/2" and punch edge using the scallop edge border punch then adhere to back of Whisper White
  • Punch two holes and insert mini brads then pop panel up onto card
  • Stamp the image from Wishing You onto Whisper White using the Baked Brown Sugar, Cherry Cobbler and Old Olive markers then cut out and pop up onto card
And there you have it! I am so excited to be a guest designer for this edition!! I just love this time of year and there are so many wonderful things to create using Stampin' Up! products! I hope you will join us for the Create with Connie and Mary Winter Collection!


 Create with Connie and Mary Winter Collection 2013
Save $5 with our EARLY BIRD PRICE - Only $24.95 US 
Regular $29.95 US
4 weeks of daily Christmas and Winter project ideas for decorating or gift giving that can be completed in about 2 hours...
perfect for classes and stamp camps!
*        Includes our popular Card "Create"tions Week...designers will feature six Christmas or Winter stamp sets with four cards using that set, over 24 exclusive card ideas! 
*        Also including one week of Last Minute Gift Ideas
*        Winter Collection runs October 20 - November 16
*        Features 2013-14 Holiday & Catalog Products
*        18 EXCLUSIVE projects AND 24 card ideas
*        See what we are all about during our FREE Preview Week October 13-19
*        Projects include step-by-step downloadable PHOTO tutorials
*        Fabulous Design Team
*        Saturday Creative Challenges for everyone
*        Projects only available to subscribers
*        Demonstrators & Customers welcome

Thursday, September 12, 2013

CCMC 268

Good morning, Friends! It's time for another Thursday challenge from the Create with Connie and Mary team! This week they have provided us with a color challenge. Take a look at these soft and beautiful colors!


Wisteria Wonder, Soft Sky and Pistachio Pudding. Love all of these! Someone I know just had a baby girl and I thought these would be great for her! So here's what I came up with!


A very simple card! I used the Christmas set, Wishing You, for the gifts image. I have been seeing a lot of people using this image for cards other than Christmas. How clever!! So here are the details:

  • Card base is Whisper White
  • Strip of Soft Sky with bottom flagged
  • Run banner through Big Shot using the Adorning Accents embossing folder (hearts) and then adhere to card
  • Stamp packages image from Wishing You using the Wisteria Wonder and Pistachio Pudding markers, cut out and pop up onto card
  • Stamp greeting from Sweet Essentials in black StazOn onto strip of Whisper White, flag end and adhere to card
  • Tie a bow using white baker's twine and adhere to popped up image then adhere a large rhinestone on top of the bow
Be sure to visit the Create with Connie and Mary site to see what the other creative designers did with these colors! Always great inspiration! Thanks for stopping by and have a super day!

Card Recipe: Stamps- Wishing You, Sweet Essentials; Paper- Whisper White, Soft Sky; Ink- black StazOn, Wisteria Wonder and Pistachio Pudding markers; Accessories- Adorning Accents embossing folder, white baker's twine, large rhinestones, dimensionals

Monday, September 9, 2013

Another Retro 79

Good morning, Stampers! What a wonderful weekend! But I just have a super hard time getting up for Monday! Ugh!! I read somewhere a funny quote that said, "I need another day between Saturday and Sunday". YES!! Wouldn't that be great - lol! Well, it finally cooled off around here yesterday! The days are getting shorter and now the weather is getting cooler... Won't be long! And it rained last night! Woohoo! We needed it so badly and we are supposed to get more! Thankfully I get a massage today! My lower back is killing me! I am looking forward to getting the kinks worked out!

Today's card was inspired by last week's Retro Sketches. This is actually the second card I made using that sketch. I am not quite in the mood for Christmas but I am working on a Christmas swap and a special Christmas card set for a design team so I was experimenting and playing to see what I could come up with. This happened to be an experiment. I love this very simple, clean lines, modern stamp set called Wishing You. Here are the details:

  • Card base is Chocolate Chip
  • Layer of Crumb Cake that was run through the Big Shot using the Stylish Stripes embossing folder
  • On the layer adhere a piece of Seasons of Style designer paper
  • Over the dsp adhere a piece of Season of Style washi tape
  • Stamp the greeting from Wishing You in Chocolate Chip onto a strip of Whisper White and pop up onto layer
  • Tie a piece of Cherry Cobbler baker's twine around layer and adhere to card base
  • Stamp the packages image from Wishing You using the Baked Brown Sugar, Old Olive and Cherry Cobbler markers onto Whisper White, cut out and pop up onto card
  • Add a rhinestone to the center of the bow on the middle package
Thanks for stopping by and have a marvelous day!

Card Recipe: Stamps- Wishing You; Paper- Chocolate Chip, Crumb Cake, Whisper White, Seasons of Style designer paper; Ink- Chocolate Chip, Baked Brown Sugar, Old Olive, Cherry Cobbler; Accessories- Stylish Stripes embossing folder, Cherry Cobbler baker's twine, rhinestone, Seasons of Style washi tape, dimensionals

Thursday, September 5, 2013

CCMC 267

Good morning, Stampers! I'm here with a very special challenge from the ladies at Create with Connie and Mary! This week they have provided us with a fabulous sketch but they have put a twist on it. We are to use the sketch AND make a pocket card! How fun is that!! So here's the sketch:


I got the idea to make a Christmas card where you could use the pocket to put a family photo! And here is what evolved:


The scallop circle element is attached just at the upper corner of the insert so that it makes it easy to insert and pull out! I don't have a picture on my insert but that is where it would go. Here are the details:

  • Card base of Baked Brown Sugar
  • Layer of Baked Brown Sugar that has been folded over that has the four corners rounded with the corner rounder
  • Behind the pocket I adhered a piece of of the Seasons of Style designer paper and then a strip of the designer paper is adhered to the flap with the bottom corners rounded with the corner rounder
  • The pocket is then adhere to the card
  • Under the flap I adhere a piece of the designer paper after flagging the bottom and then adhered the flap down
  • I stamped the greeting from Wishing You in Baked Brown Sugar and used the label thinlet from the Circle Card Thinlets die to cut it out
  • The greeting is adhered to a piece of Champagne glimmer paper that was punched with the Decorative Label punch and then popped up onto the card
  • For the circle element I stamped the packages using Old Olive and Cherry Cobbler markers onto Whisper White, cut them out and popped them up onto a circle of Cherry Cobbler that was cut with the Circles #2 die
  • The circle is then adhered to a scallop circle of Old Olive that was cut with the scallop thinlet from the Circle Card Thinlets die
  • I popped up the circle element onto the Whisper White insert and added a rhinestone to the bow on the middle package
I hope you are inspired to play along with us this week! Check out with the other designers did with this super fun challenge this week! You can find their fabulous creations at Create with Connie and Mary. And while you're there, why not sign up for the Create with Connie and Mary Fall Collection? We are into week 2 and featuring card sets! My special card set was featured this week! I would love to know what you think! But you can only see it if you are a subscriber! Thanks for stopping by and have a fabulous day!

Card Recipe: Stamps- Wishing You; Paper- Baked Brown Sugar, Old Olive, Cherry Cobbler, Whisper White, Champagne glimmer paper, Seasons of Style designer paper; Ink- Baked Brown Sugar, Old Olive and Cherry Cobbler markers; Accessories- Circle Card Thinlets dies, corner rounder, Circles #2 die, Decorative Label punch, rhinestone, dimensionals