Showing posts with label Something to Say. Show all posts

Saturday, August 29, 2015

CCMC Saturday Blog Hop: Delightful Dijon


Hello everyone! It's time for another Saturday blog hop with the Create with Connie and Mary designers! This week we are featuring projects made using Delightful Dijon as the main color. I am your stop after the fabulous Debbie Henderson!

Delightful Dijon... This is a color I just haven't used much at all. I don't hate it but it hasn't been a color that I grab. So to make something that uses this color as the main focus was a little more difficult than I thought. I kept thinking of sunflowers (my favorite flower) and thought that this color would be perfect! So here's what I came up with!

  • Card base is Whisper White
  • Adhere a piece of Delightful Dijon Color Me Irresistible designer paper to the card base
  • Stamp the greeting from the Something to Say stamp set onto a panel of Whisper White using Delightful Dijon ink then adhere the panel to a piece of Soft Suede card stock
  • Tie a piece of Delightful Dijon dotted lace trim around the panel and adhere to card with dimenionals
  • On a piece of Whisper White, stamp the solid flower image from the Beautiful Bunch stamp set using Delightful Dijon and stamping off once before stamping onto the card stock
  • Use the Stamp-a-ma-jig to help align the outline flower image on top of the solid image and stamp using Delightful Dijon at full strength
  • Punch the flower out using the Fun Flower punch
  • Adhere flower to card with dimensionals
  • Add several Soft Suede candy dots to flower center
Pretty simple card! Time to send you on to see what the super creative Connie Babbert has created! Thanks for stopping by and have a super day!


Card Recipe: Stamps- Beautiful Bunch, Something to Say; Paper- Whisper White, Soft Suede, Color Me Irresistible designer paper; Ink- Delightful Dijon; Accessories- Delightful Dijon dotted lace trim, Neutrals candy dots, Fun Flower punch, stamp-a-ma-jig, dimensionals

Tuesday, August 12, 2014

Birthday By The Tide

Good morning, Friends! I hope your week got off to a great start! My schedule is getting filled at school so that makes me feel a little more useful and helps to pass the time more quickly. Nick has started high school soccer tryouts and that is exciting, too! My husband came home sick yesterday. Yuck!! I am really hoping it was something he ate that Nick and I didn't. He did go back to work today and by last night, he looked so much better! And so far, Nick and I are fine. 

I had stamp club last night with a great group of ladies! Always love my stamp club time! Lots of laughs and great ideas shared! This is one of the cards that we did last night. It's always nice to have a stash of masculine cards.

  • Card base is Crumb Cake
  • Stamp the greeting from Something to Say onto a piece of Island Indigo card stock using Tuxedo Black Momento ink then adhere to card base
  • Stamp the coral image from By the Tide onto a piece of Crumb Cake using Crumb Cake ink then adhere to a piece of Basic Black
  • Add two mini brads to panel and adhere to card with dimensionals
  • Wrap some linen thread around a few times and adhere to card with a glue dot
  • Stamp the fish image onto a piece of Whisper White using Island Indigo ink and cut out then adhere to card with dimensionals
Thanks for stopping by and have a super day!!

Card Recipe: Stamps- By the Tide, Something to Say; Paper- Crumb Cake, Basic Black, Island Indigo, Whisper White; Ink- Island Indigo, Tuxedo Black Momento ink, Crumb Cake; Accessories- mini brads, linen thread, dimensionals

Tuesday, July 29, 2014

Color Throwdown 302

Good morning everyone! I hope your week is off to a great start! I can't believe that this is the last week of July! School starts Monday and I need to get myself ready to start waking up early to get my son ready for school! My interview yesterday went great! They even contacted my references afterwards! Since the job is working in a school they want to get someone for the first day so I should be hearing from them in the next couple of days. We will see!! And it finally rained last night! Ahhh! Blessed rain! Looks like it could do more today, too.

Today's card was inspired by the colors at Color Throwdown. Such pretty bright colors! I am too late to enter their challenge but I just had to use them anyway!

  • Card base is Whisper White
  • Adhere another piece of Whisper White to card base with dimensionals
  • Run a piece of Bermuda Bay through the Big Shot using the Large Polka Dots embossing folder then adhere to card
  • Stamp the greeting from Something to Say onto a strip of Daffodil Delight using Rich Razzleberry ink and flag the end then adhere to card
  • Stamp the flower image from Beautiful Bunch using Rich Razzleberry ink once onto Whisper White card stock and once onto Rich Razzleberry card stock
  • Punch both flowers out using the Fun Flower punch
  • Adhere flowers together using dimensionals just in the center part of the flower then adhere flowers to card with dimensionals
  • Stamp the flower again onto Whisper White using Daffodil Delight ink and cut out just the center and adhere to flower on card
  • Add three rhinestones to flower center
Loving my new stamp set! The punch makes it really easy to use, too! Thanks for stopping by and have a super day!

Card Recipe: Stamps- Beautiful Bunch, Something to Say; Paper- Whisper White, Bermuda Bay, Daffodil Delight, Rich Razzleberry; Ink- Rich Razzleberry, Daffodil Delight; Accessories- Large Polka Dots embossing folder, Fun Flower punch, rhinestones, dimensionals

Thursday, July 17, 2014

CCMC 312

Good morning! I'm here with this week's challenge from Create with Connie and Mary! This week we have a fabulous color challenge! Take a look!


Blackberry Bliss, Hello Honey and Sahara Sand are the beautiful colors to work with! And they are all included in the new Moonlight designer paper! That makes it easy to whip up a great quick and easy card! Take a look!


I had fun doing this one! 

  • Card base is Sahara Sand
  • Flag the end of a piece of Moonlight designer paper and adhere to card
  • I ran a piece of Hello Honey through the Big Shot using the Word Bubbles framelits and just cut the bottom part of the card stock
  • Run the cut piece through the Big Shot again using the star from the Circle flip card thinlit 
  • Use the Project Life corner rounder to round the top two corners
  • Stamp the greeting from Something to Say onto the cut panel using Blackberry Bliss ink
  • Adhere panel to card with dimensionals
  • Adhere the arrow embellishment from Essentials Wooden Elements to card
  • Tie a piece of white baker's twine through a Basic Metal Button and adhere to wooden arrow
See more great inspiration from the rest of the design team at Create with Connie and Mary! Don't forget about the Summer Collection! We are finishing up our last week! So many great ideas for everyone! Be sure to check it out! Thanks for stopping by and have a super day!


Card Recipe: Stamps- Something to Say; Paper- Sahara Sand, Hello Honey, Moonlight designer paper; Ink- Blackberry Bliss; Accessories- Circle Card thinlit dies, Word Bubbles framelits, Essentials Wooden Elements, Basic Metal button, white baker's twine, Project Life corner rounder, dimensionals

Friday, July 11, 2014

Blooming Goodness

Good morning, Friends! Are you looking forward to a great weekend? I know I am! I hope that I will be able to sleep in a little bit this weekend. I am also looking forward to seeing my friend, Sherry! She will be here this evening and then tomorrow we are going to a quilt show and then see a new quilt store! I haven't done any quilting in so long I'm not sure if I even remember how - lol! I am also going to do some stitching tonight with Becky. I'm hoping my arm will be able to cooperate! But in the meantime, I do need to get some stamping done! Maybe I will multi task and try to get some laundry done, too. 

Today's card was the only one that I was able to accomplish yesterday. It felt good to color again!

  • Card base is Whisper White
  • Adhere a piece of Moonlight designer paper to card base that has the top left hand corner rounded with the Project Life corner rounder
  • Round the corner of a piece of Whisper White and stamp the greeting from Something to Say in Tuxedo Black Momento ink
  • Flag the end of a strip of Old Olive and adhere to Whisper White piece then adhere panel to card
  • Stamp flower from Blended Bloom onto Whisper White using Tuxedo Black Momento ink and color using the blendabilities: Daffodil Delight and Pumpkin Pie
  • Cut out and adhere to card with dimensionals
  • Color three rhinestones with the Pumpkin Pie blendabilities and adhere to card
Thanks for stopping by and have a super day!

Card Recipe: Stamps- Something to Say, Blended Bloom; Paper- Whisper White, Old Olive, Moonlight designer paper; Ink- Tuxedo Black Momento ink, Blendabilities: Daffodil Delight, Pumpkin Pie; Accessories- Project Life corner rounder, rhinestones, dimensionals

Sunday, July 6, 2014

Stamp Review Crew Blog Hop: Summer Silhouettes


Good morning everyone! And welcome to another Stamp Review Crew blog hop! This time we are featuring the Summer Silhouettes stamp set! I know that you will find many projects to inspire you to use this set! If you arrived here from Wendy's blog then you are in the right place! Her projects always amaze me! So much talent! If this is your starting point that's just fine, too! By clicking the link at the bottom of this post, you will be directed to the next blog!

Now for my card...


I kept mine pretty simple as I needed to have it done before I left for my trip. I actually was inspired by a card that the crew at Stampin' Up! had done. I may have changed a few things.

  • Card base is Whisper White
  • On a piece of Whisper White, stamp the stem image from Summer Silhouettes using Old Olive ink several times making sure to stamp some images without reinking
  • Stamp the sentiment from Something to Say with Night of Navy ink
  • Punch a strip from Daffodil Delight using the dotted ribbon scallop punch and adhere to a strip of Night of Navy then adhere to stamped panel
  • Wrap a piece of silver baker's twine around stamped panel twice and tie a bow then adhere panel to card with dimensionals
  • Punch a flower from Daffodil Delight using the itty bitty accents punch pack and adhere to card
  • Add a Night of Navy candy dot to flower center
There you have it! Now it's time to send you on to Nancy Smith's blog where you will be inspired even more! Thanks for stopping by and have a super day!


Card Recipe: Stamps- Something to Say, Summer Silhouettes; Paper- Whisper White, Night of Navy, Daffodil Delight; Ink- Old Olive, Night of Navy; Accessories- silver baker's twine, dotted ribbon scallop punch, itty bitty accents punch pack, Regals candy dots, dimensionals

Wednesday, July 2, 2014

Razzleberry Bloom

Hello everyone! Well, I should be back in the country today - lol! My husband is picking us up today and we will be driving to Kansas to visit my parents for the 4th! We are really excited!!

  • Card base is Smoky Slate
  • On another piece of Smoky Slate, stamp the dots from Dotty Angles in Smoky Slate ink
  • Punch a strip of Rich Razzleberry using the scallop edge border punch then adhere to stamped panel
  • Tie a piece of Blushing Bride 1/4" cotton ribbon around panel and adhere to card with dimensionals
  • Stamp flower from Blended Bloom onto a piece of Whisper White using Tuxedo black Momento ink and color with blendabilities: Daffodil Delight and Rich Razzleberry then cut out and adhere to card with dimensionals
  • Stamp greeting from Something to Say onto card base with Rich Razzleberry ink
I should be "live" tomorrow!! Thanks for stopping by and bearing with me! Love you all! Have a super day!


Card Recipe: Stamps- Blended Bloom Dotty Angles, Something to Say; Paper- Smoky Slate, Rich Razzleberry, Whisper White; Ink- Smoky Slate, Rich Razzleberry, Blendabilities: Daffodil Delight and Rich Razzleberry; Accessories- Blushing Bride 1/4" cotton ribbon, scallop edge border punch, dimensionals

Thursday, June 26, 2014

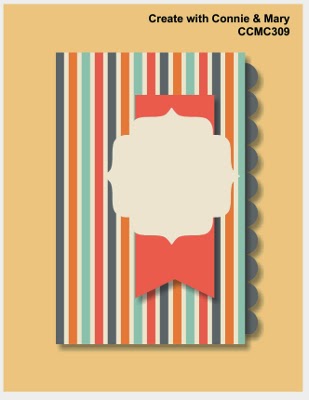
CCMC 309

Good morning, Friends! It's time for another fabulous challenge from the Create with Connie and Mary team! This week we have a sketch to work with! Take a look at this fun sketch!


Very simple and lots of fun! Here's my card.


I love the greetings in the Something to Say stamp set! They have a sort of outside and inside greeting! Like for this card, the stamp for the inside says, "for your cute little someone!" Isn't that awesome? Of course you could use both sentiments on the outside of your card or the inside. Lots of options! And then there are the three little images that coordinate perfectly with the Itty Bitty Accents punch pack! On to the details of the card...

  • Card base is Lost Lagoon
  • Use the scallop edge border punch to scallop a strip of Basic Grey
  • Adhere the scalloped strip to the back of a piece of Moonlight designer paper then adhere to card
  • Flag the end of a strip of Hello Honey card stock and run through the Big Shot using the Decorative Dots embossing folder
  • Adhere embossed banner to card with dimensionals
  • Use the Word Bubbles framelits to cut the shape from Whisper White
  • Stamp the sentiment from Something to Say in Basic Grey inside the die cut shape and adhere to card with dimensionals
  • Stamp the heart from Something to Say onto Lost Lagoon card stock using Lost Lagoon ink and punch out with the Itty Bitty Accents punch pack
  • Adhere heart to card and add a rhinestone
We are finishing up week 1 of the Summer Collection over at Create with Connie and Mary! Such fun and wonderful projects are being shared! If you aren't a subscriber yet, it's not to late to join the party! You can still join and enjoy all the fabulous projects that have been shared so far! Need more reasons to sign up? Check this out!


So what is Create with Connie and Mary Summer Collection 2014 all about? 
  • 4 FABULOUS weeks filled with wonderful ideas featuring the products from the NEW 2014-15 catalog!
  • 18 EXCLUSIVE 3D projects suitable for classes and stamp camps...most completed within 2 hours!
  • PLUS 24 card ideas seen ONLY by our subscribers (6 stamp sets with 4 cards each)
As with ALL of our collections...
  • Our projects are ONLY available to our subscribers...we never show the collection projects online (ONLY the Preview Projects are shown)
  • EACH project has a full downloadable PICTURE tutorial that continues all the information you need to recreate the project!
  • Less than $1 per project!
Summer Collection runs June 22-July 12!

Thanks for stopping by and have a fabulous day!

Card Recipe: Stamps- Something to Say; Paper- Lost Lagoon, Hello Honeycomb, Basic Grey, Whisper White, Moonlight designer paper; Ink- Basic Grey, Lost Lagoon; Accessories- Decorative Dots embossing folder, scallop edge border punch, itty bitty accents punch pack, Word Bubbles framelits, rhinestone, dimensionals

Monday, June 23, 2014

Pumpkin Bloom

Hello everyone! Today I'm sharing one of my favorite cards that I've made in quite a while! Enjoy!

  • Card base is Whisper White
  • Adhere a piece of Moonlight designer paper to the front of the Whisper White card
  • Cut a piece of Whisper White the shape for the card and then cut a piece of vellum that is 1/4" larger for the layer behind
  • Stamp the flower image from Blended Bloom onto the Whisper White piece using Tuxedo Black Momento ink
  • Color the flower with Blendabilities - Daffodil Delight and Pumpkin Pie
  • Stamp the greetings from Something to Say in Tuxedo Black Momento ink then adhere to vellum piece
  • Adhere panel to card with dimensionals
  • Color three rhinestones using the Pumpkin Pie blendabilities and adhere to card
Thanks for stopping by and have a super day!


Card Recipe: Stamps- Blended Bloom, Something to Say; Paper- Whisper White, vellum, Moonlight designer paper; Ink- Tuxedo Black Momento ink, Blendabilities: Pumpkin Pie and Daffodil Delight; Accessories- Rhinestones, dimensionals

Thursday, June 19, 2014

CCMC 308 Summer Collection Design Team Blog Hop


Good morning, Friends! Today is Thursday and that means another fun and fabulous challenge from the Create with Connie and Mary team! And this is also Preview Week for their Summer Collection! So they thought it would be really fun to do a design team blog hop for this week! Love it! Early Bird pricing ends this week so be sure to catch the deal now before it's too late! 

You may have landed here from Debbie Henderson's blog or maybe this is your first stop on the hop. Either way I am glad you are here and I hope you enjoy the entire hop! To go to the next blog, just click on the button at the bottom of this post and continue on your journey. But first I want to show you the fabulous colors that we are being challenged with this week!                                         


Real Red, Bermuda Bay and Crushed Curry! Now don't those colors say "summer" or what! Love the bright bold colors for our challenge! Here's how I put them all together.


This is a pretty simple card. Lots of white space to calm those colors down - lol!

  • Card base is Whisper White
  • Make a tag from Bermuda Bay card stock
  • Stamp the Hardwood background stamp in VersaMark onto the tag and emboss with clear emboss powder
  • Thread a piece of Crushed Curry 3/4" chevron ribbon through the hole in the tag and secure it by tying a piece of white baker's twine around it
  • Use the dotted ribbon scallop punch to punch a scallop strip of Real Red card stock and adhere to tag
  • Adhere tag to card with dimensionals
  • Punch three butterflies from Crushed Curry card stock using the bitty butterfly punch and adhere to tag
  • Add rhinestones to each butterfly
  • Stamp greeting from Something to Say in Real Red onto a strip of Whisper White and flag the end then adhere to card
There you have it! Now be sure to visit Natasha's blog to see her gorgeous creation! And don't forget to sign up for the Summer Collection at Create with Connie and Mary! You will not be disappointed!! Thanks for stopping by and have a super day!


Card Recipe: Stamps- Hardwood background, Something to Say; Paper- Whisper White, Bermuda Bay, Crushed Curry, Real Red; Ink- VersaMark, Real Red; Accessories- Crushed Curry 3/4" chevron ribbon, white baker's twine, bitty butterfly punch, rhinestones, dotted ribbon scallop punch, clear emboss powder, dimensionals

Wednesday, June 11, 2014

Silhouette Thank You

Good morning, Friends! I hope your week is going super! It seems to be going really fast anyway!! I do need it to slow down just a bit - lol! Let me catch up! It looks like it might rain today. That would be nice. Keep the temperatures down and give us a little moisture. We will see. I think it will just blow and give us a lot of dust - ugh!

Today's card was another that we did at club earlier this week. I just love the look of Blackberry Bliss! Such a rich color. This is a pretty simple card!

  • Card base is Whisper White
  • Use the corner rounder to round the top left hand corner of the card base
  • Adhere a strip of Moonlight designer paper to the left side of a piece of Blackberry Bliss card stock
  • Round the top left hand corner of the Blackberry Bliss with the corner rounder and adhere to card base
  • Stamp the branch from Serene Silhouettes in Basic Grey onto a piece of Whisper White and round the top left hand corner with the corner rounder
  • Flag one end of a strip of Hello Honey card stock and adhere to stamped panel then adhere to card with dimensionals
  • Stamp the sentiment from Something to Say in Blackberry Bliss and punch out with the oval punch
  • Adhere greeting to a piece of Basic Grey that was punched with the scalloped oval punch ten adhere to card
  • Punch a flower from Hello Honey card stock using the itty bitty accents punches, adhere to card and add a rhinestone
There you have it! Thanks for stopping by and have a super day!

Card Recipe: Stamps- Serene Silhouettes, Something to Say; Paper- Whisper White, Blackberry Bliss, Hello Honey, Basic Grey, Moonlight designer paper; Ink- Basic Grey, Blackberry Bliss; Accessories- corner rounder, oval punch, scallop oval punch, itty bitty accents punch pack, rhinestone, dimensionals

Monday, June 9, 2014

AYSI 040 & cQc 244

Good morning, Friends! Wow! I actually tried to post this a half hour ago! UGH! I really get so frustrated when my internet won't cooperate! So I hope the rest of my day goes better! I do have a workshop this evening and it is always a fun time to see them! We will be missing Becky as she is still in California recovering. Get well soon, Becky!! I can't believe that there is only a week and a half left before we leave for our trip! Wow! So much to do and so little time!! I had better really focus this week!

Today's card was inspired by two challenges! The colors came from the colourQ challenge and the sketch is from As You See It (a new one for me). I got time to play with some new stamps and I think this set, Kinda Eclectic, is one of my favorites!! Here are the details:

  • Card base is Whisper White
  • On the card base, use post-it notes to mask the top half of the card base
  • Stamp the sunburst image from Kinda Eclectic using Tangelo Twist ink then remove the post-its
  • Stamp the dotted image using Marina Mist ink
  • On another piece of Whisper White, stamp the leaf image in Old Olive and cut out then adhere to card base with dimensionals
  • Stamp the greeting from Something to Say in Night of Navy onto a strip of Whisper White and flag the end then adhere to leaf
  • Stamp the butterfly onto a piece of Whisper White using Night of Navy ink and punch out with the bitty butterfly punch
  • Adhere butterfly to card and add a rhinestone
Very fun and eclectic!! Thanks for stopping by and have a super day!

Card Recipe: Stamps- Kinda Eclectic, Something to Say; Paper- Whisper White; Ink- Tangelo Twist, Marina Mist, Night of Navy, Old Olive; Accessories- bitty butterfly punch, rhinestone, dimensionals

Wednesday, May 21, 2014

Grunge Bloom

Good morning everyone! It's a great day around here as this is the last day of school! Woohoo! Summer will begin in a few short hours for my son! He is really excited! A couple of finals and then it's done! And then I will have a freshman? Yikes! What happened?? Lol! We are looking forward to a great summer! And on Sunday my parents will be here! Guess I had better get busy!

Today's card features the Blended Bloom stamp again along with the blendabilities markers. I decided to add a little grunge to this one.

  • Card base is Whisper White
  • On the card base I stamped the lines image from Gorgeous Grunge in Smoky Slate and the splatter image in Daffodil Delight
  • On a piece of Whisper White I stamped the Blended Bloom stamp using the Tuxedo Black momento ink and colored it with the blendabilities markers - Rich Razzleberry and Daffodil Delight
  • Cut out the flower and adhere two leaves that were cut from Mossy Meadow card stock using the Autumn Accents die then adhere to card with dimensionals
  • Stamp the greeting from Something to Say in Basic Grey
  • Add a few rhinestones and call it done!
Thanks for stopping by and have a super day!

Card Recipe: Stamps- Blended Bloom, Gorgeous Grunge, Something to Say; Paper- Whisper White, Mossy Meadow; Ink- Smoky Slate, Daffodil Delight, Basic Grey, Tuxedo Black Momento, Blendabilities: Daffodil Delight, Rich Razzleberry; Accessories- Autumn Accents die, rhinestones, dimensionals

Tuesday, May 20, 2014

Coastal Bloom

Good morning, Friends! I am having a super hard time waking up this morning! I'm so glad that tomorrow is the last day of school and that we can sleep in after that! Nick has finals today and part of tomorrow and then that's it! WOW! I feel like this month has flown by! We had a great weekend of soccer! The boys won the tournament!! Such a great way to end their season! 

Today's card shows off our blendabilities. I am in love with these markers and I can't wait for my customers to see how wonderful they are! And this stamp, Blended Bloom, is a perfect stamp to use these markers on! So you will be seeing this stamp used a lot as I use these markers. Plus, I don't have a lot of stamps that need coloring. Here are the details:

  • Card base is Crisp Cantaloupe
  • Use the Project Life corner rounder to round the two left hand corners of a piece of Crisp Cantaloupe
  • Tie a piece of Crisp Cantaloupe thick baker's twine around the layer and then adhere to card with dimensionals
  • Stamp the flower image from Blended Bloom onto Whisper White using Tuxedo Black Momento ink
  • Color the flower using Coastal Cabana, Daffodil Delight and Mocha blendabilities then cut out
  • Stamp the greeting from Something to Say onto a piece of Whisper White using Coastal Cabana and adhere to a piece of Coastal Cabana card stock
  • Adhere panel to card with dimensionals and adhere flower to card with dimensionals
  • Add three rhinestones to card
Thanks for stopping by and have a super day!

Card Recipe: Stamps- Blended Bloom, Something to Say; Paper- Crisp Cantaloupe, Coastal Cabana, Whisper White; Ink- Tuxedo Black Momento, Coastal Cabana, Blendabilities: Mocha, Daffodil Delight, Coastal Cabana; Accessories- Crisp Cantaloupe thick baker's twine, PL corner rounder, rhinestones, dimensionals