Thursday, March 15, 2012

CCMC 193

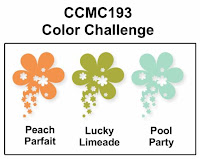
Good morning everyone! I hope you are having a fantastic week! Today is Thursday and time for another great challenge with the wonderful ladies at Create with Connie and Mary! This week we are being challenged with color. Take a look at these fantastic colors!


The challenge colors are Peach Parfait, Lucky Limeade and Pool Party. And here is what I came up with!


I found a simple layout in a magazine to help me bring this card together. I started with a card base of Lucky Limeade. Then I took another piece of Lucky Limeade and stamped the border stamp from Fresh Vintage along the bottom in Lucky Limeade. This is adhered to the card base. For my focal point, I took a piece of Very Vanilla and stamped the floral image from the same set in Peach Parfait, Pool Party and Lucky Limeade. I rounded the top right hand corner and tied some Lucky Limeade ribbon around the panel. Below, I stamped the greeting from Friendly Phrases in Lucky Limeade. This panel is popped up onto the card. My final touch was to add a flower that was punched from Peach Parfait with the itty bitty shapes punch pack and add a pearl. 


Be sure to stop by the Create with Connie and Mary site to see what the other fabulous designers came up with. Then create your own project and upload it so we can all see, too! We always love to see what you all do with the challenges! Thanks for stopping by and have a super day!


Card Recipe: Stamps- Fresh Vintage, Friendly Phrases; Paper- Lucky Limeade, Very Vanilla, Peach Parfait; Ink- Peach Parfait, Lucky Limeade, Pool Party; Accessories- Everyday Enchantment ribbon and brad pack, itty bitty shapes punch pack, pearl, corner rounder, dimensionals
Wednesday, March 14, 2012

Delightful Smooches

Good morning everyone! Wow! It's Wednesday already! With my headache yesterday, I didn't get much done but I am ready to get something done today. So we will see. 


Today's card was inspired by one I saw while browsing through some old magazines. It was a simple layout and one that I thought worked great to show off our new Smooches preview! I took a piece of Whisper White card stock that was cut just a little shorter than the card base of Whisper White and adhered two strips of the Summer Smooches designer paper. In the middle I adhered a piece of Island Indigo. Then I tied a piece of the Daffodil Delight seam binding ribbon around the top and popped it up on the card base. Then I took another smaller piece of Whisper White and rounded the corners. I used my Island Indigo, Lucky Limeade and Daffodil Delight markers to ink up the vase and flowers from the Bright Blossoms set and stamped it. Then I stamped the greeting from Friendly Phrases in Island Indigo. This panel is popped up on the card. I needed a little sparkle so I added one little rhinestone to the flower. Easy! Thanks for stopping by and have a super day!


Card Recipe: Stamps- Bright Blossoms, Friendly Phrases; Paper- Whisper White, Island Indigo, Summer Smooches designer paper; Ink- Island Indigo, Lucky Limeade, Daffodil Delight; Accessories- Daffodil Delight seam binding ribbon, corner rounder, rhinestone, dimensionals

Tuesday, March 13, 2012

Poppy Car Parade

Good morning, Friends! I hope your week is off to a great start! I am up earlier than I want to be - ugh! I seem to be getting a migraine. So I am trying to nurse it before it gets too bad. Hard to sleep anyway because of the pain. So I took some pills and now I am drinking some coffee and hope it will subside soon. I did get some stamping done yesterday. Not much but some. So I will be trying to get a little more done today. 


Today's card was inspired by one I saw in a PaperCrafts magazine. I think this issue was an older one but the card still caught my eye. It was simple and masculine. My card base is Poppy Parade and I stamped the splatter from Extreme Elements onto it in Poppy Parade. Then I took two strips of Basic Black and ran them through the Big Shot with the Tasteful Trim die. I adhered these to the back of a strip of Whisper White. On that I stamped the greeting from Happiest Birthday Wishes in black StazOn. I added two silver brads before adhering to the card base. On a scrap of Whisper White I stamped the car from Need for Speed in black StazOn and used the Poppy Parade marker to outline the car. I cut it out and popped it up onto the card. Done! Told you it was easy!! Thanks for stopping by and have a super day!


Card Recipe: Stamps- Need for Speed, Happiest Birthday Wishes, Extreme Elements; Paper- Poppy Parade, Whisper White, Basic Black; Ink- black StazOn, Poppy Parade; Accessories- Tasteful Trim die, silver brads, dimensionals

Monday, March 12, 2012

Delightful Smooches

Good morning, Friends! It's spring break around here and the weather is definitely going to cooperate with that! Most beautiful!! And we get to sleep in a little! Nick will still have various practices to attend but he will get to have the days to do whatever he can think of! For me I have to think about the laundry and grocery shopping today. And I really need to do some stamping. Yesterday was a really fun day of stitching and I even signed up for another class! Yikes!! I am really getting into this! I am thinking of starting another blog to show off the pieces that I have made. Of course I won't have as much to post because it does take a while to finish a piece. But it might be fun! I will keep you updated on that. 


Today's card was inspired by one that I saw on Pinterest. I think that I did one like this before but I just love the grey and yellow! And I got a new stamp set, Bright Blossoms. This set will be in the upcoming 2012-2013 catalog but customers will be able to order it in April!! And it isn't just a stamp set. It's the beautiful Daffodil Delight seam binding ribbon and the designer paper along with some other goodies!! So be sure to ask your demonstrator about it!! For my card I started with a card base of Basic Grey. Then I stamped the Bright Blossoms with Daffodil Delight and Lucky Limeade markers onto a piece of Whisper White. This is adhered to the card base. I took another piece of Whisper White and punched a 1 3/4" circle on the right hand side and stamped the greeting on the left hand side from Friendly Phrases in Basic Grey. I added a piece of the Summer Smooches designer paper to the bottom part and rounded the corners on the bottom. I tied some of the new Daffodil Delight seam binding ribbon around the edge of the designer paper and popped this panel up on the card. My final touch was to add a flower that was punched from Daffodil Delight with the itty bitty shapes punch pack and a rhinestone. Thanks for stopping by and have a super day!


Card Recipe: Stamps- Bright Blossoms, Friendly Phrases; Paper- Basic Grey, Whisper White, Daffodil Delight, Summer Smooches designer paper; Ink- Lucky Limeade, Basic Grey, Daffodil Delight; Accessories- Daffodil Delight seam binding ribbon, 1 3/4" circle punch, corner punch, itty bitty shapes punch pack, rhinestone, dimensionals

Sunday, March 11, 2012

TSSC 211

Good morning everyone! Boy that time change always throws me for a loop! I like to sleep in a little but then it is even later when I wake up! Oh well. I still have all of spring break to adjust. But I do need to get ready for the day. Becky and I are going to spend the afternoon working on our wool projects at the quilt store! And then the brackets are going to be announced this evening for the NCAA tournament!! Love March Madness!!


Today's card was inspired by Mary Jo. This time I decided to pull and dust off a set I haven't used in quite some time, Vintage Vogue. I used some of the colors from the Just Add Cake designer paper for inspiration as well. So I started off with a card base of Whisper White and stamped the leafy vine in Wild Wasabi two times. Then I added a strip of Early Espresso card stock with one end flagged. On scrap pieces of Whisper White I stamped the "Friends" twice - once in Blushing Bride and once in Early Espresso. I cut the Blushing Bride "F" out and the Early Espresso "Friends" out. I also stamped the flowers - the big one in Peach Parfait and two small ones in Baja Breeze. And I stamped the leaves in Wild Wasabi. I cut all these out and arranged them on my card. I added Early Espresso brads to the flower centers before adhering them with glue dots to the card. The "F" is popped up onto the card. Thanks for stopping by and have a super day!


Card Recipe: Stamps- Vintage Vogue; Paper- Whisper White, Early Espresso; Ink- Early Espresso, Peach Parfait, Baja Breeze, Blushing Bride, Wild Wasabi; Accessories- Early Espresso brads, dimensionals

Saturday, March 10, 2012

FMS 25

Good morning, Friends! Are you ready for a great weekend? We are going to have fantastic spring like weather here! Nick starts his soccer season this afternoon! I am excited to see how the team will do! And don't forget to change your clocks! Oh and spring break has started, too! Wow! When Nick goes back to school, he will be starting the fourth quarter. I can't believe how time is just flying by!


Today's card was inspired by a sketch at Freshly Made Sketches. I used this card for my shoebox swap this month, too. And it is a really simple card! The colors are not my usual but I found an unopened spool of Pink Pirouette taffeta ribbon and based my colors around that - lol! So I went with the colors in the Beau Chateau designer paper. My card base is Pink Pirouette with a strip of designer paper from the Attic Boutique pack. Then I stamped the tea cup from Tea Shoppe in Marina Mist onto Very Vanilla. I scalloped one end of that piece and tied a piece of Pink Pirouette taffeta ribbon around it. This is adhered to a piece of Marina Mist and then popped up onto the card. I stamped the sentiment onto a scrap of Very Vanilla in Soft Suede and punched it out with the 1 3/4" circle punch. I sponged the edges before adhering to the card. The last thing I did was to add some pearls to the tea cup. Thanks for stopping by and have a super day!


Card Recipe: Stamps- Tea Shoppe; Paper- Very Vanilla, Pink Pirouette, Marina Mist, Attic Boutique designer paper; Ink- Marina Mist, Soft Suede; Accessories- Pink Pirouette taffeta ribbon, scallop edge border punch, 1 3/4" circle punch, pearls, sponge, dimensionals

Friday, March 9, 2012

SFF 030912

Good Friday morning everyone! My son will be the happiest boy around when school is out today! Spring break will have officially started!! He is looking forward to sleeping in and spending time just hanging out! I, too, look forward to sleeping in - lol! I do hope you are all ready for another fun sketch challenge at Sketch Frenzy Friday! This week's sketch was created by Robbie Rubala. Take a look!


This one came together quite easily for me. I love it when a plan works out!! Take a look!


I started with a card base of Very Vanilla then added a piece of Poppy Parade and another piece of Very Vanilla. The top corner is a piece of the Everyday Enchantment designer paper. For the lower panel, I cut another piece of Very Vanilla and stamped the image from Fresh Vintage using my Poppy Parade, Lucky Limeade and Pool Party markers. The greeting below the image is from Apothecary Art and is stamped in Poppy Parade. Then I added a strip of Poppy Parade that has both ends flagged. Then I stamped the flower image from Fresh Vintage in Poppy Parade and cut it out. I added a brad from the Everyday Enchantment ribbon and brad pack to the center and popped it up on the card. Simple!!


Please click 'here' to go to Jennifer's blog to see what she did with this sketch. I do hope that you will be able to play along with us at Sketch Frenzy Friday! We always love to see what you come up with! Thanks for stopping by and have a super day!


Card Recipe: Stamps- Fresh Vintage, Apothecary Art; Paper- Very Vanilla, Poppy Parade, Everyday Enchantment designer paper; Ink- Poppy Parade, Lucky Limeade, Pool Party; Accessories- Everyday Enchantment ribbon and brad pack, dimensionals

Thursday, March 8, 2012

CCMC 192

Good morning, Friends! It's Thursday and I am happy to post another challenge from the gals at Create with Connie and Mary! This week we are being challenged with a sketch. Take a look at this fantastic sketch!


Isn't that just a wonderful sketch? I know I will be using this one again! So many possibilities and so clean and simple! So here is what I came up with!


I wanted to keep my card just as clean and simple as the sketch. So I decided to use a lot of color on color and this time it was Very Vanilla. My card base is Very Vanilla that was run through the Big Shot with the Vintage Wallpaper embossing folder. Then I cut a piece of Very Vanilla with the Labels framelits die and another piece of Very Vanilla with the Beautiful Butterflies die. Then I cut a piece of the Everyday Enchantment designer paper with the Beautiful Wings embosslit. The Label is popped up onto the card base. The butterflies were adhered together and then a mini brad was put through them before popping them up on the card. I also like to slightly bend the wings up to give them more of a 3-D look. Then I took a strip of Very Vanilla and stamped the greeting from Apothecary Art in Soft Suede. I flagged one end and tucked the other under the butterfly. Easy!!


Make sure to visit the Create with Connie and Mary website to find more inspiration and to link up your project. We always love to see what you come up with! Thanks for stopping by and have a super day!


Card Recipe: Stamps- Apothecary Art; Paper- Very Vanilla, Everyday Enchantment designer paper; Ink- Soft Suede; Accessories- Vintage Wallpaper embossing folder, Labels framelits, Beautiful Butterflies die, Beautiful Wings embosslit, mini brad, dimensionals

Wednesday, March 7, 2012

Romantic Thanks

Good morning, Friends! Another week seems to be flying by! Nothing too exciting going on around here. I got some new toys yesterday and I am looking forward to spending some time playing!


Today's card is one I did for a swap last month. I really liked the way this one turned out! The black really makes a 'pop'! I started with a card base of Naturals Ivory and then took another piece of Naturals Ivory and ran it through the Big Shot using the Frame Tulip embossing folder. I cut around this before adhering it to the front of my card. Then I cut a piece of Basic Black with the Labels framelits die and adhered this to the card. Before cutting another framelit, I stamped the piece of Naturals Ivory card stock with the Apothecary Art stamp by coloring just the frame of it with a Basic Black marker. This is popped up onto the black frame. Then I stamped the flowers from Bordering on Romance in black StazOn onto Naturals Ivory card stock. I colored them in with a blender pen and Pool Party, Pear Pizzazz, More Mustard and So Saffron. I cut them out and added three brads before popping them up onto the card. Then I took a strip of Naturals Ivory card stock and stamped the greeting from Thank You Kindly. I flagged one end and tucked the other end behind the flowers. Thanks for stopping by and have a super day!


Card Recipe: Stamps- Bordering on Romance, Thank You Kindly, Apothecary Art; Paper- Naturals Ivory, Basic Black; Ink- black StazOn, So Saffron, Pool Party, Pear Pizzazz, More Mustard; Accessories- Tulip Frame embossing folder, Labels framelits dies, blender pen, silver brads, dimensionals

Tuesday, March 6, 2012

FMS 24 and PPA 130

Good morning, Friends! We made it back safely yesterday afternoon. The roads were perfect and the day was most beautiful! Looks to be another beautiful day around here, too! Now it's back to reality. Laundry needs to be done. I need to go to the grocery store. Nick has practice. I need to spend some time in my craft room... You can see which one will take priority - lol!


Today's card was inspired by two challenges. Freshly Made had a sketch that was nice and clean and simple. The other challenge it the Pals Paper Arts color challenge. I thought that both challenges came together nicely on my card. And the Lean on Me stamp set is perfect for a clean and simple card! I started with a piece of Always Artichoke and added a piece of Lucky Limeade striped designer paper. On top of that I added a strip of Chocolate Chip card stock that was flagged on both ends. Then I popped this whole panel up onto a card base of Whisper White. I stamped the image from Lean on Me in black StazOn onto a piece of Whisper White. I colored in the image with a blender pen using Always Artichoke, Lucky Limeade and Chocolate Chip inks. I adhered this to a piece of Always Artichoke and then added two brads. This panel is popped up onto the card. Done! Thanks for stopping by and have a super day!


Card Recipe: Stamps- Lean on Me; Paper- Whisper White, Always Artichoke, Chocolate Chip, In Color designer paper pack; Ink- black StazOn Always Artichoke, Lucky Limeade, Chocolate Chip; Accessories- brads, blender pen, dimensionals

Monday, March 5, 2012

LIM Week 56

Good Monday morning, Friends! Well, we will be on our way home this morning. What a most wonderful weekend it was! We will have the car loaded up with new purchases (mostly Becky's - lol!). I am anxious to start some new wool appliqué projects soon, too! 


Today's card was inspired by a challenge at Less is More. The challenge was to use up scraps to make a card (by the way, this was last week's challenge). The only thing that was not a scrap was the card base of Very Vanilla. So on top of my card base I attached three strips of designer paper from the Everyday Enchantment pack. These are varied in length and width and then flagged on the end. I just put adhesive in the middle of each strip and then sort of curved the ends off the card. Then I took a scrap of Very Vanilla and stamped the 'Hello' from Elementary Elegance in Soft Suede. I rounded one corner of this strip and popped it up onto the card. Then I took a scrap of Peach Parfait and ran it through the Big Shot with the Beautiful Wings embosslit. I added a mini brad before adhering it to the Very Vanilla strip. And there you have it! A super simple card using scraps! Thanks for stopping by and have a super day!


Card Recipe: Stamps- Elementary Elegance; Paper- Very Vanilla, Peach Parfait, Everyday Enchantment designer paper; Ink- Soft Suede; Accessories- Beautiful Wings embosslit, mini brad, corner rounder, dimensionals 

Sunday, March 4, 2012

SSSC 153 and LNS 162

Good morning everyone! I hope you are having a fantastic weekend! I can't believe how fast it has gone for us! Becky and I have been having a blast visiting with our friend Sherry! Yesterday was a FULL day of shopping at various wool and quilt stores and stamp stores! I think I controlled myself pretty well. But it was sure fun to see Becky go nuts!! And we even got Sherry excited about wool, too! So she has several projects to start and even inquired about classes at the local stores! Go Sherry! We even picked a project that we are going to work on together. Guess that means I will have to visit more often!


Today's card was inspired from a sketch by Karen Giron. I also combined it with the challenge at LNS which is to go green. And I did use the green on this one! My card base is Lucky Limeade. Then I adhered a piece of Lucky Limeade designer paper to a piece of Basic Black. Then I took a piece of Basic Black and ran it through the Big Shot using the Houndstooth embossing folder and adhered it to the designer paper. I took some strips of Basic Black and ran them through the Big Shot with the Tasteful Trim die and adhered them to the panel. Then I added two black brads and adhered the whole panel to the card base. My focal point is a 2 1/2" punched circle of Lucky Limeade that has the splatter stamped from Extreme Elements in Lucky Limeade. I also stamped the car from Need for Speed in black StazOn and then stamped the car again on a scrap of Lucky Limeade in black StazOn. I used my Lucky Limeade marker to highlight some of the lines on the car and then popped it up on the circle. I stamped the greeting from Teeny Tiny Wishes in black StazOn and then popped the circle onto the card. Thanks for stopping by and have a super day!


Card Recipe: Stamps- Extreme Elements, Teeny Tiny Wishes, Need for Speed; Paper- Lucky Limeade, Basic Black, In Color designer paper pack; Ink- Lucky Limeade, black StazOn; Accessories- Houndstooth embossing folder, Tasteful Trim die, 2 1/2" circle punch, black brads, dimensionals

Saturday, March 3, 2012

TSSC 210

Good morning from Ault! My friend and I are visiting a very good stamping/crafting friend who lives in Ault. Did you know that it means "A Unique Little Town"? Cute, huh! We got here yesterday early evening and had a fantastic dinner! Then we did some wool appliqué the rest of the evening! Today we are going to have a wonderful breakfast and then we are going on a field trip to various stamping and quilting stores. Fun, fun fun!!! 


Today's card was inspired by Mary Jo's Lunchtime Sketch Challenge. I really liked the sketch and had fun with this card. I tried some different colors, too. My card base is Riding Hood Red with a piece of Basic Gray that was run through the Big Shot with the Perfect Polka Dots embossing folder. Then I stamped the greeting from Friendly Phrases in Basic Gray onto Whisper White and added two silver brads. This was adhered to the card and then a piece of Twitterpated designer paper. Then I stamped the flower from Mixed Bunch in Riding Hood Red onto Whisper White and punched it out with the Blossom punch. I also used the Blossom punch to punch out a flower from Riding Hood Red card stock and then from Pear Pizzazz card stock. The two Riding Hood Red flowers are adhered together. I cut two petals from the Pear Pizzazz flower and used them as leaves and adhered them behind my flowers. This is popped up onto the card. Then I took a Basic Gray button and tied a bow with the white baker's twine. I glue dotted this to the middle of the flower. And there you have it! Thanks for stopping by and have a super day!


Card Recipe: Stamps- Mixed Bunch, Friendly Phrases; Paper- Riding Hood Red, Pear Pizzazz, Basic Gray, Whisper White, Twitterpated designer paper; Ink- Riding Hood Red, Basic Gray; Accessories- Perfect Polka Dots embossing folder, Blossom punch, neutrals buttons, white baker's twine, silver brads, dimensionals

Friday, March 2, 2012

SFF 030212

Good morning everyone! Thank goodness it's Friday! Are you ready for a great weekend? I am going to be visiting my friend Sherry this weekend! I know we are going to have a great time! Well, I hope you are ready for a great sketch from the Sketch Frenzy Friday team! This week's sketch was provided by Patrice Herrera. Take a look at this cute sketch!


A lot of different elements that took me a while to figure out what I might do. But then an idea came to me and here is the result!


I have seen quite a few projects that have these cute banners on them made from designer paper. So I went with that! I used the Everyday Enchantment designer paper to make my banners and attached them to linen thread and then to the card base of Very Vanilla. I ran a piece of Calypso Coral through the Big Shot with the Perfect Polka Dots embossing folder and attached that to the card. Then I stamped the greeting from Outlined Occasions onto Very Vanilla in Soft Suede. I colored in the images with Pool Party, Calypso Coral and Poppy Parade markers. This is popped up onto the card. I cut two stars using the Stars #2 die and Pool Party card stock. I put a silver brad through the smaller one and both are popped up onto the card. Super simple!


Click 'here' to see what Jennifer did with this sketch. Then continue through the tour to see what the other designers came up with using this sketch. I hope you find time to play along with us this week! Be sure to upload your creation to the Sketch Frenzy Friday blog so that we can all take a look! Thanks for stopping by and have a super day!


Card Recipe: Stamps: Outlined Occasions; Paper- Very Vanilla, Calypso Coral, Pool Party, Everyday Enchantment designer paper; Ink- Soft Suede, Pool Party, Calypso Coral, Poppy Parade; Accessories- linen thread, Perfect Polka Dots embossing folder, Stars #2 die, silver brad, dimensionals

Thursday, March 1, 2012

CCMC 191

Good morning, Friends! And happy March to you all! I hope your week is going super! It sure seems to be going fast!! But I am glad for that! Tomorrow my friend Becky and I are driving over the mountains to see our good friend Sherry! We are looking forward to some awesome crafting time and shopping and maybe a little sewing, too! But today is Thursday and that means it is time for a great challenge at Create with Connie and Mary! This week we are being challenged with color. Take a look at these fantastic colors!


Don't they remind you of spring? They did for me! And spring will be here very soon! Here is what I did with these colors!


Another very clean and simple card but I really like the way it turned out! I punched two flowers with the Blossom punch in Island Indigo and a third in Wild Wasabi. I took one Island Indigo flower and ran it through the Big Shot with the Perfect Polka Dots embossing folder. This is glued to the other Island Indigo flower. I punched a flower from So Saffron with the Blossom Bouquet triple layer punch. I adhered this to the flower center and put an In Color brad through the layers. I took the Wild Wasabi flower and cut two petals from it to make the leaves. Then I took a strip of Whisper White and rounded the bottom right hand corner. I stamped the greeting from Friendly Phrases in Island Indigo. I punched a strip of So Saffron using the dotted ribbon scallop punch. This is popped up onto a card base of Whisper White that has the bottom right hand corners punched, too. The flower is popped up onto the card as well.


Be sure to take a look at what the other designers came up with using this color combination! You will find their lovely creations at the Create with Connie and Mary site. And don't forget to play along this week! We always love to see what you do with our challenges! Thanks for stopping by and have a super day!


Card Recipe: Stamps- Friendly Phrases; Paper- Whisper White, Island Indigo, So Saffron, Wild Wasabi; Ink- Island Indigo; Accessories- Blossom punch, Blossom Bouquet triple layer punch, Perfect Polka Dots embossing folder; dotted ribbon scallop punch, corner rounder, In Color brads, dimensionals