Tuesday, January 31, 2012

SSSC 151

Good morning, Friends! I hope your week is off to a great start! I need to finish a few projects today but that's about it! 


Today's card comes from a sketch by Karen Giron. I always like her sketches! I haven't played hers in a while and decided to give this one a try. I didn't do as many layers but I like how soft this one turned out! You all know it is Sale-A-Bration time, right! I am using the SAB set called Sprinkled Expressions. I started with a card base of Whisper White and then added two panels of Blushing Bride of which I rounded the outside corners. Then I took another piece of Whisper White and ran it through the Big Shot with the Adorning Accents edgelits embossing folder. I embossed the bottom part with the hearts. I stamped the image at the top in Blushing Bride. I glued this down to a piece of Basic Grey and added a strip of Twitterpated designer paper that has one end flagged. This panel is then popped up on the card. Then I stamped the greeting - also from the same set - in Blushing Bride on a scrap of Whisper White card stock and punched it out with the 1 3/8" circle punch. I popped this up on the card. Then I took some Blushing Bride card stock and put it in the Big Shot with the Fashionable Hearts embosslit and placed the smallest heart right over the stamped hearts. I added a rhinestone for a little bling! Thanks for stopping by and have a super day!


Card Recipe: Stamps- Sprinkled Expressions; Paper- Whisper White, Blushing Bride, Basic Grey, Twitterpated designer paper; Ink- Blushing Bride; Accessories- Adorning Accents edgelits embossing folder, Fashionable Hearts embosslit, corner rounder, 1 3/8" circle punch, rhinestone, dimensionals

Monday, January 30, 2012

FTL 175

Good morning, Friends! I can't believe that we are at the last little bit of January! That just seemed to fly by! We had a quiet weekend around here. And it doesn't look like there is too much excitement for the week. That's o.k. with me! Just a nice routine!


Today's card was one that I did for the fall-to layout at Clean&Simple. I'm not sure that this is my favorite card but I like the three hearts and the button. Those little buttons are so stinkin' cute!! I started with a piece of Basic Grey and attached a piece of Twitterpated designer paper to it. Then I pierced holes in the Basic Grey all around the designer paper. This panel is popped up onto a card base of Whisper White. Then I punched three hearts from Blushing Bride using the Full Heart punch. The two outer ones are glued flat to the card. The middle one is glued to a Riding Hood Red heart that was cut from the Scallop Heart of Hearts sizzlet and then is popped up in the middle. I cut some hearts from Baja Breeze using the Fashionable Hearts sizzlet and used a glue dot to attach the smallest heart in the corner. Then I took the greeting from Teeny Tiny Wishes and stamped it on a strip of Whisper White in Basic Grey. I flagged one end and glued it flat. Then I added a Twitterpated designer button that has some white baker's twine tied to it. Thanks for stopping by and have a super day!


Card Recipe: Stamps- Teeny Tiny Wishes; Paper- Whisper White, Blushing Bride, Baja Breeze, Basic Grey, Riding Hood Red; Ink- Basic Grey; Accessories- Full Heart punch, Scallop Heart of Hearts sizzlet, Fashionable Hearts sizzlet, Twitterpated designer buttons, white baker's twine, dimensionals

Sunday, January 29, 2012

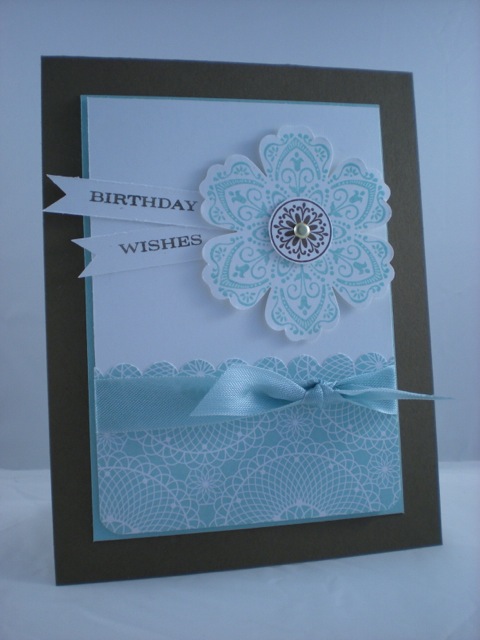
Flagged Flower

Good Sunday morning everyone! It was sure great to sleep in this morning but I didn't really expect to sleep this long! I took a peek at the clock and just expected to sleep about a half hour longer and ended up sleeping two hours longer!! Yikes! Oh well! Now I don't have as much time before I have to get Nick to soccer practice. Looks to be a beautiful day today!


Today's card is one that I did for a recent swap I participated in. My card base is Soft Suede with a piece of Pool Party glued down. Then I took a piece of Whisper White and rounded the bottom corners. I took a piece of the Attic Boutique designer paper and scalloped one end and corner rounded the other. I glued this to the Whisper White piece and then wrapped a piece of Pool Party seam binding ribbon around it before popping it up on the card. On a scrap piece of Whisper White I stamped the flower from Mixed Bunch in Pool Party and punched it out with the Blossom punch. I also stamped the flower center in Soft Suede and punched it out with the 3/4" circle punch. I put a brad through this and popped it up on the flower and the flower is popped up on the card. Then I took two strips of Whisper White and stamped the words on each in Soft Suede. The greeting is from the hostess set, Happiest Birthday Wishes. I flagged one end on each and glued them to the card by tucking them behind the flower. And there you have it! Thanks for stopping by and have a super day!


Card Recipe: Stamps- Mixed Bunch, Happiest Birthday Wishes; Paper- Whisper White, Soft Suede, Pool Party, Attic Boutique designer paper; Ink- Pool Party, Soft Suede; Accessories- Pool Party seam binding ribbon, scallop edge border punch, corner rounder, Blossom punch, 3/4" circle punch, gold brad, dimensionals

Saturday, January 28, 2012

CCMC-OCC1

Good morning, Friends! It is so good to be back to my regularly scheduled routine! I still have the lingering effects of a cold but I am happy to be back to "normal". My son even stayed home from school one day this week because he had the same thing. Feels more like allergies than a cold. And with all this unseasonably warm weather we are having, it is no wonder! 


Today's card was inspired from a sketch at Create with Connie and Mary. It is actually their sketch challenge for those that have subscribed to their Create Occasions Edition. And it is their sketch from last week. I just loved this sketch! Something a little different. My card base is Basic Grey to which I added a piece of the Twitterpated designer paper. At the top of this I added a piece of the Blushing Bride satin pleated ribbon. Then I cut a piece of Whisper White that was 2 3/8" wide (can't remember how long). I stuck one end through the top of my 2 1/2" circle punch (the other end is sticking out so that it won't get punched). This rounds the top. Then I stamped the greeting from Friendly Phrases in black StazOn. I took a strip of Riding Hood Red and ran it through the Big Shot using the Adorning Accents edgelits. This is glued to the back of the Whisper White piece. Then I took some of my cut out flowers from the Bordering on Romance stamp set and arranged them on my panel. One is glued flat and the other is popped up. The trio of flowers has brads in the flower centers. They were stamped on Whisper White in black StazOn and then colored with markers - Pear Pizzazz, Blushing Bride, Island Indigo, Riding Hood Red, and Baja Breeze. This whole Whisper White panel is then popped up onto the card. These flowers were leftovers of the project that I did for the Create Occasions Edition. But you have to be a subscriber to see that! Thanks for stopping by and have a super day!


Card Recipe: Stamps- Bordering on Romance, Friendly Phrases; Paper- Basic Grey, Whisper White, Riding Hood Red, Twitterpated designer paper; Ink- black StazOn, Blushing Bride, Riding Hood Red, Baja Breeze, Island Indigo, Pear Pizzazz; Accessories- Blushing Bride pleated satin ribbon, silver brads, Adorning Accents edgelits dies, dimensionals

Friday, January 27, 2012

SFF 012712

Good morning everyone! And thank goodness it's Friday! I hope that you all have had a fabulous week and are ready to play along with us at Sketch Frenzy Friday! We have a fabulous sketch for you that was designed by Angela Walters. Take a look!


Such a great clean and simple sketch! So many possibilities with this one! I just love the new Tea Shoppe set and decided to have a go with it. Here is what I came up with.


I stamped the little tea cup six times in Pool Party onto Very Vanilla card stock and cut them out. Then I punched six circles from Very Vanilla with the 1 1/4" circle punch. I ran them through the Big Shot with the Perfect Polka Dots embossing folder. The circles are glued to a Pool Party card base. The tea cups are popped up on each circle. I stamped the greeting in Pool Party at the bottom. The last thing I did was to add a flower three cups that was punched with the itty bitty shapes punch pack from Daffodil Delight card stock. A pearl is added to each flower. 


Please click 'here' to go on to Jennifer's blog to see her fabulous creation! Make your way through the tour to get inspired. I do hope that you will upload your creation to the Sketch Frenzy Friday blog so that we can all have a look! I always love to see what you come up with! Thanks for stopping by and have a super day!


Card Recipe: Stamps- Tea Shoppe; Paper- Pool Party, Very Vanilla, Daffodil Delight; Ink- Pool Party; Accessories- Perfect Polka Dots embossing folder, itty bitty shapes punch pack, 1 1/4" circle punch, pearls, dimensionals 

Thursday, January 26, 2012

CCMC 186

Good morning, Friends! I know it's been a while since my last post, but I hope that I am back to my regular routine! Today I am bringing you the Thursday challenge from Create with Connie and Mary! This week we are being challenged with a sketch. Check it out!


And here is what I came up with!


I decided to keep this one very simple. I started by taking a piece of Confetti Cream and rounding the opposite corners. Then I ran it through the Big Shot with the Vintage Wallpaper embossing folder. Then I attached a piece of designer paper with the Everyday Enchantment paper pack from the SAB brochure. I did round the bottom right hand corner before adhering it. Then I wrapped a piece of Very Vanilla seam binding ribbon around this panel and popped it up on a card base of Confetti Cream. Then I took a piece of Confetti Cream and used my ovals die to cut an oval. Then I stamped the image from Fresh Vintage onto the oval using Poppy Parade and Lucky Limeade markers. Then I took it back to the Big Shot and ran it through using the Designer Frames embossing folder. This is then popped up onto the card. That's it!!


Be sure to visit the Create with Connie and Mary site to see all the wonderful inspiration from the rest of the design team! I do hope you will find time this week to play along with us! I always love to see what you all come up with! So be sure to upload your project and share it with all of us! Thanks for stopping by and have a super day!


Card Recipe: Stamps- Fresh Vintage; Paper- Confetti Cream, Everyday Enchantment designer paper; Ink- Poppy Parade, Lucky Limeade; Accessories- Very Vanilla seam binding ribbon, corner rounder, Vintage Wallpaper embossing folder, Designer Frames embossing folder, dimensionals

Saturday, January 21, 2012

SFF 012012

Good morning everyone! I hope you are all having a fabulous start to the weekend! I think that I am starting to feel like I am able to get out and about. I can keep my eyes open without anything seeping out of them - yay! Now it just seems to be the regular cold like stuff. And I am getting a cough. Oh joy! So now that I am feeling better, I need to get to work on all the projects that must be finished this next week! 


Today's card was the one that I did for this week's Sketch Frenzy Friday challenge. I am loving the tea cups! So dainty! I good a piece of Pool Party and ran it through the Big Shot with the Framed Tulips embossing folder and cut around it. This is adhered to a Pool Party card base. Then I took a piece of Soft Suede and stamped the large tea cup from Tea Shoppe in Soft Suede. I also stamped the greeting in Soft Suede and adhered this to a piece of Very Vanilla. Then I popped the panel on the card. I stamped the small tea cup in Soft Suede on Very Vanilla and cut it out. This is popped up on the card, too. I punched a flower from Pool Party with the itty bitty shapes punch pack and adhered it to the tea cup. I added a pearl to finish it off. Very simple! Thanks for stopping by and have a super day!


Card Recipe: Stamps- Tea Shoppe; Paper- Pool Party, Soft Suede, Very Vanilla; Ink- Soft Suede; Accessories- Framed Tulips embossing folder, itty bitty shapes punch pack, pearls, dimensionals

Thursday, January 19, 2012

Control Freaks Blog Tour - Love is in the Air


Hello everyone! Welcome to another Stampin' Up! blog tour brought to you by the Control Freaks swap group! You might have just come from my friend, Mary Brown's blog. I think she is just a genius!! Didn't you just love her projects? If you happened to land here or are a regular visitor, never fear! Just click on the button at the end of my blog post to advance through the tour. And eventually you will end right back where you started! Please remember that if you are visiting before the 20th, some of the links may not be working. You can come back on the 20th and go right through the tour without any hiccups!

So this month's tour is all about the LOVE! We will be featuring projects made with a lot of love but also showing a lot of love, too! I have three projects this month. Which surprises me as I woke up this morning feeling awful! Thank goodness I didn't have anything else to do and could take my time finishing up my projects. My first project is a simple card (do I do any other kind -lol).


I ran a piece of Very Vanilla card stock through the Big Shot with the new edgelits embossing folder. I hope you can see the cute little hearts that are embossed! Love them!! This is adhered to a piece of Poppy Parade and then popped up onto a Crumb Cake card base. Then I stamped the solid heart from I {Heart} Hearts onto a scrap of Very Vanilla with Poppy Parade ink and cut it out. It is popped up onto the card. I stamped the greeting onto a strip of Very Vanilla in Poppy Parade. I flagged one end and put in one of the new brads from the Everyday Enchantment ribbon and brad pack. This is adhered right over the heart. Very simple. I even thought it isn't too "mushy" for a guy!


My second project is another card. It is hard to tell from the photo, but I actually punched out an oval from Island Indigo with my extra large oval punch. Then I ran it through the Big Shot using the designer frames embossing folders. So when it came out, the frame had a hole in the center. Make sense? Then I cut around the frame. I stamped the greeting from Grateful Greetings on Whisper White in Island Indigo. Then I put dimensionals on back side of the frame and adhered it to the greeting. I cut any excess Whisper White card stock so it didn't show around the outside of the frame. Then I took a piece of designer paper from the Twitterpated pack and stamped the dotted heart from i {Heart} Hearts in Island Indigo. This was adhered to a piece of Whisper White and then popped up onto a card base of textured Island Indigo. Then I stamped the other heart in Riding Hood Red onto Whisper white and cut it out. I glued down my frame piece and popped up the heart. I also added a flower that was punched from Blushing Bride card stock with the itty bitty shapes punch pack. I added a rhinestone to the flower and a few under the greeting as well. Very simple and not much of a layout change from the other card. 


The next project is one that I am really proud of! It is my first faux chenille quilted project!! I actually started this project last week (thinking I would use it for the tour) but got stuck on the binding. And that is why you will not be getting close-ups of this!! The binding is really not good but I can't complain too much because it is all held together - lol!!


I am not going to go into details on how I made this because you can find many tutorials on this kind of project. I did use the Twitterpated designer fabric. And I think it is SO cute!! It's not a potholder because it doesn't have any insulation. It is more of a table decoration! Remember the tea light mason jar I made for last month's tour? Well, doesn't it look great set on top of it? You could also set a plant on it or a bigger candle. Anyway, I am thrilled!! 


The Benadryl that I took a few minutes ago seems to be kicking in. I do hope there aren't too many typos and that you can understand everything. I am so glad you stopped by to see my projects! Now I am going to send you on to Gretchen Barron's blog to see the delightful projects that she has come up with! Have a super day!!


Recipe: Stamps- I {Heart} Hearts, Grateful Greetings, Teeny Tiny Wishes; Paper- Whisper White, Very Vanilla, Poppy Parade, Crumb Cake, Island Indigo, Blushing Bride, Twitterpated designer paper; Ink- Poppy Parade, Island Indigo, Riding Hood Red; Accessories- Twitterpated designer fabric, rhinestones, designer frames embossing folders, edgelits embossing folder, itty bitty shapes punch pack, Everyday Enchantment ribbon and brad pack, dimensionals

CCMC 185

Good morning everyone! It's time for another fun Thursday challenge at Create with Connie and Mary! This week we are challenged with color. Take a look!


The colors this week are Peach Parfait, Calypso Coral and Lucky Limeade. Such FUN colors! But I did have a hard time trying to put Peach Parfait and Calypso Coral together. Here is what I finally came up with.


I decided to let the Confetti Cream do most of the 'talking'. These colors can be very bright but with all the cream they do soften quite a bit and can look very pretty! I love the way this one turned out! I got my layout from an older Clean&Simple sketch. I stamped the image from Bordering on Romance onto Confetti Cream in black StazOn. Then I used my aqua painter and water colored the image with Calypso Coral, Peach Parfait and Lucky Limeade. Then I cut the image out. I took a piece of Confetti Cream and stamped the greeting from Friendly Phrases in black StazOn at the bottom and attached this to a piece of Lucky Limeade. This panel is then popped up onto a card base of Confetti Cream. Then I took a strip of Calypso Coral and flagged both ends before gluing it to the card. Then I took a piece of Peach Parfait and ran it through the Big Shot with the Labels framelits die. I sponged it with Peach Parfait before popping it up on the card. The cut out flowers are then popped up on the label. The final touch was to add some pearls. And there you have it!


Be sure to check out the design team and their work with these fabulous colors! You can find them at the Create with Connie and Mary website. I do hope you will find some time to join us in this challenge and post your work to the website. We always love to see what you come up with! Thanks for stopping by and have a fabulous day!


Card Recipe: Stamps- Bordering on Romance, Friendly Phrases; Paper- Confetti Cream, Lucky Limeade, Peach Parfait, Calypso Coral; Ink- black StazOn, Calypso Coral, Peach Parfait, Lucky Limeade; Accessories- Labels framelits dies, pearls, aqua painter, sponge, dimensionals

Wednesday, January 18, 2012

A Hero's Birthday

Good morning everyone! I am really glad that we are already at the middle of this week! It is a really cold morning here and I can feel a sort of head cold coming on. Ugh! I do hope that finds its way out, and soon! I have a lot that I want to do this week and I hope that I can find the time to do it all!


Today's card is one that I made for a young man serving in our military. His mom is a good friend of mine and she asked me (and some others) to make a birthday card for her son who is serving overseas. She told me that her son has spent seven of his last eleven birthdays serving overseas. WOW! I have met him once and from what my friend, Kim, tells me, he is very serious about what he does! He absolutely loves what he does and works very hard. So I considered it an honor to send him a birthday card. His birthday is next week but I wanted to make sure he got it in plenty of time. I took a piece of Crumb Cake and ran it through the Big Shot with the stripes embossing folder and the sponged the edges with Crumb Cake ink. I attached this to a piece of Riding Hood Red and popped it up on a card base of Crumb Cake. I ran a piece of Not Quite Navy through the Big Shot with the stars die. I attached the largest star to the card and then took a smaller start, but a silver brad in it and then popped it p on the card. Then I took a strip of Crumb Cake and stamped the greeting from Happiest Birthday Wishes in Early Espresso. I flagged one end and then sponged the edges with Crumb Cake. I glued it in between the two stars. I hope he likes his card! Thanks for stopping by and have a super day!


Card Recipe: Stamps- Happiest Birthday Wishes; Paper- Crumb Cake, Riding Hood Red, Not Quite Navy; Ink- Crumb Cake, Early Espresso; Accessories- stars die, silver brad, stripes embossing folder, sponge, dimensionals

Tuesday, January 17, 2012

CPS 249

Good morning, Friends! I hope your week got off to a great start! After a day off yesterday it is back to the routine around here. This week we get to add soccer practices to our schedule as the soccer team prepares for a tournament in Phoenix in a few weeks!


Today's card was inspired by a sketch from CPS. This sketch was from a few weeks ago but I loved the simplicity of it and wanted to give it a try. Having Valentine's Day on the brain, here is what I came up with. My card base is Whisper White that I ran through the Big Shot with the edgelits embossing folder. I rounded the bottom corners with the corner rounder and attached a strip of Riding Hood Red. On scrap Whisper White I stamped two hearts from I {Heart} Hearts in Blushing Bride and Riding Hood Red and cut them out. On a piece of Blushing Bride I stamped the greeting from Grateful Greetings in Basic Grey and then attached the Blushing Bride heart to that before popping that piece up on the card. Then I popped up the Riding Hood Red heart over the that. I punched a flower from Blushing Bride using the itty bitty shapes punch pack and added a rhinestone. Thanks for stopping by and have a super day!


Card Recipe: Stamps- Grateful Greetings, I {Heart} Hearts; Paper- Whisper White, Riding Hood Red, Blushing Bride; Ink- Blushing Bride, Riding Hood Red, Basic Grey; Accessories- edgelits embossing folder, itty bitty shapes punch pack, rhinestone, corner rounder, dimensionals

Monday, January 16, 2012

Basic Love

Good morning everyone! Well, we are home once again! We got home late last night. Well, not real late but late for old people who don't like driving in the dark - lol! We would have stayed another night but a storm was forecasted to come in and we didn't want to drive in the snow. When I woke up this morning I see that it is very cloudy and wet looking. So that probably means snow in the mountains. I think we made a good choice. Nick's basketball team was able to win their last game so that was exciting for them! And all the games were very exciting and close! Not bad for a team that has only been together for two months!


Today's card was inspired by an older card that my friend Becky did in her card class. It is super simple!! I took a piece of Basic Grey and ran it through the Big Shot with the edgelits die to make the scallops. Then I glued a piece of the Twitterpated designer paper to that. I tied a piece of Whisper White taffeta ribbon to cover the seams. I added three white brads just above the ribbon and glued this to the front of a Whisper White card base. At the bottom of the card I stamped the greeting from Outlined Occasions in Basic Grey and colored the hearts with a Riding Hood Red marker. Then I used the heart to heart punch to punch the three hearts from Riding Hood Red card stock. I glue dotted the smallest one down and the other two are popped up. Done! Thanks for stopping by and have a super day!


Card Recipe: Stamps- Outlined Occasions; Paper- Whisper White, Basic Grey, Riding Hood Red, Twitterpated designer paper; Ink- Basic Grey, Riding Hood Red; Accessories- Whisper White taffeta ribbon, neutral brads, heart to heart punch, edgelits dies, dimensionals 

Sunday, January 15, 2012

Valentine Shoebox

Good morning everyone! Well, the two games that I cared about the most didn't turn out the way I had wanted. Bummer for the Broncos but I am looking forward to seeing what next year will hold for them! As for Nick's basketball team, they played awesome! But they ended up just losing at the very end. I think they should be very proud of themselves. So we are up early, had our breakfast and now we are packing up to head to the next game. We will see what happens! Just a lot of fun!!


Today's card was one I made for the shoebox club I am in. My card base is Pool Party which I ran through the Big Shot with the new edgelits embossing folder (they are little hearts - too cute). Then I attached a piece of Calypso Coral card stock. On a piece of Very Vanilla I stamped the heart from I {Heart} Hearts. I wrapped a piece of Calypso Coral ribbon from the Everyday Enchantment ribbon and brad pack (from the SAB brochure). This is attached to a piece of Calypso Coral. I punched three holes for silver brads and then popped this up on the card. I stamped another heart from the same set on Very Vanilla scrap paper in Calypso Coral and cut it out. This was popped up onto the card. Then I stamped the greeting from Teeny Tiny Wishes in Pool Party onto the card base. Thanks for stopping by and have a super day!


Card Recipe: Stamps- I {Heart} Hearts, Teeny Tiny Wishes; Paper- Pool Party, Calypso Coral, Very Vanilla; Ink- Calypso Coral, Pool Party; Accessories- Everyday Enchantment ribbon and brad pack, silver brads, edgelits embossing folder, dimensionals

Saturday, January 14, 2012

Friendly Hearts

Good morning, Friends! Are you ready for a great weekend? We will be heading to Denver later this morning because Nick has a basketball tournament over there. The bummer part about this is that his first game is later this evening when our beloved Broncos will be playing. We have told him that we may have to stay at the hotel and watch the Broncos - lol! No really... And then again, maybe we really don't want to watch? So I said that we could watch the beginning and see how they are doing and then if they aren't doing well, we could go and watch Nick. I know... Bad parents. But he will be well cared for by his coaches. O.k. we will continue to think about it. Too many exciting things going on!


Today's card was inspired by one I saw on the Hero Arts blog. I love clean and simple cards and this one definitely fits the bill! My card base is Whisper White to which I rounded the corners on the top and bottom of the right hand side. Then I stamped the dotted outline heart in Riding Hood Red. I attached a piece of designer paper from the Twitterpated pack and flagged one end. On scrap pieces of Whisper White I stamped two other hearts (all images are from the I {Heart} Hearts set) - one in Baja Breeze and the other in Blushing Bride, and cut them out. I attached the Baja Breeze one with glue dots because the glue dots gives just a hint of dimension instead of gluing it down flat. The Blushing Bride heart is popped up. My final touch was to punch a flower from Riding Hood Red using the itty bitty shapes punch pack and add a rhinestone. And it's done! Thanks so much for stopping by and have a super day!


Card Recipe: Stamps- I {Heart} Hearts; Paper- Whisper White, Riding Hood Red, Twitterpated designer paper; Ink- Riding Hood Red, Baja Breeze, Blushing Bride; Accessories- corner rounder, itty bitty shapes punch pack, rhinestone, dimensionals

Friday, January 13, 2012

SFF 011312

Good Friday morning everyone! I hope you are ready to play along with us this week at Sketch Frenzy Friday! This week's sketch is provided by Tammy Fite. Take a look!


A super simple, very fun sketch! SO many possibilities with this one! And here is what I came up with!


I just got some new goodies to play with and one of thing I ordered was the Tea Shoppe stamp set. I just love the tea cups in this set! I drink more coffee than tea but these could certainly be used for coffee as well! What I did was to start by stamping the three cups onto scraps of Confetti Cream card stock in Pool Party, Daffodil Delight, and Soft Suede. Then I cut them out. Then I took a strip of Soft Suede and scalloped one end with the scallop edge border punch. I glued a piece of designer paper from the Attic Boutique designer paper pack to this and tied a piece of Pool Party seam binding ribbon around it. I glued the Pool Party cup and the Daffodil Delight cup to this strip. I popped the strip up onto a card base of textured Pool Party. I stamped the greeting in Soft Suede onto the card. Then I popped up the Soft Suede cup in between the other two. My finishing touch was to punch a flower from Poppy Parade card stock with the itty bitty shapes punch pack and attach it to the Soft Suede cup and added a pearl. Sweet and simple!


Continue on the tour by clicking 'here' to see what Jennifer did with this sketch. I hope you will join us this week at Sketch Frenzy Friday for some fun! Thanks for stopping by and have a super day!


Card Recipe: Stamps- Tea Shoppe; Paper- Pool Party, Soft Suede, Confetti Cream, Poppy Parade, Attic Boutique designer paper; Ink- Soft Suede, Daffodil Delight, Pool Party; Accessories- Pool Party seam binding ribbon, itty bitty shapes punch pack, scallop edge border punch, pearl, dimensionals